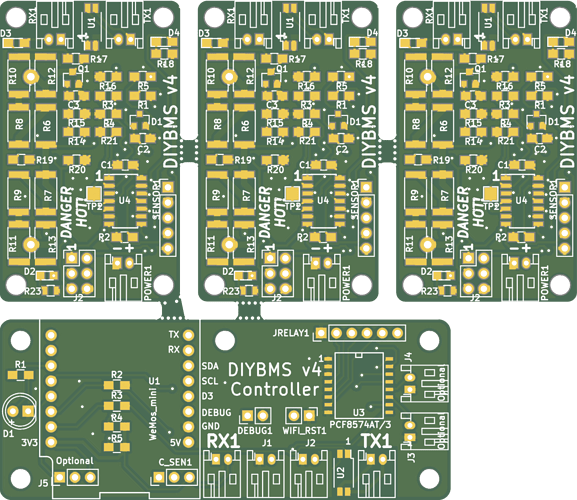
Indeed, but they’ll only panel the same gerber in the same orientation with a footprint of 70mmx70mm or larger - essentially you’d get 6xBMS per panel, but wouldn’t be able to use the ($2) 100mm x 100mm option
(and incur an engineering fee).
Stuart have you looked into using a dedicated ic like the LTC6813?
No I’ve not. Its an expensive chip to have a play about with (about $30 USD)
Yes you can.
Upload the Gerber
Select “Panel By JLCPCB” and X=2 Y=3 (giving 6 PCBs per panel)
Panel size is X: ( 50 x 2 )=100.00mm Y: ( 30 x 3+ 10 (Edge Rails) ) =100.00mm
They V score the panel so you can break it apart and the cost is still only $2 USD
If you increase the number of PCBs to 10, they only charge $4 USD
This way you should get 60 modules for $4 USD
awesome stuff, thanks
8 posts were merged into an existing topic: DIYBMS v4
i did that and they contacted me to ask for more money (Hi, the panel is no more than 100*100mm and it needs you to pay for extra board fee 6.1$ . If the extra fee haven’t been paid ,the order will be cancelled for you in 2 days.Thanks!)
thanks but they already started production on the controller so all i need is the smaller one
Wouh, good to see! I am still debugging. My AttinyModule double blinks every 8 seconds. The ESPController blinks every 4 seconds. But I still don’t recieve any data. In my case it’s my first SMD-soldering. So I try some more soldering and debugging 
I love this project! Great thanks to Stuart!
36 posts were split to a new topic: Getting (BMS) influxdb info into grafana?
Hello all. Thanks for all your time and energy into this project. I am having an issue with v3.
Modules disappear when I try to provision a second module. First module is fine. My understanding is to leave the first one connected, then connect the second one to the first one and provision again. When I do this, the module acts like it has been provisioned, but the web reference doesn’t show the second mod or the first. When I disconnect the second, the first reappears.
My cable is + to +, sda to sda, etc. Am I dealing with two modules with the same id?
If so, what’s the fix? I will search through the previous posts for something.
Ok, I’ve got the hardware dialed in. After a couple of bricked attinys and a some 710’s replaced, I’ve finally got the cell modules good. I can’t see any modules on the web interface. I’ve flashed my Amica Node MCU controller with the correct settings (again), and went through the wifi setup. The controller connects to the Management console, and everything works --But, there are no modules showing.
My only assumption might be a software issue for me. Though I have only limited python skills, I guess I will dig through the code to see if something is wrong.
Fred, are you referring to the V3 boards? If so, did you follow the provision process?
Yes, V3 boards and I believe so. I’ll give a brief history of my process maybe someone can figure out what went wrong/not done correctly.
I assembled 6 boards (I only need 4 currently). The only issue was that the 710’s had no pin 1 markings so I toasted a couple before I figured that out.
I programmed the Amica NodeMCU; went into my network; saw the DIY bms; web interface connection went smoothly.
Found my card’s IP; went to the management console.(In Windows Edge browser)
Built a shield for my Amica with 2 2k2 pullup resistors; attached one cell mod to the controller.
Went back into the management console and couldn’t get the buttons to do anything so I opened up seamonkey and got to the #modules screen.
Clicked the provision button. Controller light lit up, seconds later the cell module light lit up and after a moment, both the cell module and controller were blinking together (the cell module LED was very faint).
The first cell module then showed up in the management console (yes!). Leaving it connected, I attached the second cell module to the first cell module; clicked provision; and got the identical process as the first. Both were successfully provisioned.
The second cell mod didn’t show up. I tried everything (even bricking attinys. p.s. use the eeprom_clear under attiny in Arduino examples, not the other one).
Reset both cell modules (clear eeprom, burn bootloader, load cell module script)
Reset the controller with the esptool.py file process and reloaded the controller script; went through the process again of signing up to my network. (successfully)
Connected one cell mod to the controller; opened up web interface; provisioned cell mod (appears to be successfully), Nothing.
I did see just before clicking the provision button, the Titles of the columns (i.e.Module
id, Current Voltage, Voltage calibration, Manual Calibration, Temperature Bypass, etc.) but they disappeared after the provision process.
Here I am. One cell connected with no way to monitor it.
No luck. I’ve reset both the controller and the module to ‘factory’. Then, using Arduino 1.8.5, successfully loaded both scripts (including the bootloader on the mod; bootloader first).
Successfully provisioned but nothing on the Management console.
Ok, this is what I see without cell module connected to controller:
And this is what I see when cell module IS connected to controller:
I finally think I’ve got it. I needed to be sure that there is 3.3V to the NTC thermistor, and I needed to be sure that the ADUM’s pins were ALL soldered down. It really helps a lot 
THANK YOU to all that put in the time and energy needed for this project’s success, I am grateful!

4 posts were merged into an existing topic: DIYBMS v4
Hello
Just wondering if anyone knows why my modules are showing a voltage of 65535 alot of the time. If there is a solution i would love to hear it as well.
Thanks
Andy
@stuart


