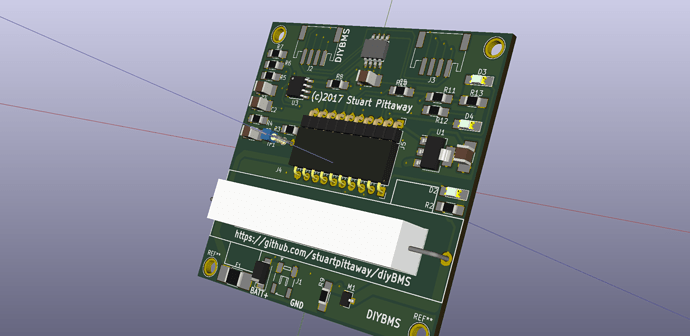
DIY Lithium Battery Balancer and monitoring (BMS)

I’m currently in the process of designing and building a battery balancer and monitoring system/circuits for a home made DIY Powerwall.

I’m aiming to use this forum to log the design decisions and gather comments and improvements from the wider community.

This is some useful background reading from people who have already built similar devices (for automotive use)
http://www.aeva.asn.au/forums/viewtopic.php?f=17&t=4302&sid=2f2ab22c1b80824afd22e37d22c582a9

3 Likes

Hi @stuart

Wow, that looks really impressive! Nice work.

Is the design open source?

It will be, if it works :slight_smile:

1 Like

The project linked above AEVA isn’t mine - its created by a couple of geniuses in Australia a few years ago before “off the shelf” EV’s became available!!

1 Like

I appear to be one of several individuals who are developing an arduino based charger/BMS/balancing circuit for an 18650 style battery system.

My approach is different from everything else I have seen which may be a good or bad thing - we shall see.

I have designed and built various PCB’s and have written and tested lot of code but this is a big project for one individual.

My original plan was to open source it and release when everything is working but that could take a very long time and at the end of it I may discover that others have better ideas than mine.

So, if anyone is interested I shall post some stuff in this thread to see what level of interest is out there.

I shall start with a system description and a pretty video of the arduino nano based charger PCB.

Brian’s system description
Video of charger PCB

Hi @BrianD good to have you on board, seems a popular topic!

I’m interested in your charger as thats a gap in my current setup I need to solve. I notice that you are recommending using small grid tie inverters (micro inverters) for the load - have you found one which is value for money? Most 250W units are £150+, yet a small 1kw inverter can be had for about £250 (or less second hand).

Does the MPPT in the micro inverter cause problems?

My cell balance system is looking to go simple and use top cell balancing with dump loads - nice and simple!

Hi Stuart,

Was chatting to you earlier on Facebook about this project, I am too, you do seem to be going down the route of activity charge and dumping load as well as a real time voltage reading of individual cells.( Were I was going for first draft. )

Yes exactly that - no frills at the moment, just the basics to keep the cells safe

@stuart I have lots of the 250W micro inverters and access to many more at a sensible price so it makes sense for me to go this route. However, this may not be to everyone’s liking.

The MPPT simply maintains a constant output from the inverter which results in the current draw from the battery increasing as the terminal voltage drops.

Your cell balance approach may have more components than my flying cell.

1 Like

Yes I suspect so!!

A further update and some background, along with problem statement/requirements.

Problem

A DIY Powerwall is the DIY construction of a pack of battery cells to create an energy store which can be used via inverters to power electrical items in the home. Generally cells are salvaged/second hand, and typically use Lithium 18650 cells.

Lithium batteries need to be kept at the same voltage level across a parallel pack. This is done by balancing each cell in the pack to raise or lower its voltage to match the others.

Existing balancing solutions are available in the market place, but at a relatively high cost compared to the cost of the battery bank, so this project is to design a low-cost, simple featured BMS/balancer.

A large number of people have utilised the commercial BATRIUM BMS system in their powerwall devices.

My Situtation/Environment

UK based, with existing solar panel installation and “feed in tariff” - this is a grid tied install.
I do not want to change/interfere with the existing installation as I get the maximum FIT rates for the next 20 years!

I may also install additional solar panels to a separate inverter in the future.

Therefore, I am looking at an “AC coupled” solution where excess electric generation is diverted to store in a battery rather than exported to grid. This energy is then released at night (or at peak costs) to reduce cost of importing energy.

I am NOT looking to go off-grid (or islanding) as UK power cuts are a rare event in my area.

Existing Energy Usage

Through the monitoring of my home electric usage using the emonTX and emonSD solutions I typically use around 9kW/H per day (excluding electric car charging). Apart from odd spikes, load it generally less than 500W for the majority of the day/night.

The Plan

Install a DIY powerwall with the ability to supply a 1000W load to cover all regular home usage (excluding spikes which the grid will handle).
A grid tied inverter would be required to convert the battery DC into mains level AC.
A controllable charger would be required to charge the battery during the day (or at cheap energy times from the grid). Ideally the charger should be able to match the generation of export from the solar array(s) to prevent import.
It may be possible to combine both charger and inverter into a single unit (so called hybrid units)

For obvious reasons, safety is critical, so care must be taken to ensure components are installed and certified as needed, along with the correct specification for cables, breakers and fuses etc.

Why am I doing this? For fun :slight_smile: I really must get out more!

Parameters

I’m working to the the following design parameters, which are taken from research into the area (what most others are doing!)

  • Assumption that second hand 18650 cells are made into “packs” containing tens or hundreds of cells in parallel.
  • Voltage of 18650 cell between 3.0V (empty) and 4.2V (full)
  • 48V DC battery pack - running 14 packs/cells in series (aka 14S) this gives between 42V and 58.8V DC
  • Battery expected to output (1000W) so produce up to 25A current (depending on battery voltage)
  • Charger and inverter would be commercial products (not DIY) to comply with necessary approvals

BMS Design
Building upon my existing skill set and knowledge, and also building something that others can contribute to using regular standard libraries and off the shelf components.

  • Design a hub and spoke arrangement, for a central controller and individual cell monitoring nodes on each pack (so 14 in my case)
  • Use Arduino based libraries and tools (possible move to platform.io) **
  • Use esp8266-12e as the controller - to take advantage of built in WIFI for monitoring/alerting and CPU/RAM performance
  • Use AVR ATTINY85 for each node
  • Ensure each cell voltage is isolated from other cells and that ground voltage is isolated
  • Isolated communications between controller and node is needed
  • Put everything on GITHUB
  • Document it!

** There are better more capable CPUs than the 8-bit Arduino however they lack user friendliness and the community to support and nuture the development of code

6 Likes

GITHUB repository created for hosting code and circuit diagrams

PCB design complete for individual battery cell monitoring.

4 Likes

My approach is equalisation rather than dissipative (no energy wasted). It is designed for eight series connected 18650 cells rather than just 1.

https://1drv.ms/v/s!AtcxErupGaCfgasxKev5b80-GdmH1g

1 Like

I have also built a battery monitor/charger for the same pack.

Unlike Stuart I am using a pre-built Arduino nano as they are so ridiculously cheap.

It would be good to hear members views on the relative merits of different balancing, charging and monitoring techniques.

@BrianD whats the specification of the charger you have - amp rate etc?

The charger is a boost constant current type set to 405mA with a high voltage limit controlled by the arduino at 33.6V so about 13.6W output power. This allows me to use cheap regular 12V 2A mains adapters running at about 1.2A as the power source.

The switcher is a TPS55340 http://www.ti.com/product/TPS55340

The arduino controls charging (on/off) with cutoff at 4.2V per cell. I am not extending the charge with a constant voltage mode as this is believed to reduce the cell lifespan.

Although 13.6W does not sound like much I plan to have 100 of these packs.

2 Likes

I’m currently waiting for my prototype PCBs to be delivered so working on the controller code.

I’m using the ATTINY85 on each cell module which communicates back to a ESP8266-12E controller (aka NodeMCU).

To keep things simple I’m using the Arduino development environment on both chips.

I’ve not had any luck running the ATTINY85 @ 1Mhz and using as a i2c slave - 8Mhz works fine, but 1Mhz works for the first few requests then hangs or starts losing data.

Prototype code is on github for those interested.

Looking good, been following your progress on github closely. Might seem a silly question but do you anticipate many more modifications to the pcb design? Tempted to order some as i really like your design. I had ordered the i2c isolator chips a few weeks back and was headed down that route also but you’ve beaten me to it by miles and love the custom pcb.