Hi, I’ve started a thread to gather all the information needed to integrate a Daikin Altherma, ESPAltherma & Home Assistant with OpenEnergyMonitor
I am a little disappointed with the Daikin Stats (SCOP and COP) from the API and display, I have tried speleolontra/daikin_residential_altherma integration from HACS…
If you haven’t seen it, there’s lots in this thread already, albeit scattered.
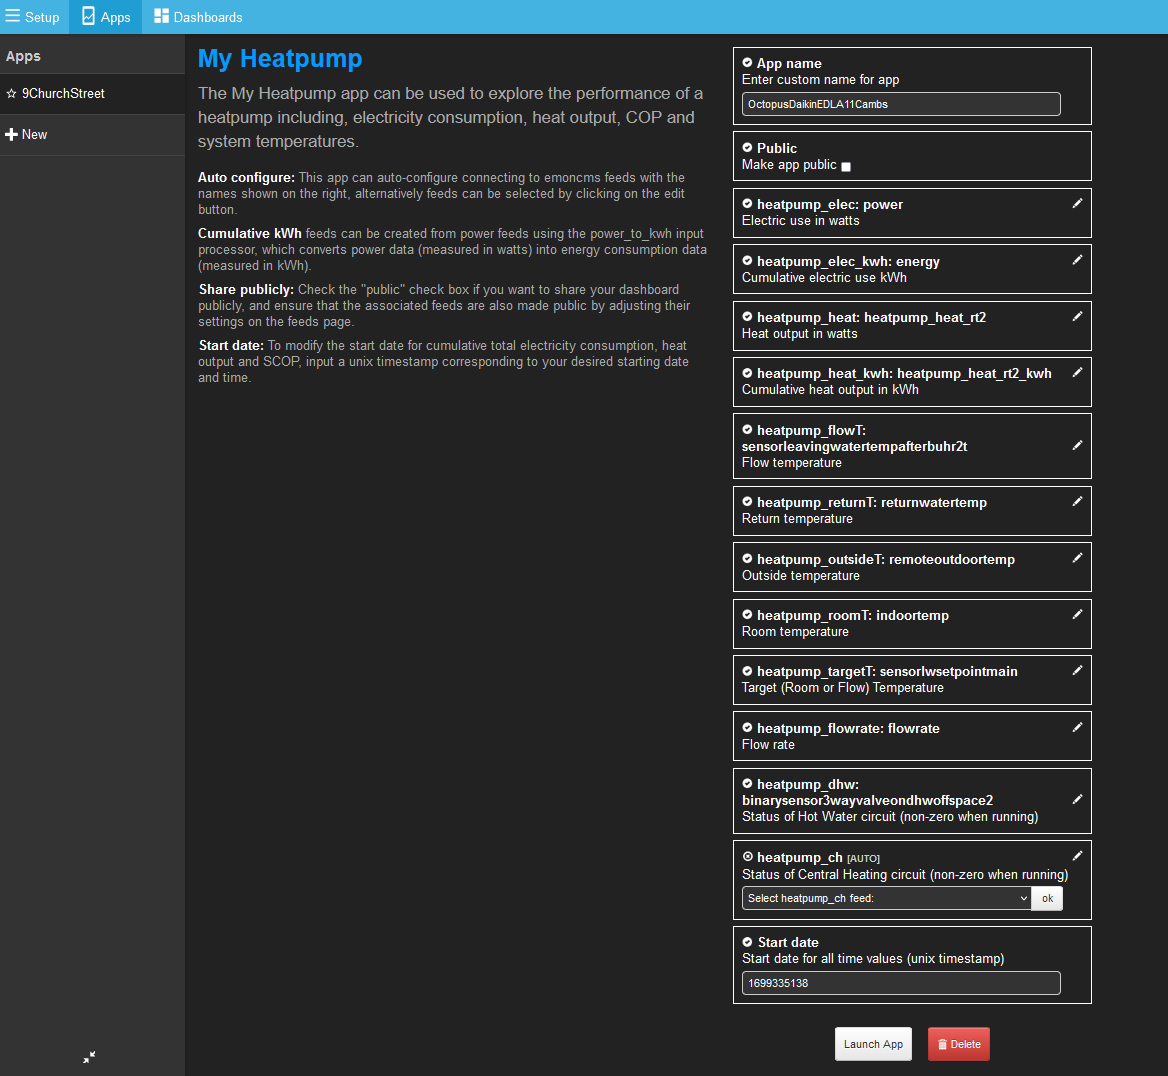
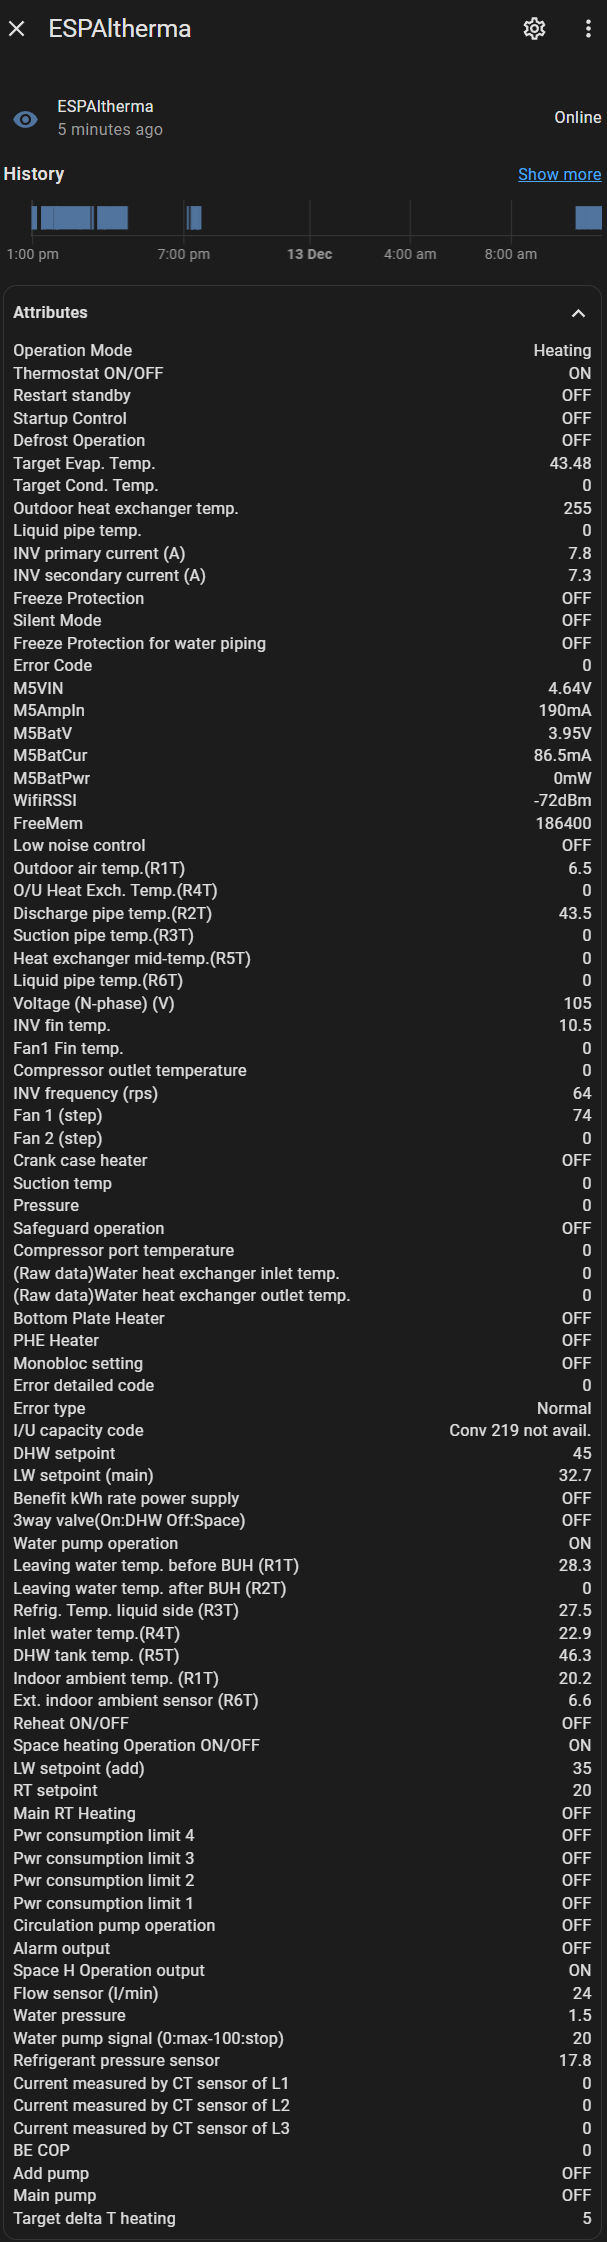
Firstly, the standard ESPAltherma software works well, and integrates automatically with HA. The instructions are very clear, and work fine, with no actual gotchas I can think of. The only “interesting” part is the selection of items to monitor, to use the My Heatpump app at a minimum you’d need
Outdoor air temp.(R1T) - this is read by the HP itself, does what it says
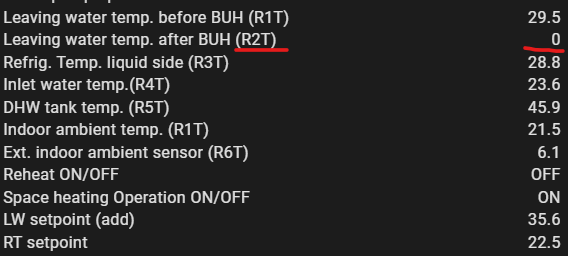
Leaving water temp. before BUH (R1T) - if you have no Backup Heater, this is the one to use for Flow Temp
Leaving water temp. after BUH (R2T) - if you have a Backup Heater, use this for Flow Temp (currently being validated…)
Inlet water temp.(R4T) - this is the Flow Return temp
Flow sensor (l/min) - this is the heating water flow rate, which needs to be converted into kg/hour (x 4200 x 0.0166666667)
Handy options:
LW setpoint (main) - this is whatever the HP is configured to get the LWT to, usually dependent on Outdoor air temp, useful to see how well HP tracks the requirement
Target delta T heating - not a part of the MyHeatpump app, but very handy for checking what’s going on if you change it!
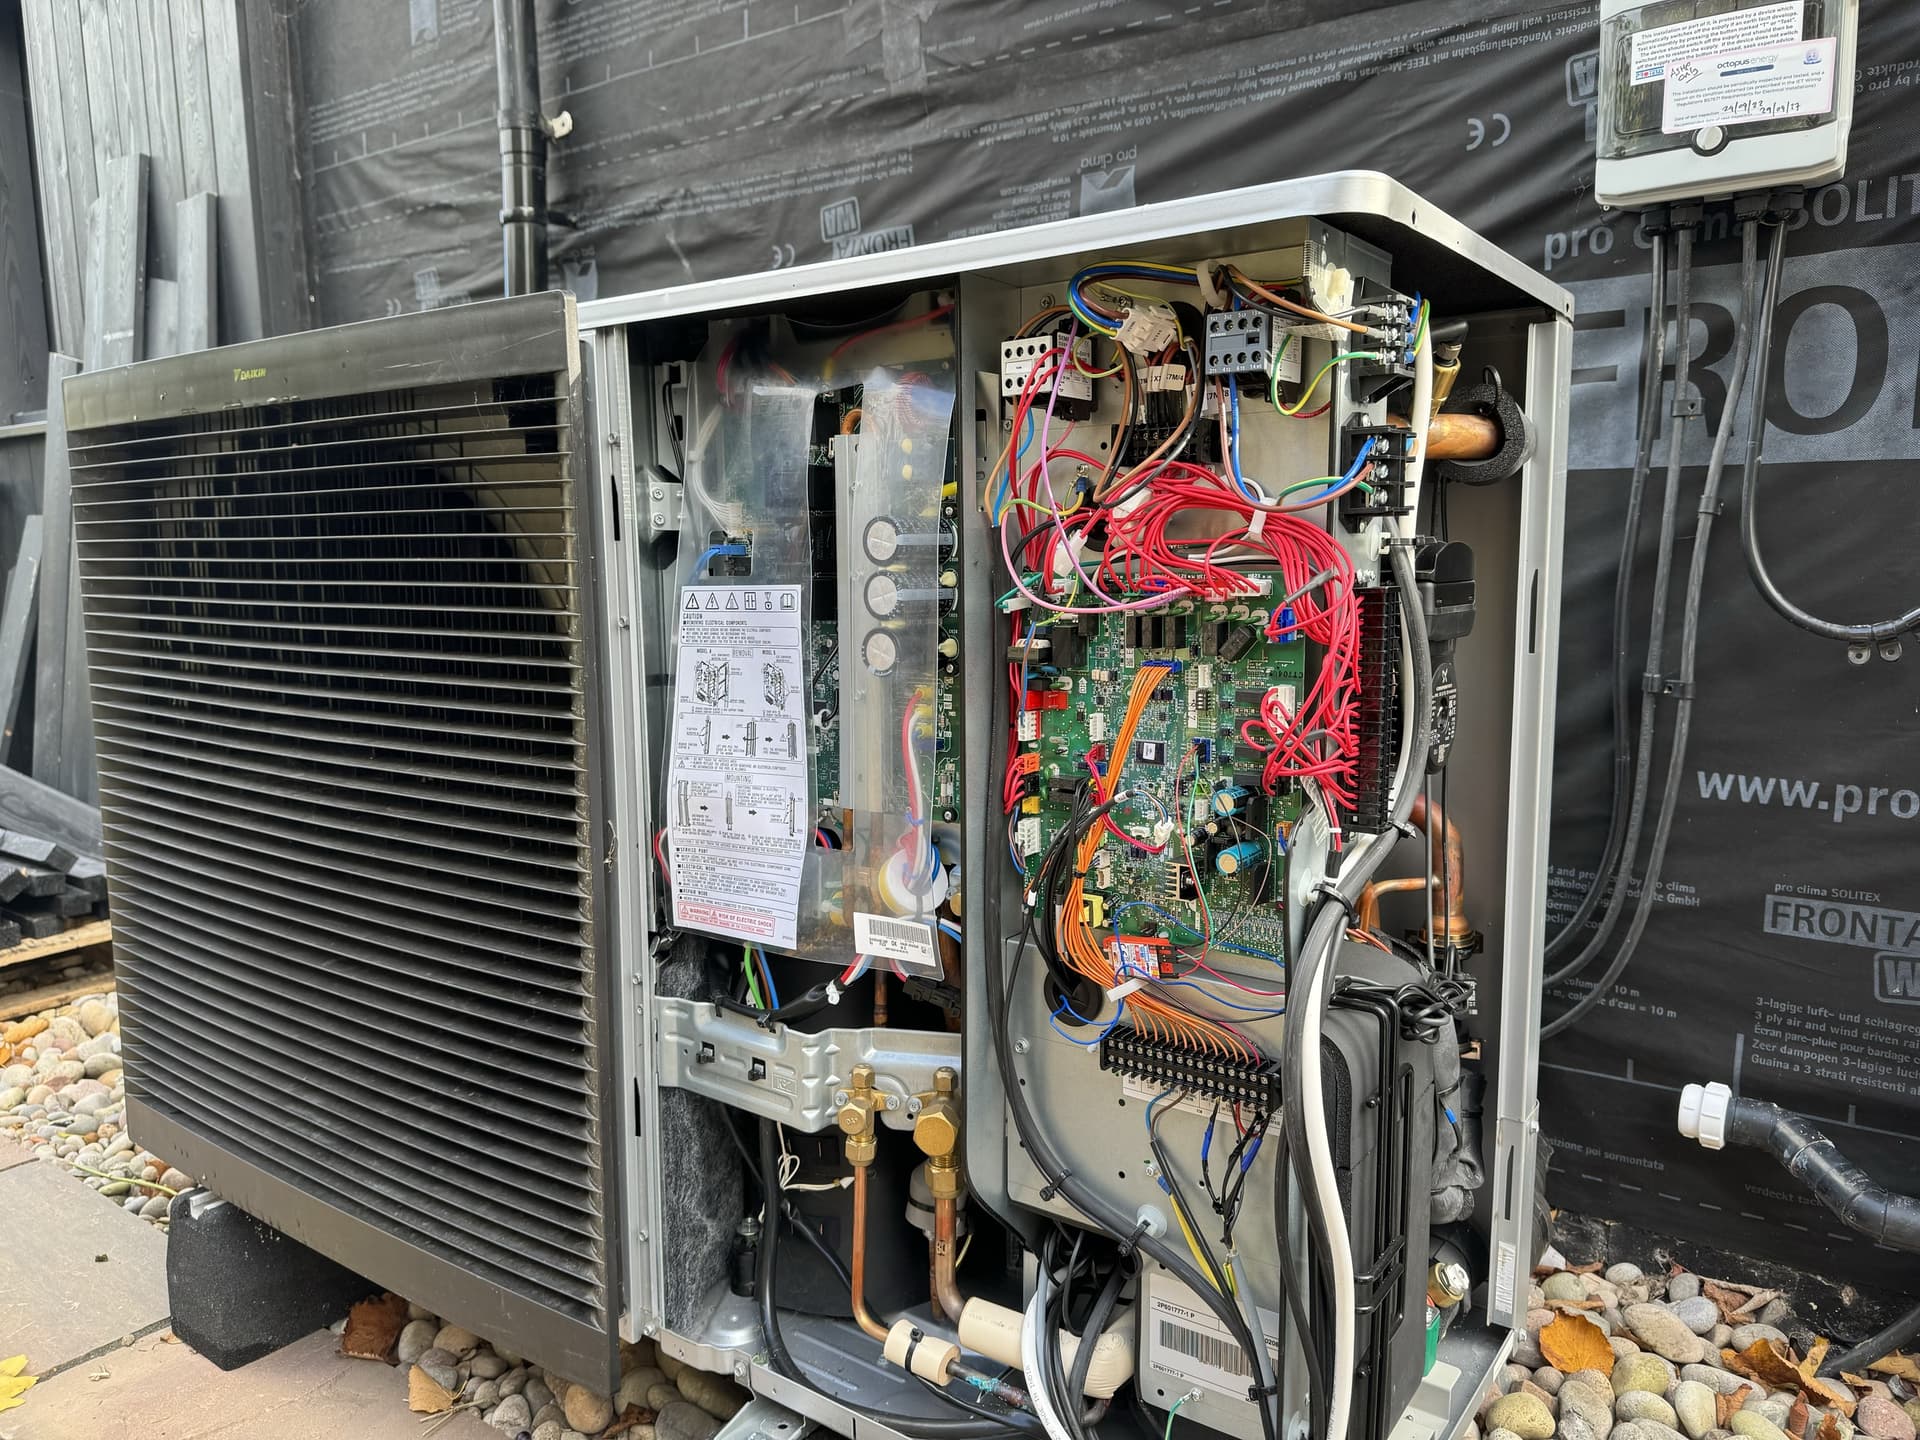
I used an M5Stack StickC-Plus, because it’s a handy package with no exposed parts and a nifty LCD screen for logging, and powered it from the X10A 5V pin, as per instructions. I used an extended cable to site the StickC in a waterproof box outside the HP casing, which effectively acted as a Faraday cage and prevented the wireless signal from being received. Your mileage will doubtless vary - @Stephen_Crown doesn’t appear to need that and has it in his HP casing. Having it outside the casing is also handy if you want to reflash it with revised parameter - saves getting the heavy casing off again.
I haven’t linked HA to EmonCMS, using the EmonCMS integration, because I preferred the EmonCMS data series, storage and facilities. A small change in the setup.h file makes it work with EmonCMS directly, providing you have an MQTT broker/server set up as part of a local EmonCMS installation. Again, @Stephen_Crown has done this.
If you go directly from ESPAltherma to EmonCMS, as I did, and you subsequently want to export your data to emoncms.org, then you need to set up a regular export of your data to your account in emoncms.org, say hourly. That is because the usual route for data from OEM emon is
emon sensor e.g. emonTX4 => emonHub
emonHub => emonCMS (local), with optional emonCMS (remote at emoncms.org)
Sending inputs directly to emonCMS via MQTT means emonHub is skipped, along with the item-by-item link to emoncms.org. It’s just an easy config change in cron.
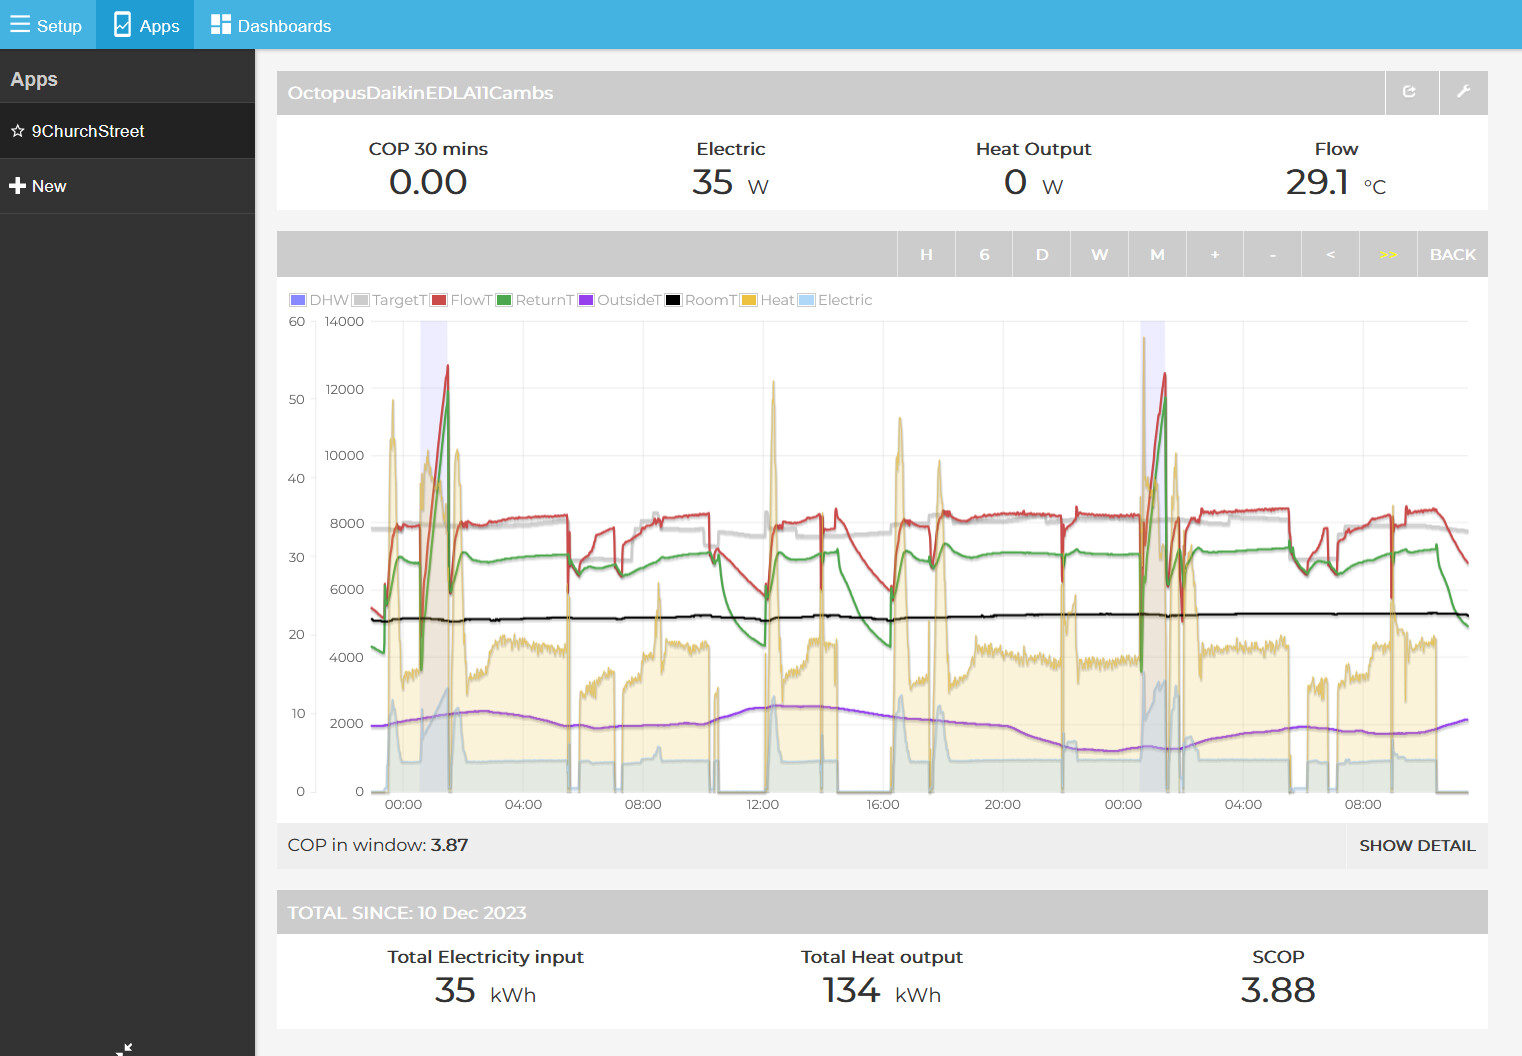
Once you’ve got data into emonCMS, setting up the Feeds from the Inputs is pretty easy, and then the standard My Heatpump app (basically a pre-configured Graphs display) can be set up.
I’ll add to this thread when I can (I don’t have time right now), as I use Home Assistant as a middle man (for better or worse!)
Works well for me anyway.
In the meantime, suggest using the search function on this forum for “ESPAltherma” as I’ve added that word to posts I’ve made that are related to that.
I’ve now created the post doing the end to end setup:
thanks in advance @Stephen_Crown my ESPAltherma is out for delivery, I try to flash it today, however it’s a bit rainy in Gloucestershire and I do not think I want to take the cover off the Monoblock…
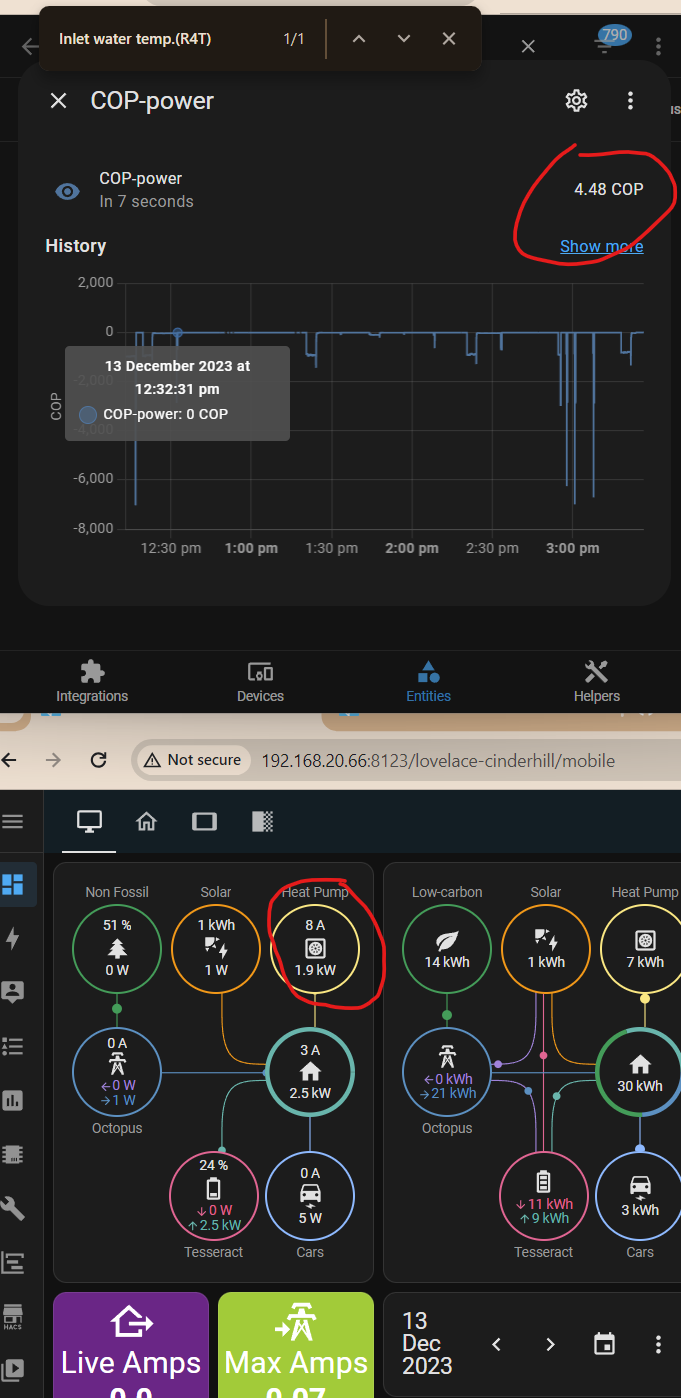
Will have a little work to expose the attributes in HA 1st, and then figure out a way to display a rolling COP, 1hr, 6hr, 1Day, month etc…
I chose to go the ESPAltherma route for a few reasons:
can’t find a plumber generally round here willing or wanting(!) to work on a heat pump (hence I went the Octopus route for installation)
I wanted to learn some new skills
I wanted data and information on behaviour and relative performance, not precision of the data.
With that out of the way….
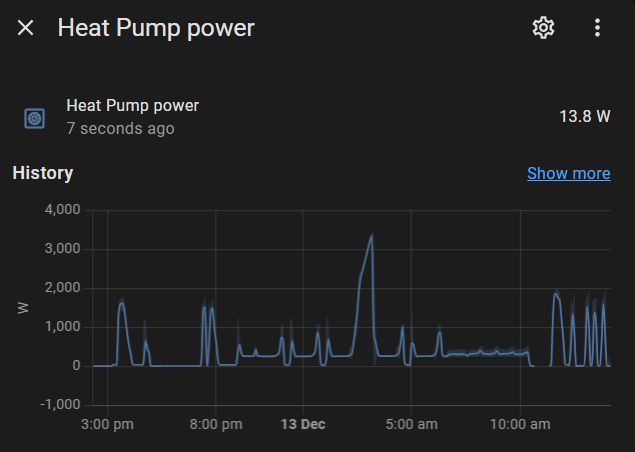
Electrical power monitoring
A qualified/certified electrician may be required for this step, especially if the cable you’re looking to connect the Current Transformer (CT) inside a consumer unit
You will need a separate electrical power monitor as the data from the device is not even nearly sufficient as detailed in this thread over on the ESPAltherma GitHub discussions page. It is not accurate enough due to manay factors unfortunately.
I then pull this data into Home Assistant, and send on to EmonCMS. Other electrical power monitoring systems are available, including on the OpenEnergyMonitor shop
Hardware
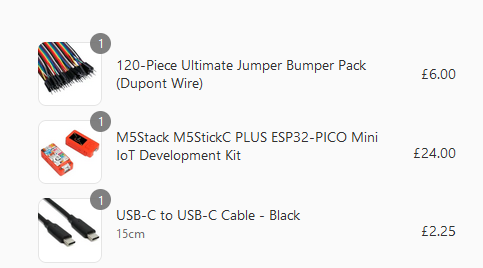
I ordered the following hardware, and this has been sufficient:
note: I won’t link to the shop here, as I’m not sure if it is against the rules, but the screenshot should help you find whats needed:
Use the instructions on GitHub to complete the build using VSCode for example.
M5Stick-C installation
Before completing this step, please ensure the power is turned off, ideally at both the isolator next to the outdoor unit, and as a failsafe the circuit breaker that feeds the isolator
You will want to ensure that you have a very strong wifi connection very close if you are installing the M5Stick-C inside the Daikin outdoor unit, as the external metal casing along with a presumably small and low power wifi chip means a weak signal or a high noise environment may not allow this to work.
Others in this thread have added details of how they mounted the M5Stick-C externally in an IP rated box with outdoor rated CAT5/6 network cable. That seems like a great workaround for this issue.
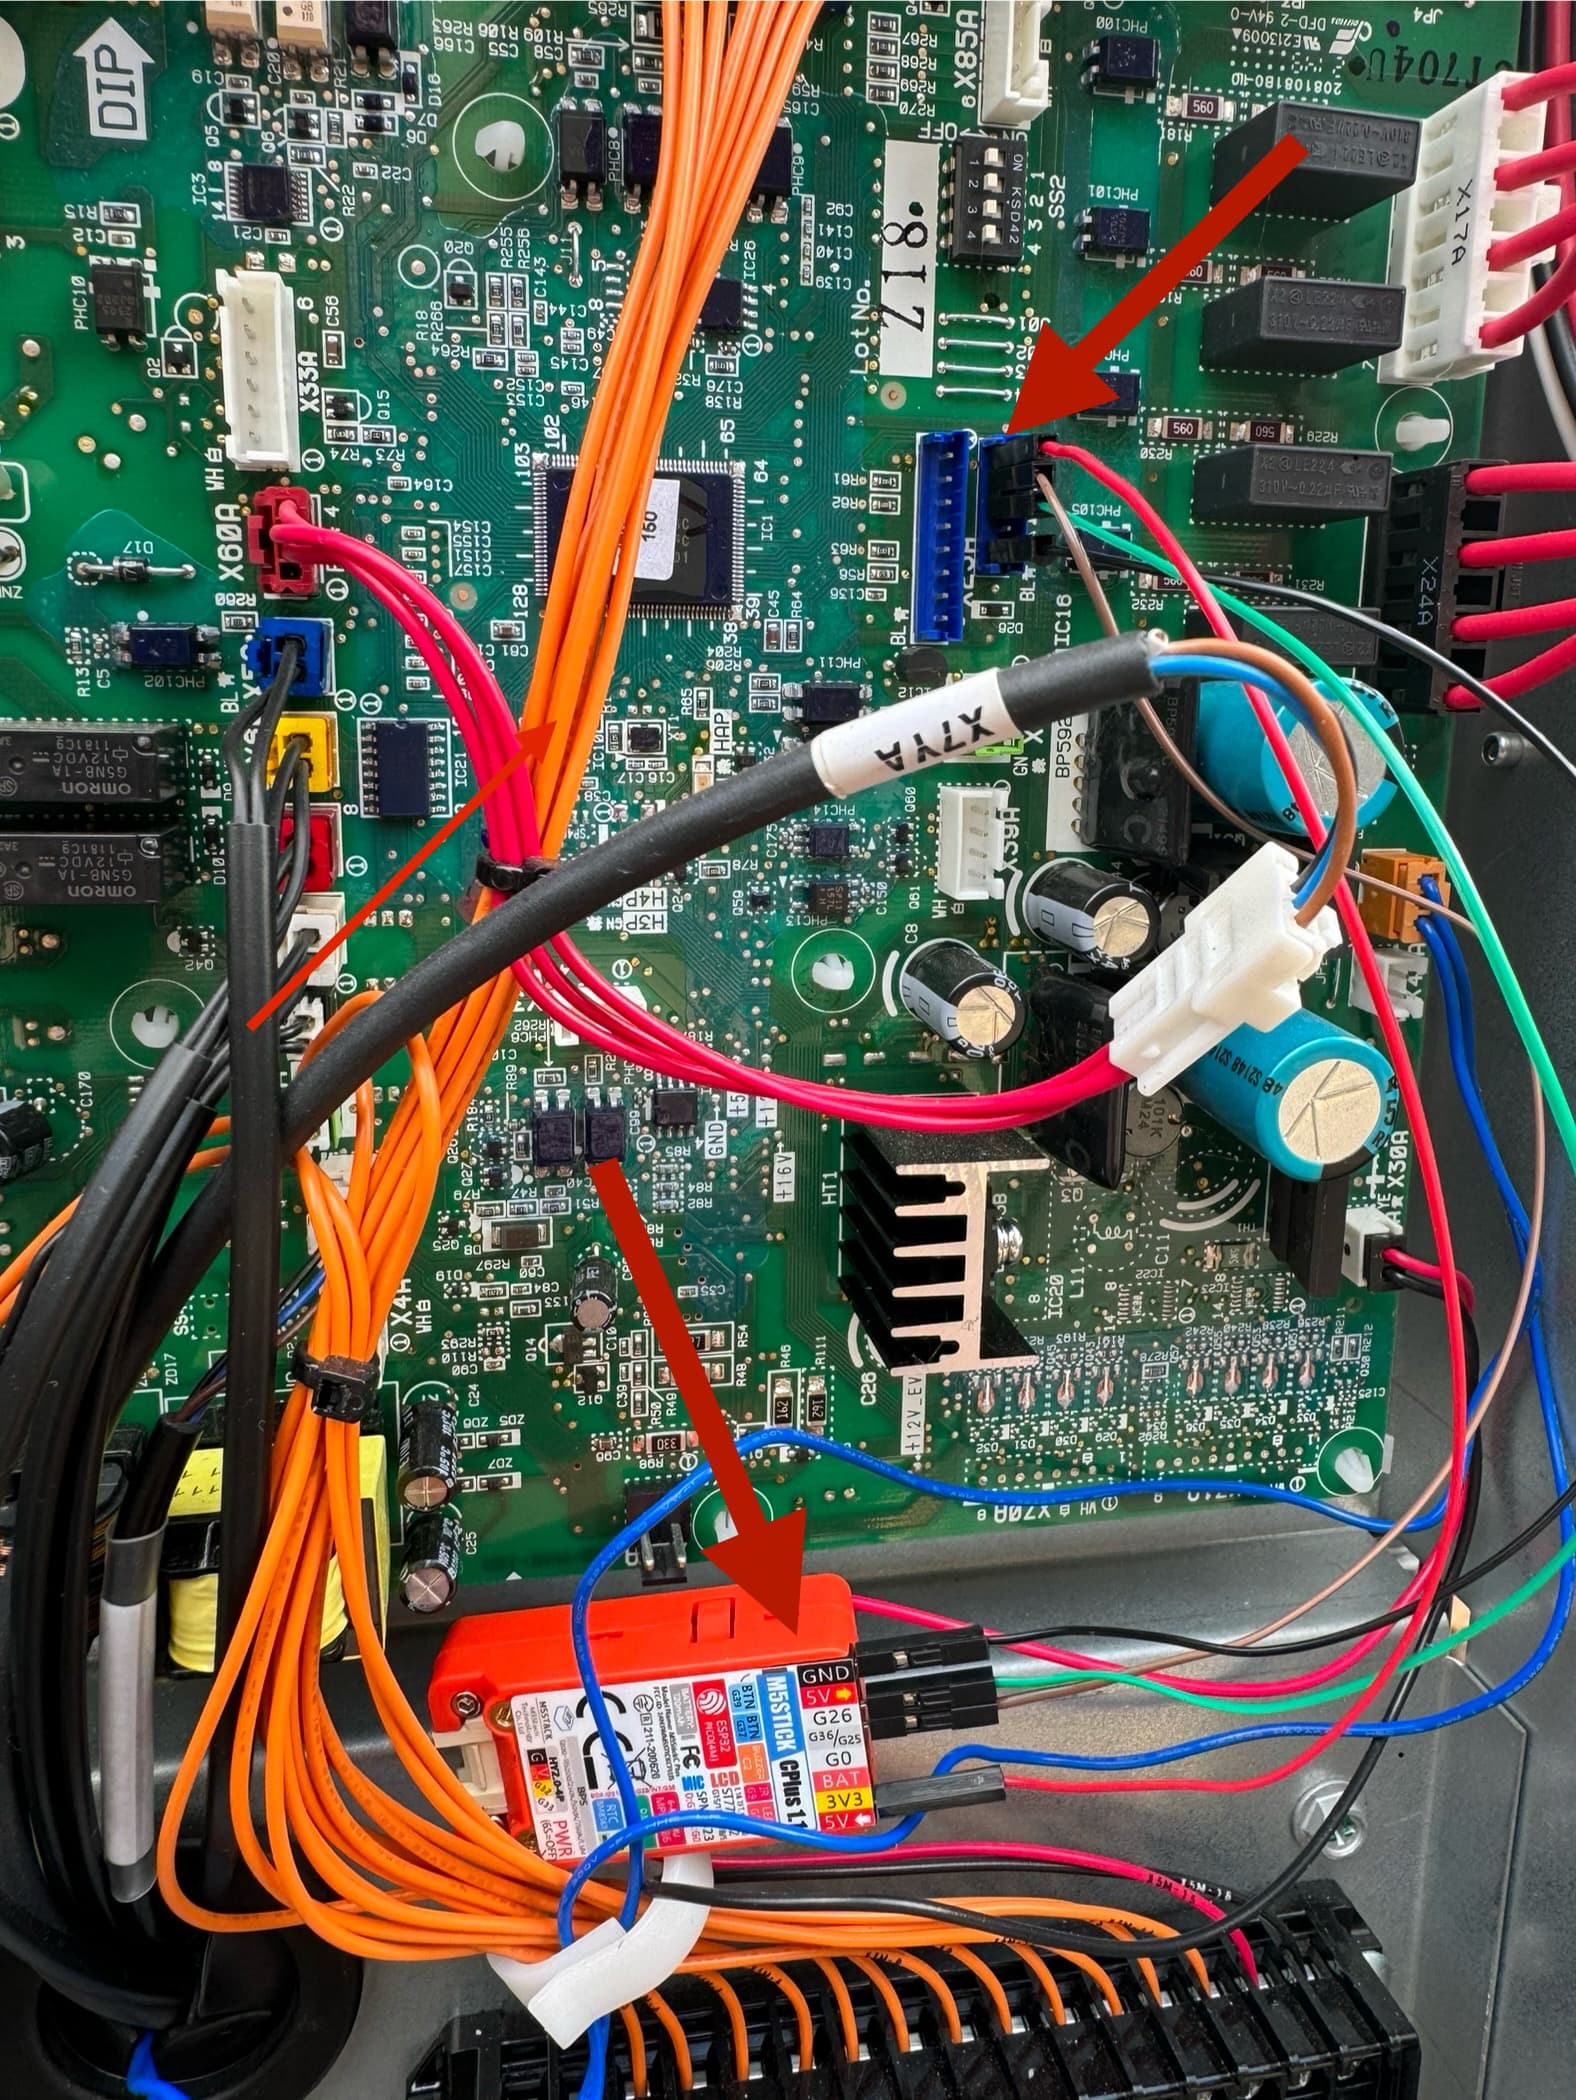
The below photos at various zoom levels shows where the X10 connector is located on Daikin Altherma EDLA/EBLA 9-16 models, and shows my M5Stick-C in position (for now - I might make this more permanent to be fair):
Going into that entity should look like the below Note: only sections in red will show if not yet connected it to the Daikin outdoor unit, i.e. testing inside first, which is a good idea
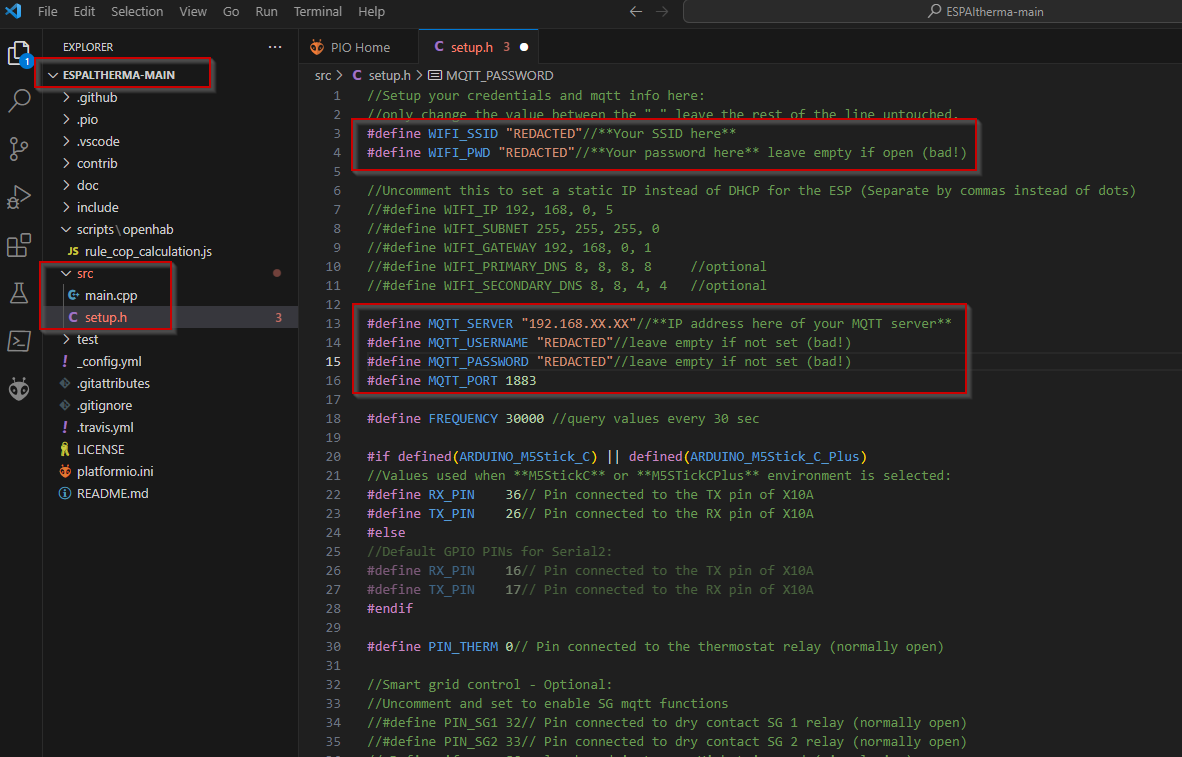
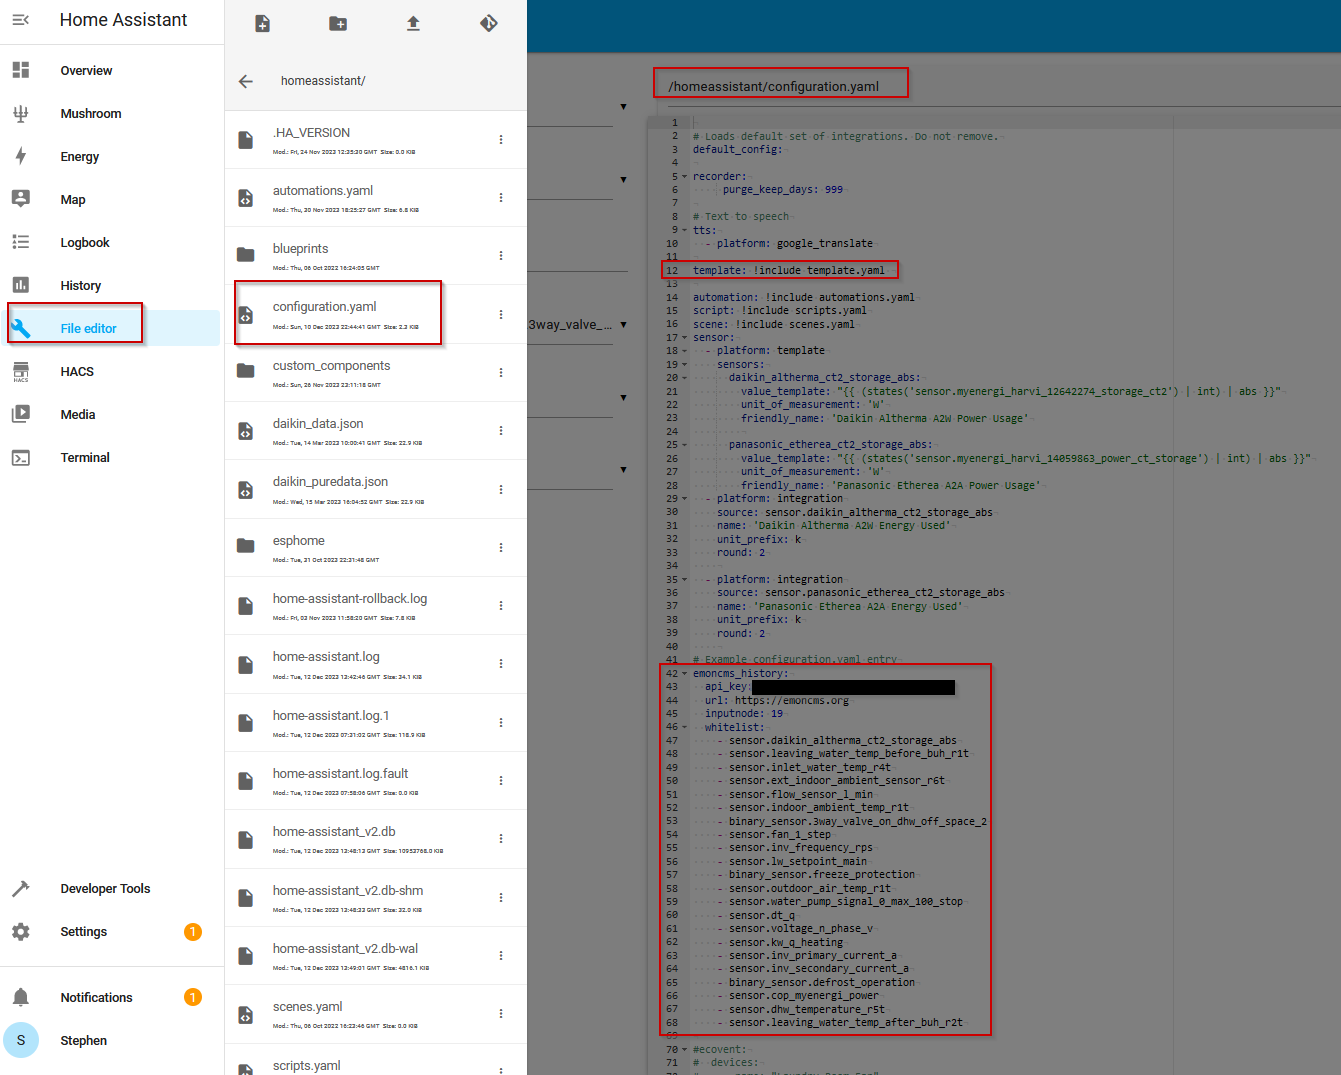
Once all the sensor data is pulling through, next is amending config files to be able to consume the data:
Configuration.yaml (note you’ll need to just take the relevant section from my file and to yours as long as you double check entity names match those in your system, but uploaded the whole file so you can see full context)
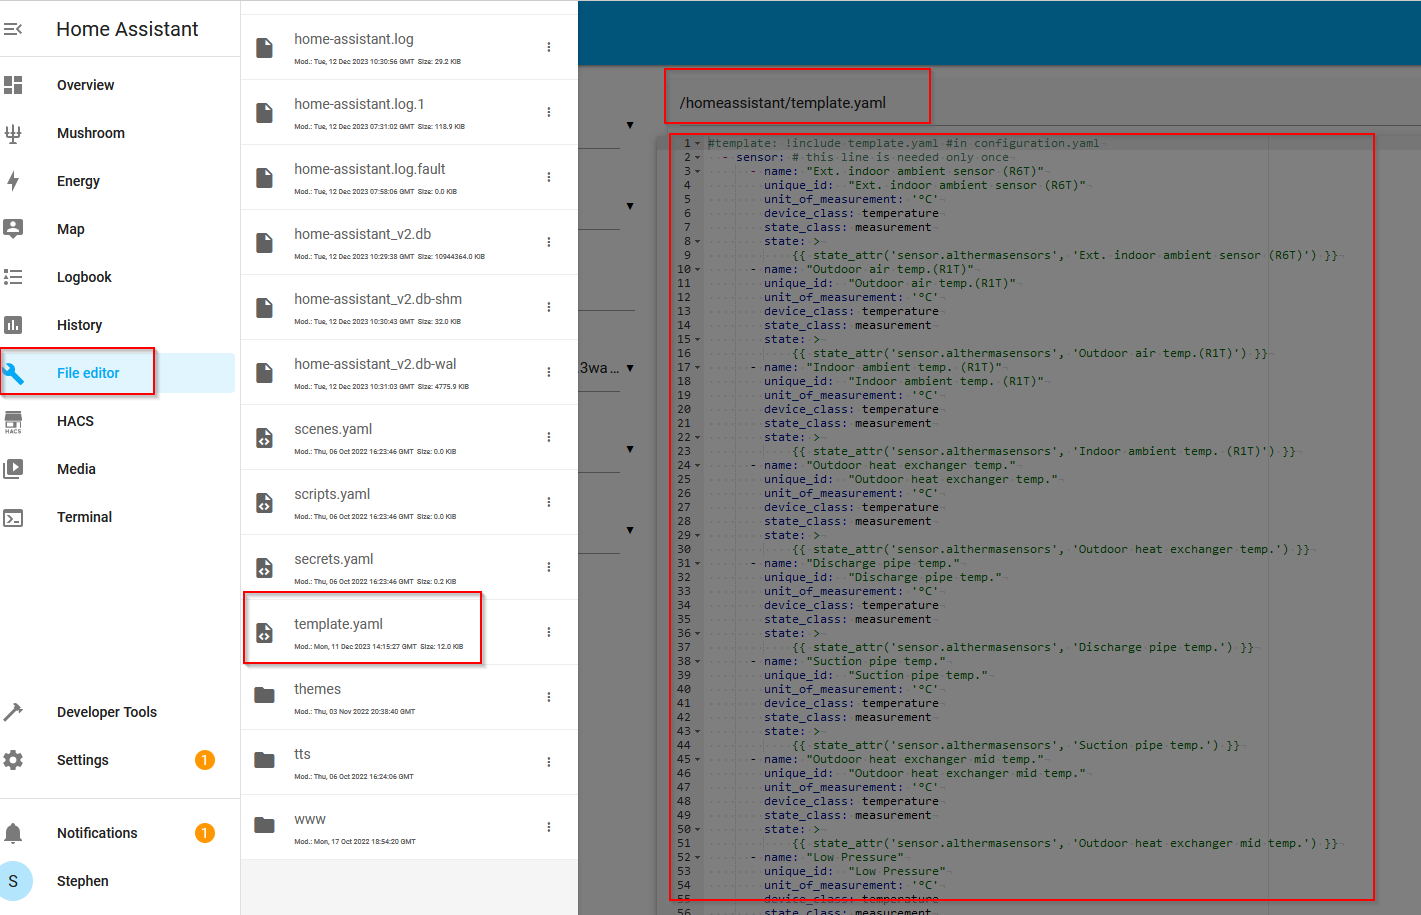
Template.yaml (I think you should be ok to add this in “as is”, however, do note that the sensor names match up with the ESPAltherma .h file contents further up this post)
The below is where the EmonCMS_History integration occurs, allowing for sending sensor data collected by HA over to EmonCMS cloud service.
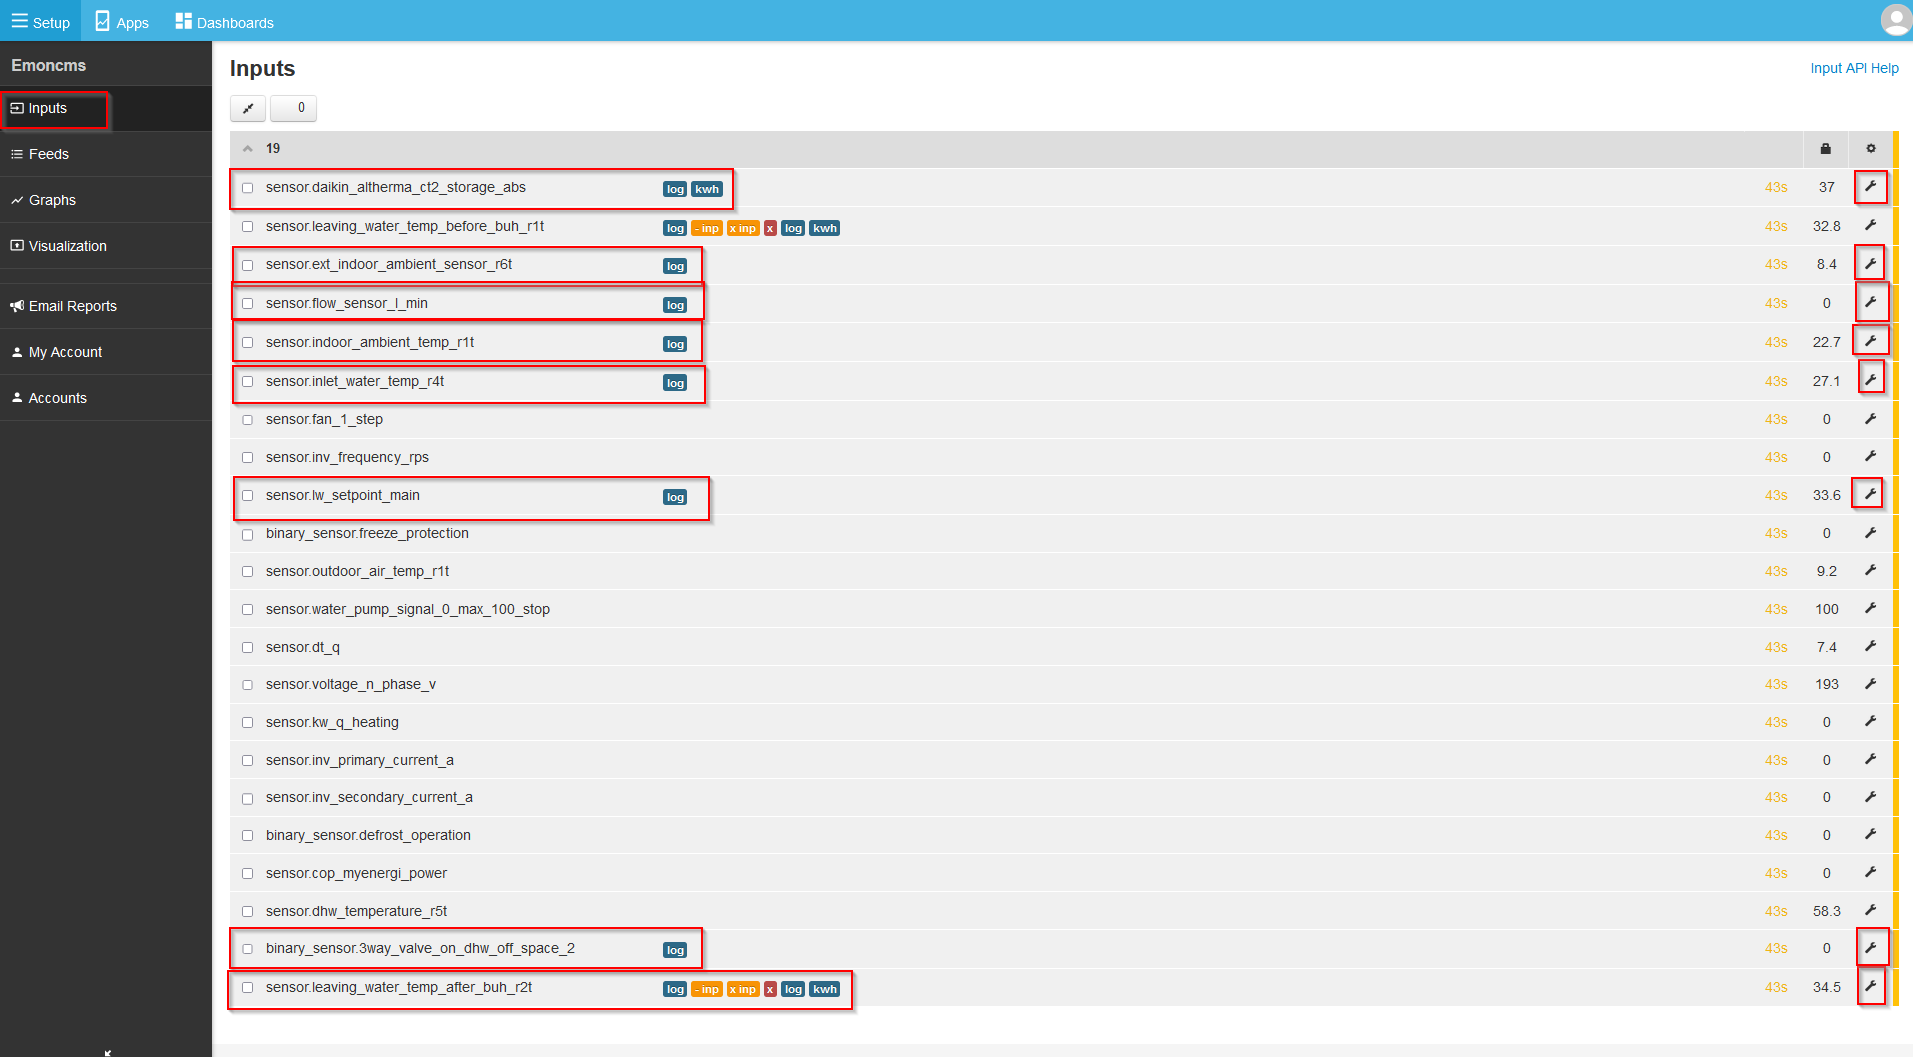
These show up in your EmonCMS account as inputs (which are transient and are not stored, but are free)
Pay very special attention to entity names, I’ve had a few fixes due to names not coming through correctly/as expected. If something is not working as expected, it’s possible an entity name mismatch
e.g.
the below does not have an underscore showing here, but does in the .h file and subsequently needs it for sensor creation:
The below has a “_2” on the end due to my own trial/error getting this working, so if you get this working 1st time, you will NOT have the added _2 at the end
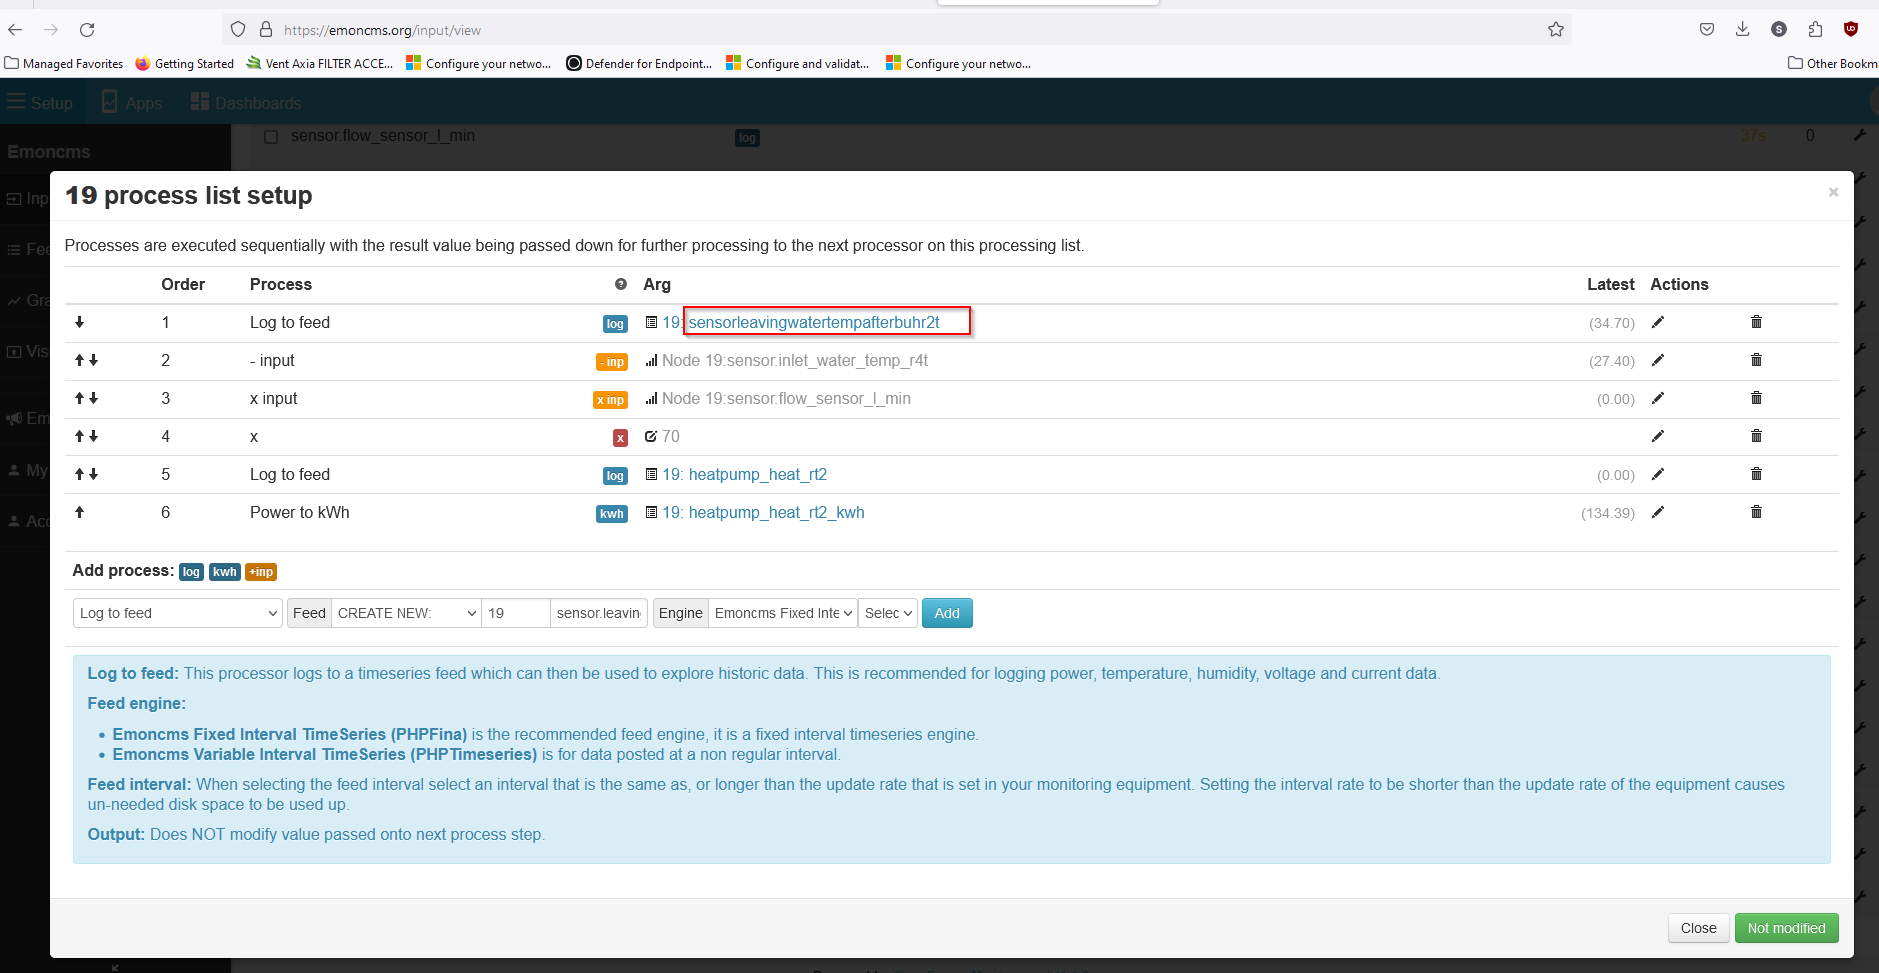
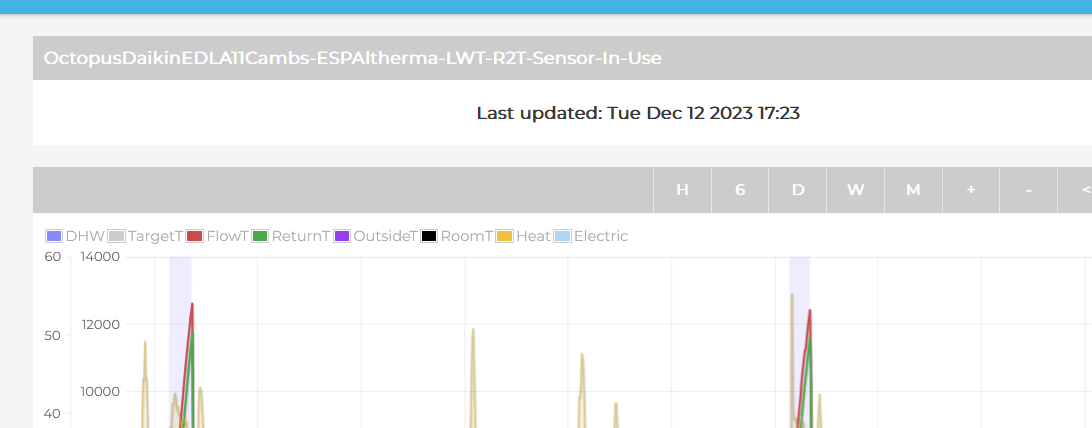
This particular point was relevant in trying to get the 3 way valve data and then send to EmonCMS to register the feature for automatic identification of DHW cycles per example below:
Please ensure you restart Home Assistant to get the latest version of configuration.yaml to be active.
I have been contacted (thank you!) as it has been noted I have some minor errors on sensors in the template.yaml which they’ve fixed further down this thread, however as I don’t actively use them I hadn’t spotted these. I will fix them (including uploading a fresh template.yaml) and update this post to reflect those errors corrected when I get a chance on my laptop
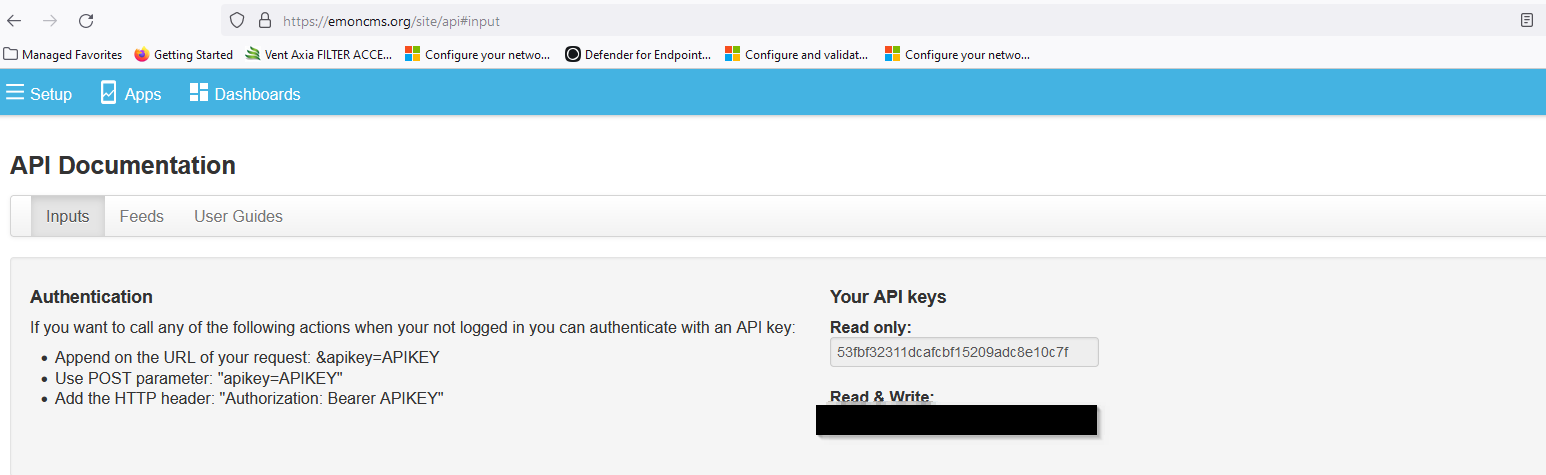
EmonCMS - Cloud Service
Thanks to @glyn.hudson and @TrystanLea and probably others not mentioned for this fantastic service to show the data in an informative way with features added regularly.
Inputs are transient in nature, take external data sources, not stored and used primarily to provide data to a Feed, using the Log to Feed processing function (and some as detailed below use a few more processes than just this)
Feeds are persistent in nature, and store the data for as long as you pay for the feed (in EmonCMS cloud version anyway), and are then consumable from EmonCMS apps such as the MyHeatpump app.
EmonCMS Inputs you see (hopefully) are derived from the Home Assistant configuration.yaml section where your sensors are listed for sending to EmonCMS.
(remember you need to restart Home Assistant to get the latest configuration.yaml update to become active)
The important ones are highlighted in the screenshot below (I have personally added others for my own use but they are not needed for this setup) and are the ones (albeit sensor names might be slightly different) you will need to process (spanner symbol):
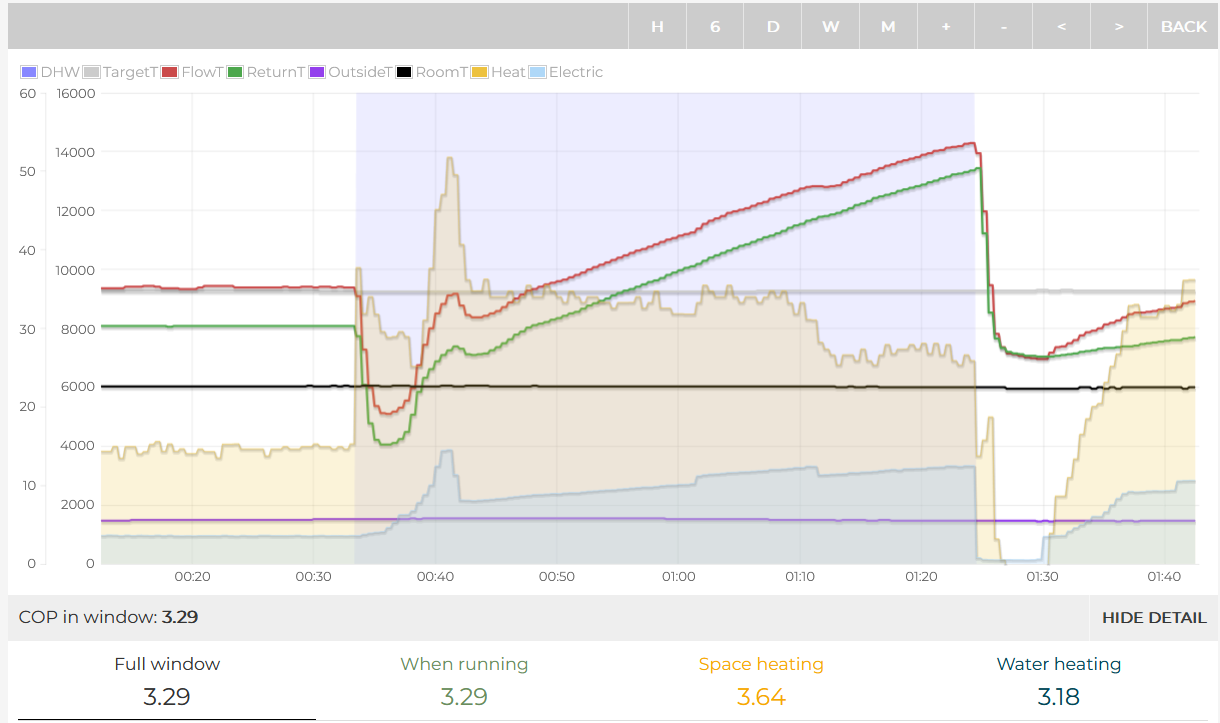
For those Daikin Altherma EDLA/EBLA (and maybe others?) models with a backup heater (BUH) (not to be confused with tank/cylinder booster heater/immersion) it is not accurate to use Leaving Water before BUH R1T sensor for some reason.
Defaulting to R2T (Leaving Water after BUH R2T) sensor is the current most accurate data we have from the unit for those with a BUH
For those Daikin Altherma units without a backup heater (BUH), Leaving water before BUH R1T sensor is all that is available, and it is advised to see if someone on this forum with a MID compliant Heat Meter can provide some correlated sensor data if possible to provide confidence in its’ usage
Here is the EmonCMS Leaving Water R2T processing formula that initally gave me the most issues and has the most complex steps of all of them, but works really well:
Next step if you want to publish the system on HeatPumpMonitor.org is to log in there with your EmonCMS account and complete the steps to carry that out.
Hi @Stephen_Crown you’re a star, thanks you, i have got to the following step, I have the M5 in a container on top of the HP and have wireless connectivity I guess the other attributes will get pulled through once i add to the Config YAML and connect up, I have a 8kW unit so hoping it all reads across. From your config build…
Sorry to be a bother, I have cranked up the Power on my AP as a temp workaround as it was not connecting through the case as expected, an external enclosure will be on the list.
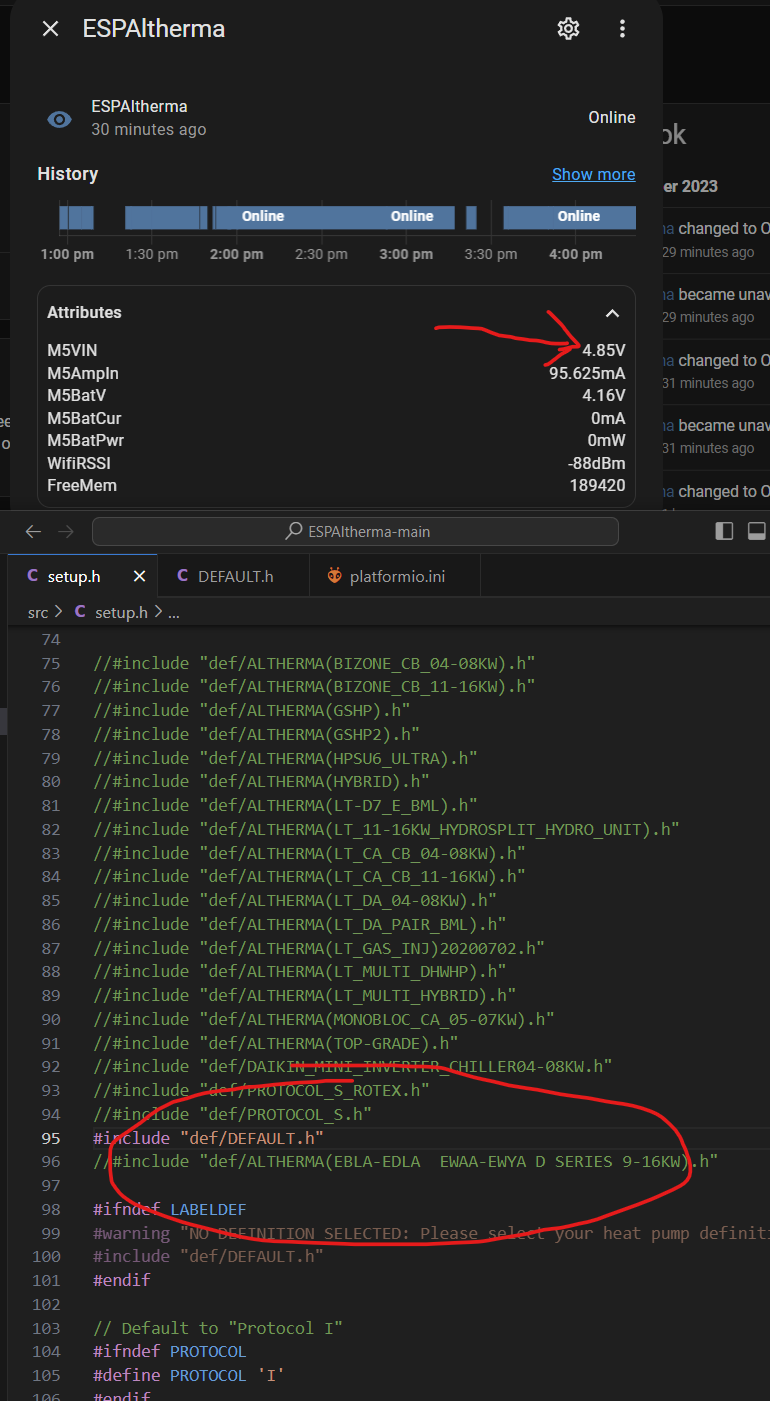
However, I have problems with exposing additional attributes, do I have the data pins the wrong way around (the power is good 4.85V)?
I added the include def lines with your config and tried the default, still no luck.
I have not added any YAML text yet….
its raining now and will have to wait until tomorrow to double check, I am also trawling the GitHub for any gotchas. Take care Neil
@tiger_cook The voltage looks pretty similar to mine. So think that’s ok.
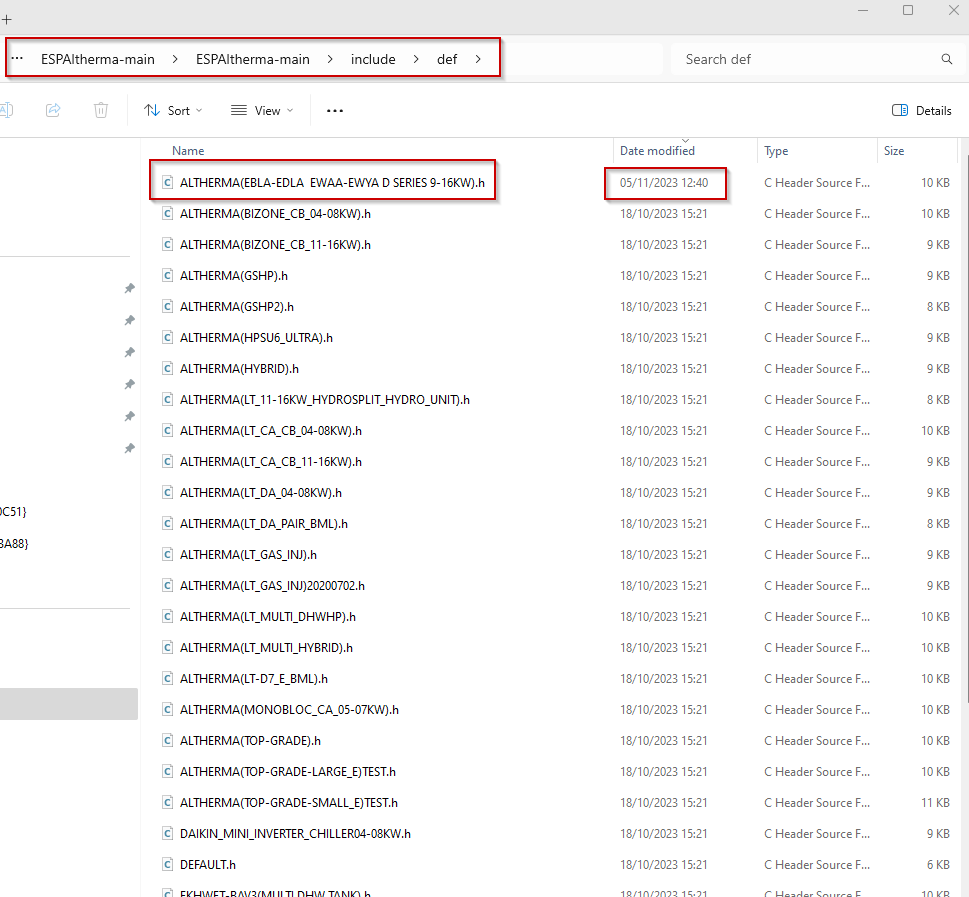
Any “.h” file is good for functional testing to be honest as it should pull through a bunch of data you may/may not want, but will show it is working.
It’s only when you want to get end to end testing and working the correct “.h” file will matter.
There were a few other people on the GitHub repo referencing the 4/6/8 EDLA models, not seen anyone mention this doesn’t work. Do double check the pins either end are in the right place.
If you sort your issue and I’ve missed something in my walk through, I’ll update it to include it.
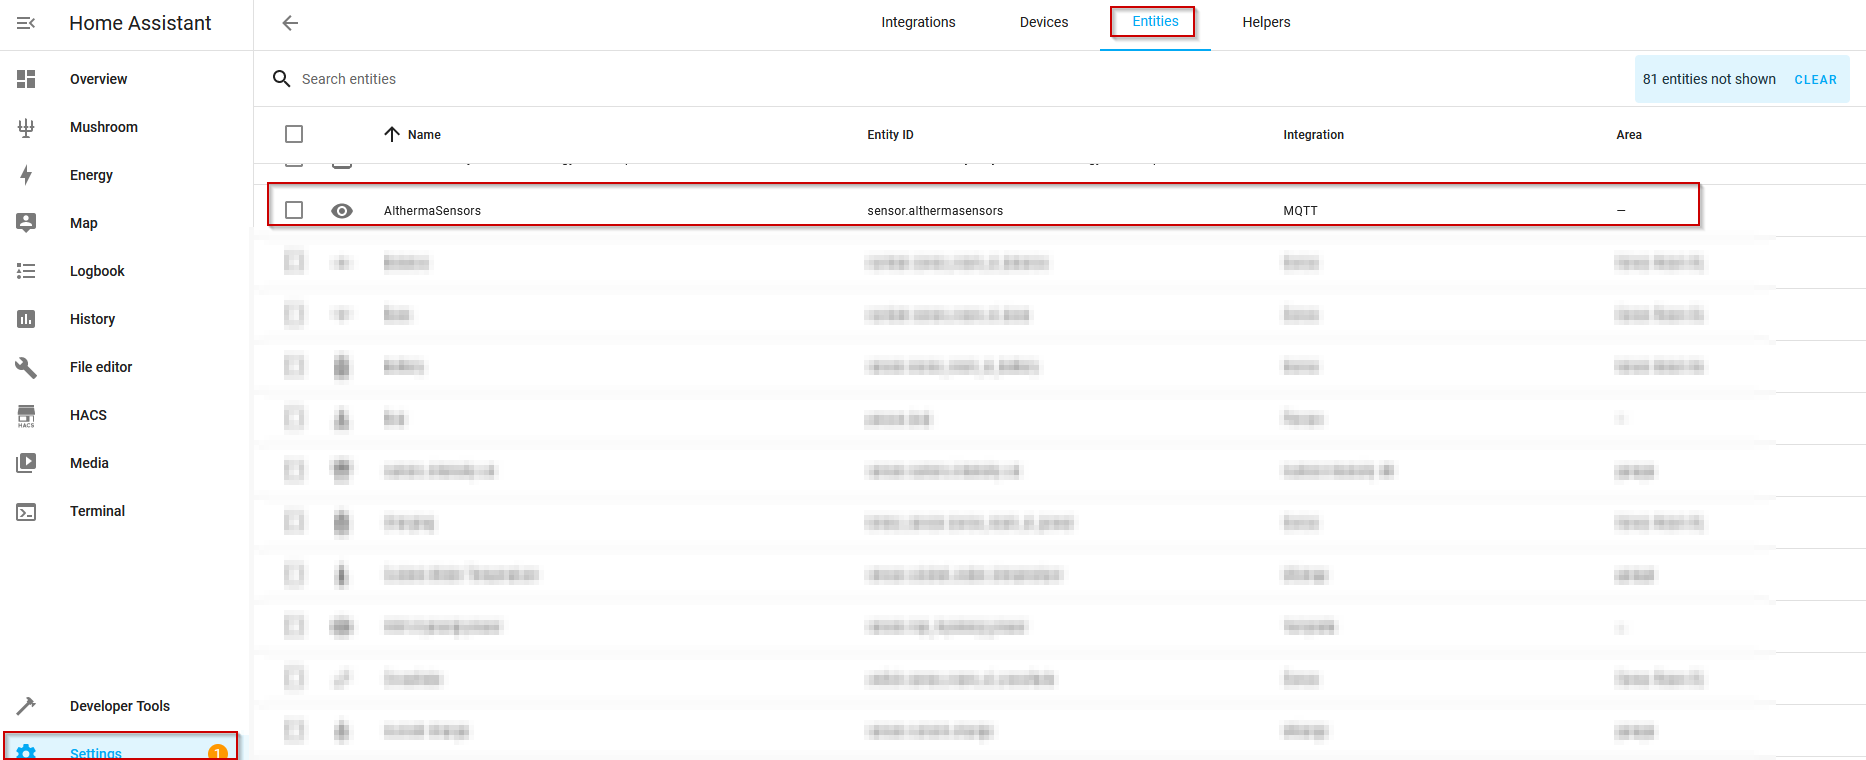
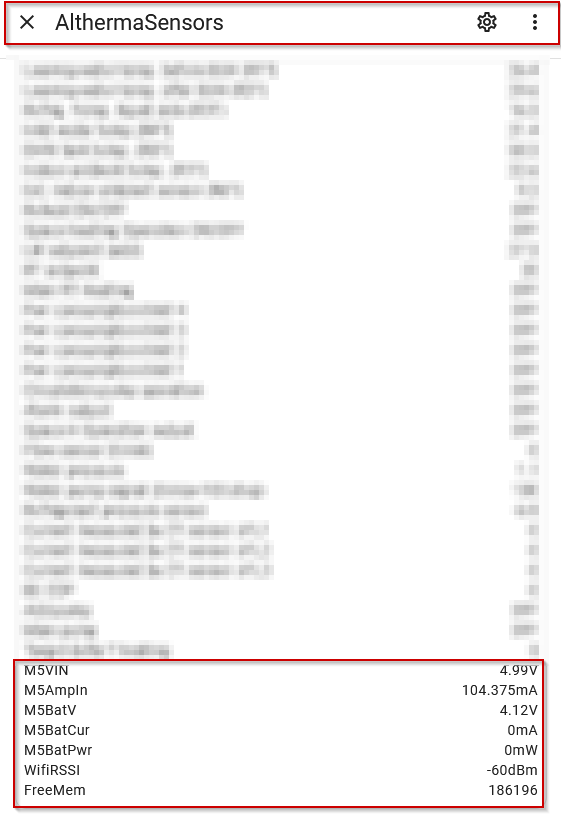
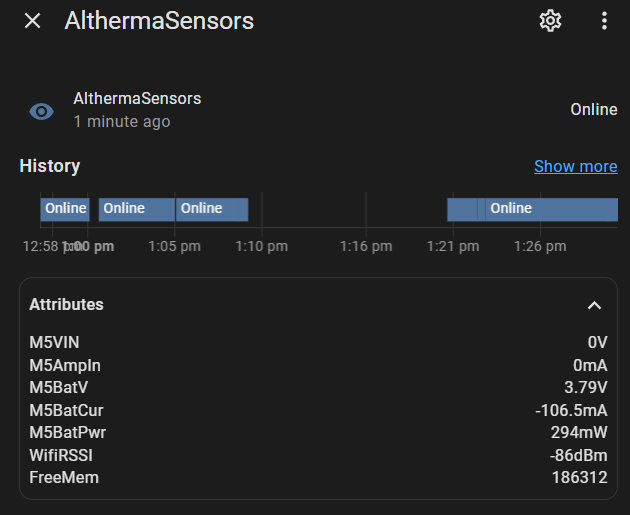
@John mentioned signal is very low (but I’m guessing noise levels are too, hence it’s working), but it will work/not work. It’s obvious when it’s offline, as the “AlthermaSensors” device state is “Unknown”:
e.g.: Here is an example when I moved the Google Wifi puck half a meter before I realised I was getting dropouts
Before going to much further, suggest getting the correct “.h” file flashed onto the M5Stick-C and ensuring all of the parameters you want to use are being brought through.
I’ll update the guide tomorrow to cover pin layout and checking of pin connections.
no probs, used some ‘stranded’ CAT5 (more flexible and less likely to break than solid core) cable to the dupont connections via a connection blocks ultimately to a waterproof box for the M5Stack…
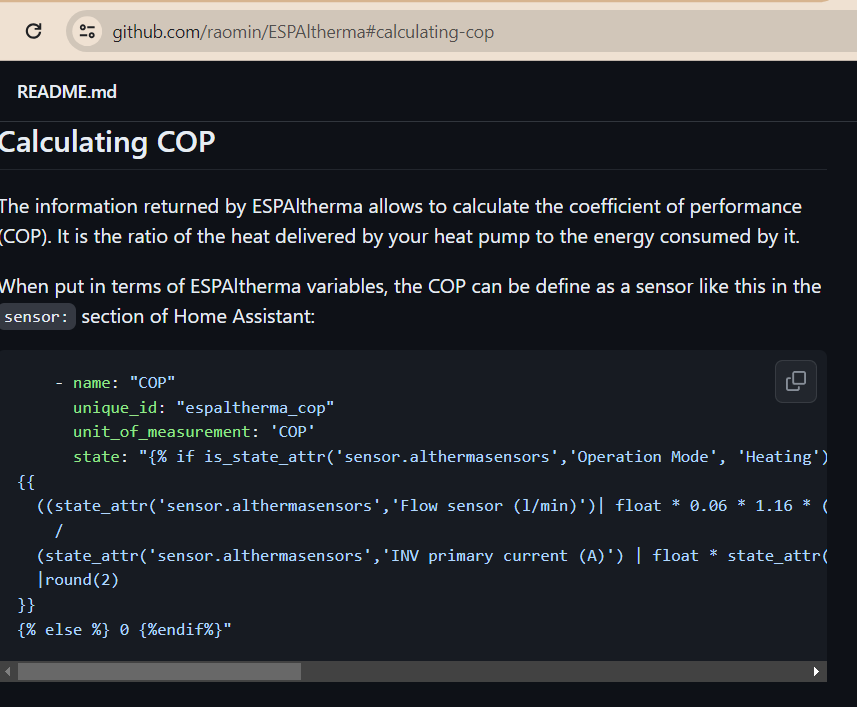
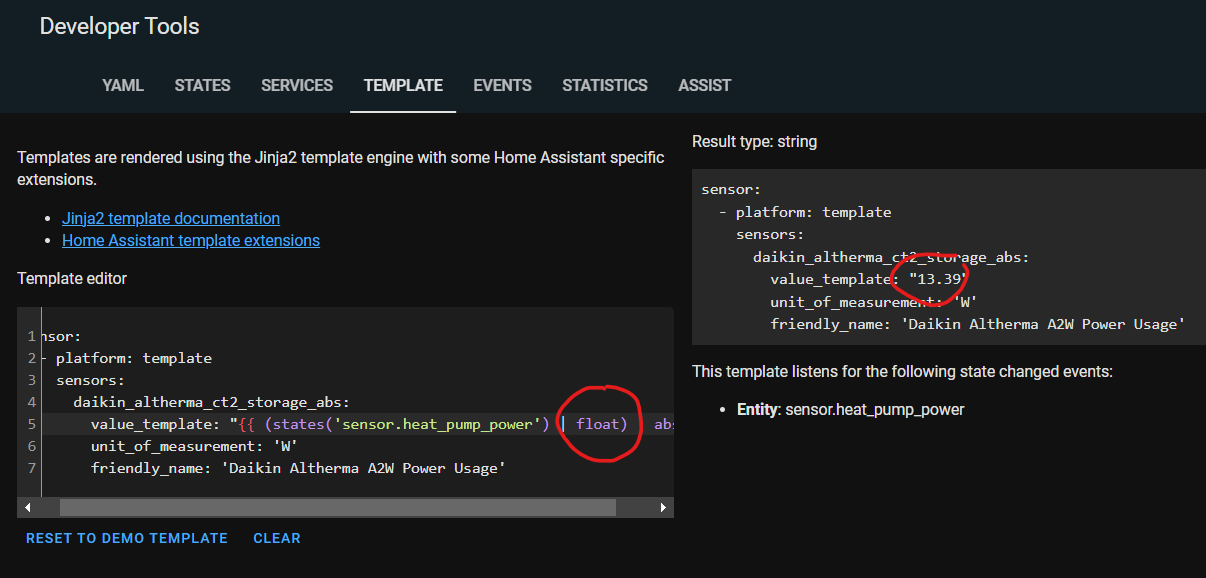
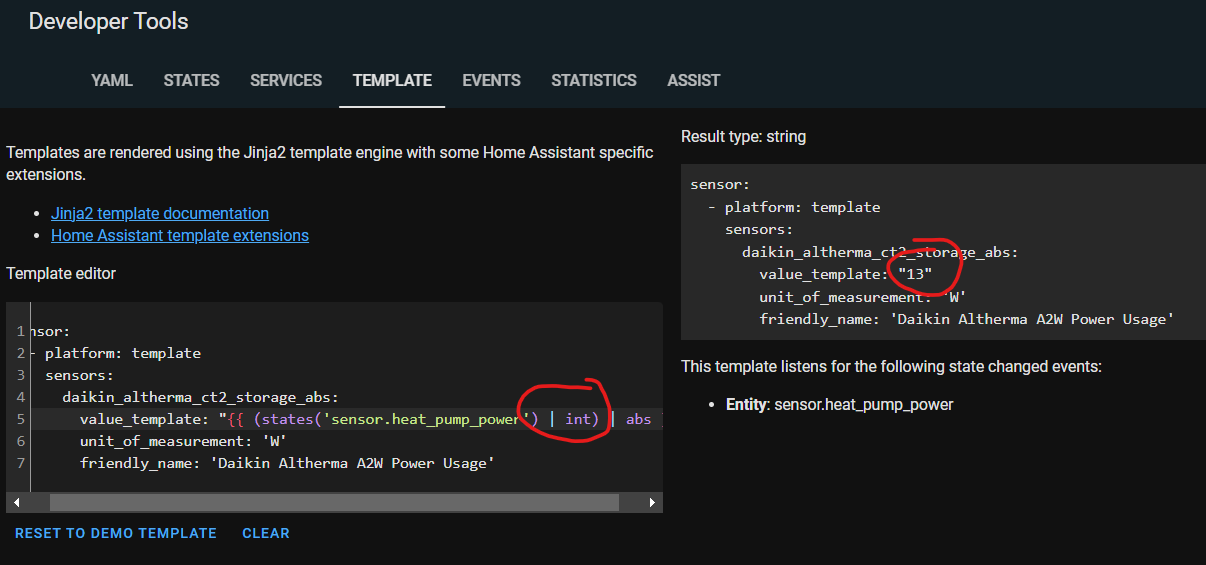
Having a few challenges with the COP Template, changed the power sensor from your harvi CT to my ShellyEM sensor, currently getting negative values, just going to try the stock COP template to see if it helps? out of interest, why do you not use the stock template on the GitHub?
Here is my modified version for Home Assistant, although I send raw data values to EmonCMS and the calcs are done there as well separately, and I tend to use EmonCMS more anyway.
@tiger_cook depending on what data is output, you may want a “float” rather than “int” in the transformation power formula re: divide by 100 (your CT may be spitting out kW, whereas mine was W already)
I’d read about that, but didn’t need to change mine. Worth trying
I was fairly sure (albeit I did this bit nearly 18 months ago), the “abs” element ensured a positive figure.
To be honest, you may need to ask some questions around Home Assistant over in their forums, I’m not stating I’m an expert, I managed to get it working however!
@tiger_cook - yes I do mention in the guide that the sensor will be depended on the model.
Given the descrepency we’ve found on the larger EDLA 9-16 model with a BUH for R1T sensor, its worth adding that you’re using that sensor to your My HeatPump app name to make it clear to others thats what you’re using.
Also, until someone on here that has a MID Billing Grade Heat Meter connected to the same EDLA 4-8 model range without a BUH and can provide useful correlated data, you will need to understand the sensor accuracy is unknown (but still useful for behaviour and performance characterisation)