Great thread, thanks for so much detailed info @Stephen_Crown
I’m nearly there with my Daikin, My HAOS server is up and running (generic x64 machine), my MQTT is working and the data is being sent to my server, just need to get the Dupont cables crimped onto the CAT6 cable I’m using to run the ESP32. I had wanted to put it inside the unit and just use jumper cables but I can’t get signal with the cover on so I’m bringing it to the inside wall behind the heat pump.
I do need to come up with an energy metering solution. I don’t really want a raspberry pi or something to manage the CT clamp - so maybe the Tuya clamp that John uses, looks like some kind of ESP32 chip? Is it easy enough to just get it to send the data to my Home Assistant server via MQTT? Edit, having done some reading it seems the Tuya ZIGBEE is best for HA rather than the WiFI - I assume I’d need a Zigbee bridge for this? I’m planning to get one anyway…
Hi @jtrent for I have a rather extensive HA setup.
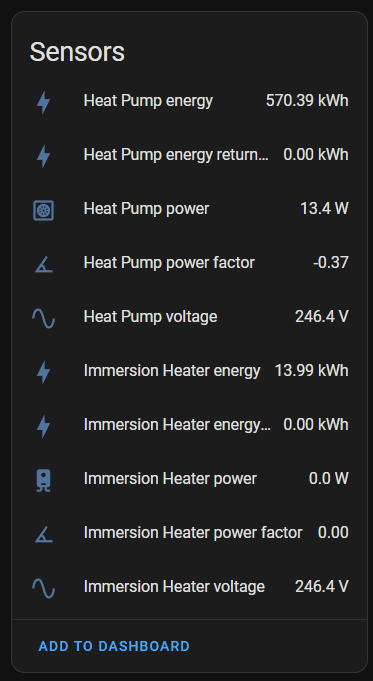
For metering I use the Powerwall and ShellyEM for heat pump and car chargers, they work really well, you can also get Wi-Fi and ZigBee plugs for regular appliance monitoring.
I run HA in a VM and backup daily locally and then to the cloud; you will make mistakes, its good and you learn, but always have a backup to restore from; you will get hooked and put hrs of work in automating everything, we currently have Christmas songs in the bathroom!!!
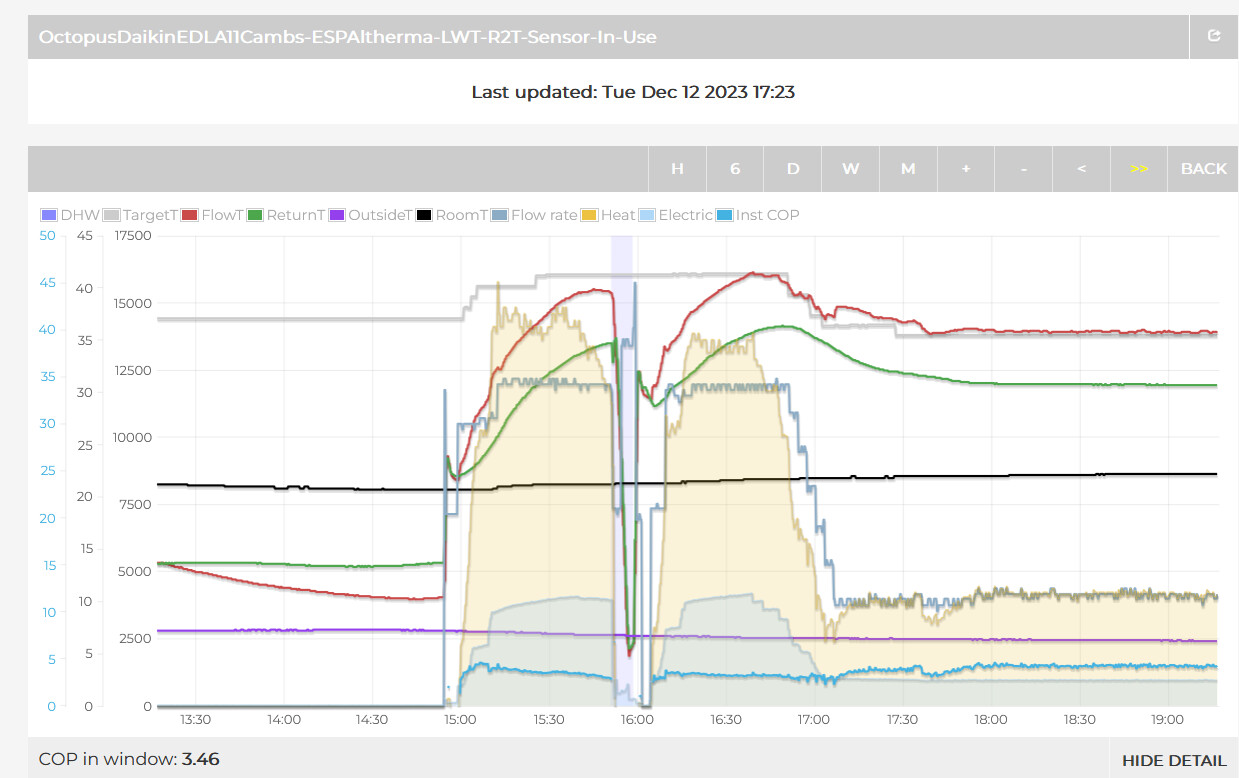
PS looking to log the COP in Grafana for long term stats
Does the Shelly-EM need to be wired into the same phase/supply as the heat pump to operate? Or are those terminals just to control the appliance it’s metering if required? I’m just metering the energy consumption of the heat pump. Ideally I’d like to just power the meter with a 3.3v supply alone.
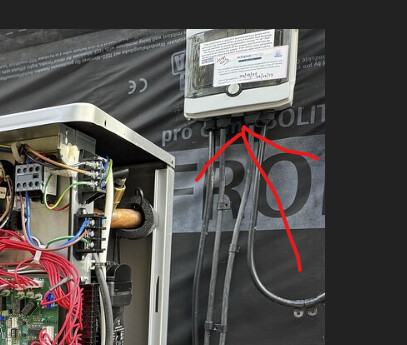
I put the ShellyEM (AC Powered) into the external consumer unit (red arrow), and clamped onto the Heat pump and Immersion feeds (BTW I disabled the Immersion in the MMI)
Love the idea of having it outside the main casing but just be careful with the cat5e as that looks like the internal stuff and it will degrade with exposure to UV over time.
It goes without saying use an electrician to be safe, and make sure everything is isolated.
To power the Shelly, I used the Immersion breaker for the Live and the common Neutral bar, then CT around each Live cable going to the Heat Pump (Make sure you have the direction right giving a positive value for the CT clamp), all within the Octopus Outside Consumer Unit.
Slightly off Topic, but for Zigbee I have two hubs/meshes on different channels -
1 Hue bridge (I need the 50+ light bulbs to just work without Houme Assistant, however it is integrated to trigger automations) and
2 SMLIGHT SLZB-06(M) Zigbee 3.0 to Ethernet, USB, and WiFi gateway coordinator with PoE, works with Zigbee2MQTT, Home Assistant, ZHA - for other devices, blinds, plugs, switches, etc
the 2nd is a good generic hub IMHO as its PoE and no proprietary ZigBee funniness, its also IP so you can run it with a VM and not via USB passthrough or have it directly connected
Thank you for the insights - much appreciated. I’m likely going to put it inside my consumer unit, seems to be the neatest option and I’ve plenty of space.
I’m going to use the wifi for the Shelly, but will get a zigbee bridge/hub eventually. I’m in the tinkering stage of my Home Assistant journey at the moment. I started out with it as a standalone HAOS system on a refurbed mini PC I bought. Almost immediately after that I installed Proxmox instead and have it on a virtual machine instead - just so I can use the same machine in future for other systems such as BlueIris etc.
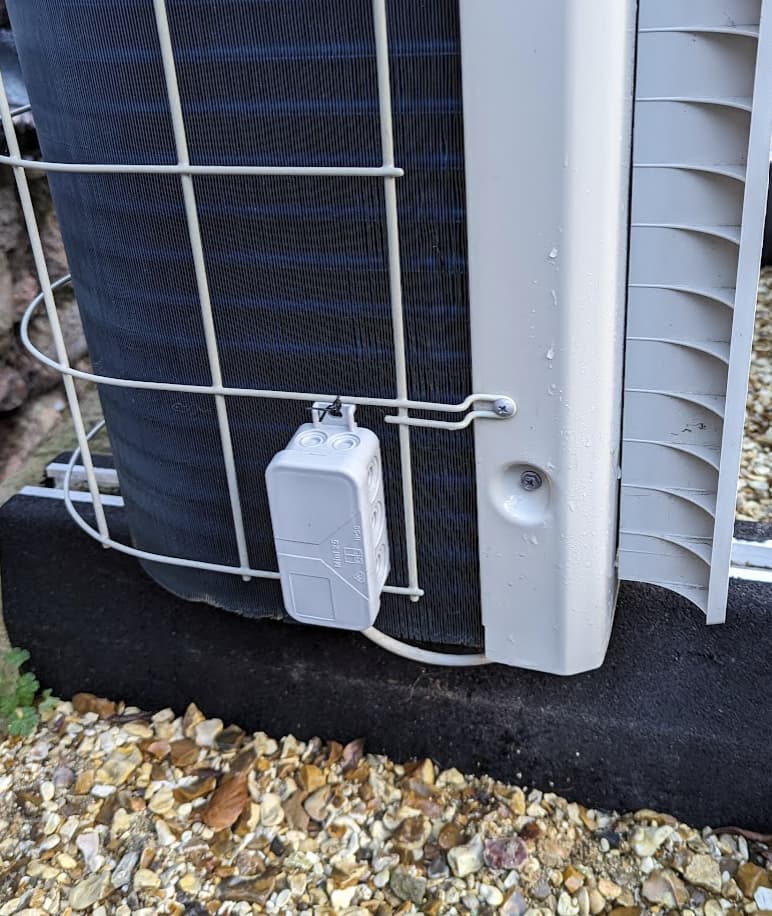
I got my ESPAltherma connected to Home Assistant at the weekend, with a WiFi repeater in an IP66 enclosure near the heat pump and the M5Stick inside the same box.
I have been looking at the formulae in Home Assistant template.yaml.
The “KW Q Heating” formula makes sense - as it is nicely commented!
But I can’t figure out the constants 0.06 and 1.16 in the COP sensor.
I can see that these are broadly equal:
0.06 * 1.16 = 1/60 * 4.184
I have just tweaked the COP Template to avoid, false peaks of COP, negative and positive while the ESPAltherma is waiting for state change from ‘heating’ (I think, the ESPAltherma updates every 30 secs, whereas the shelly is every second), I have set a condition that measures the power draw, ie below 80W the heat pump is idle or just the circulation pump running, so COP is zero, greater than 80W the heat pump its heating, so a COP should be calculated.
- name: "COP"
  unique_id: "espaltherma_cop_2"
  unit_of_measurement: 'COP'
  state: >
      {% if (states('sensor.heat_pump_power') | int >= 80) and is_state_attr('sensor.esp_altherma','Freeze Protection', 'OFF')  %}
      {{
      ((state_attr('sensor.esp_altherma','Flow sensor (l/min)')| float * 0.06 * 1.16 * (state_attr('sensor.esp_altherma','Leaving water temp. before BUH (R1T)') | float - state_attr('sensor.esp_altherma','Inlet water temp.(R4T)')|float) )
      /
      (states('sensor.heat_pump_power') | float /1000 ))
      |round(2)
      }}
      {% else %} 0 {%endif%}
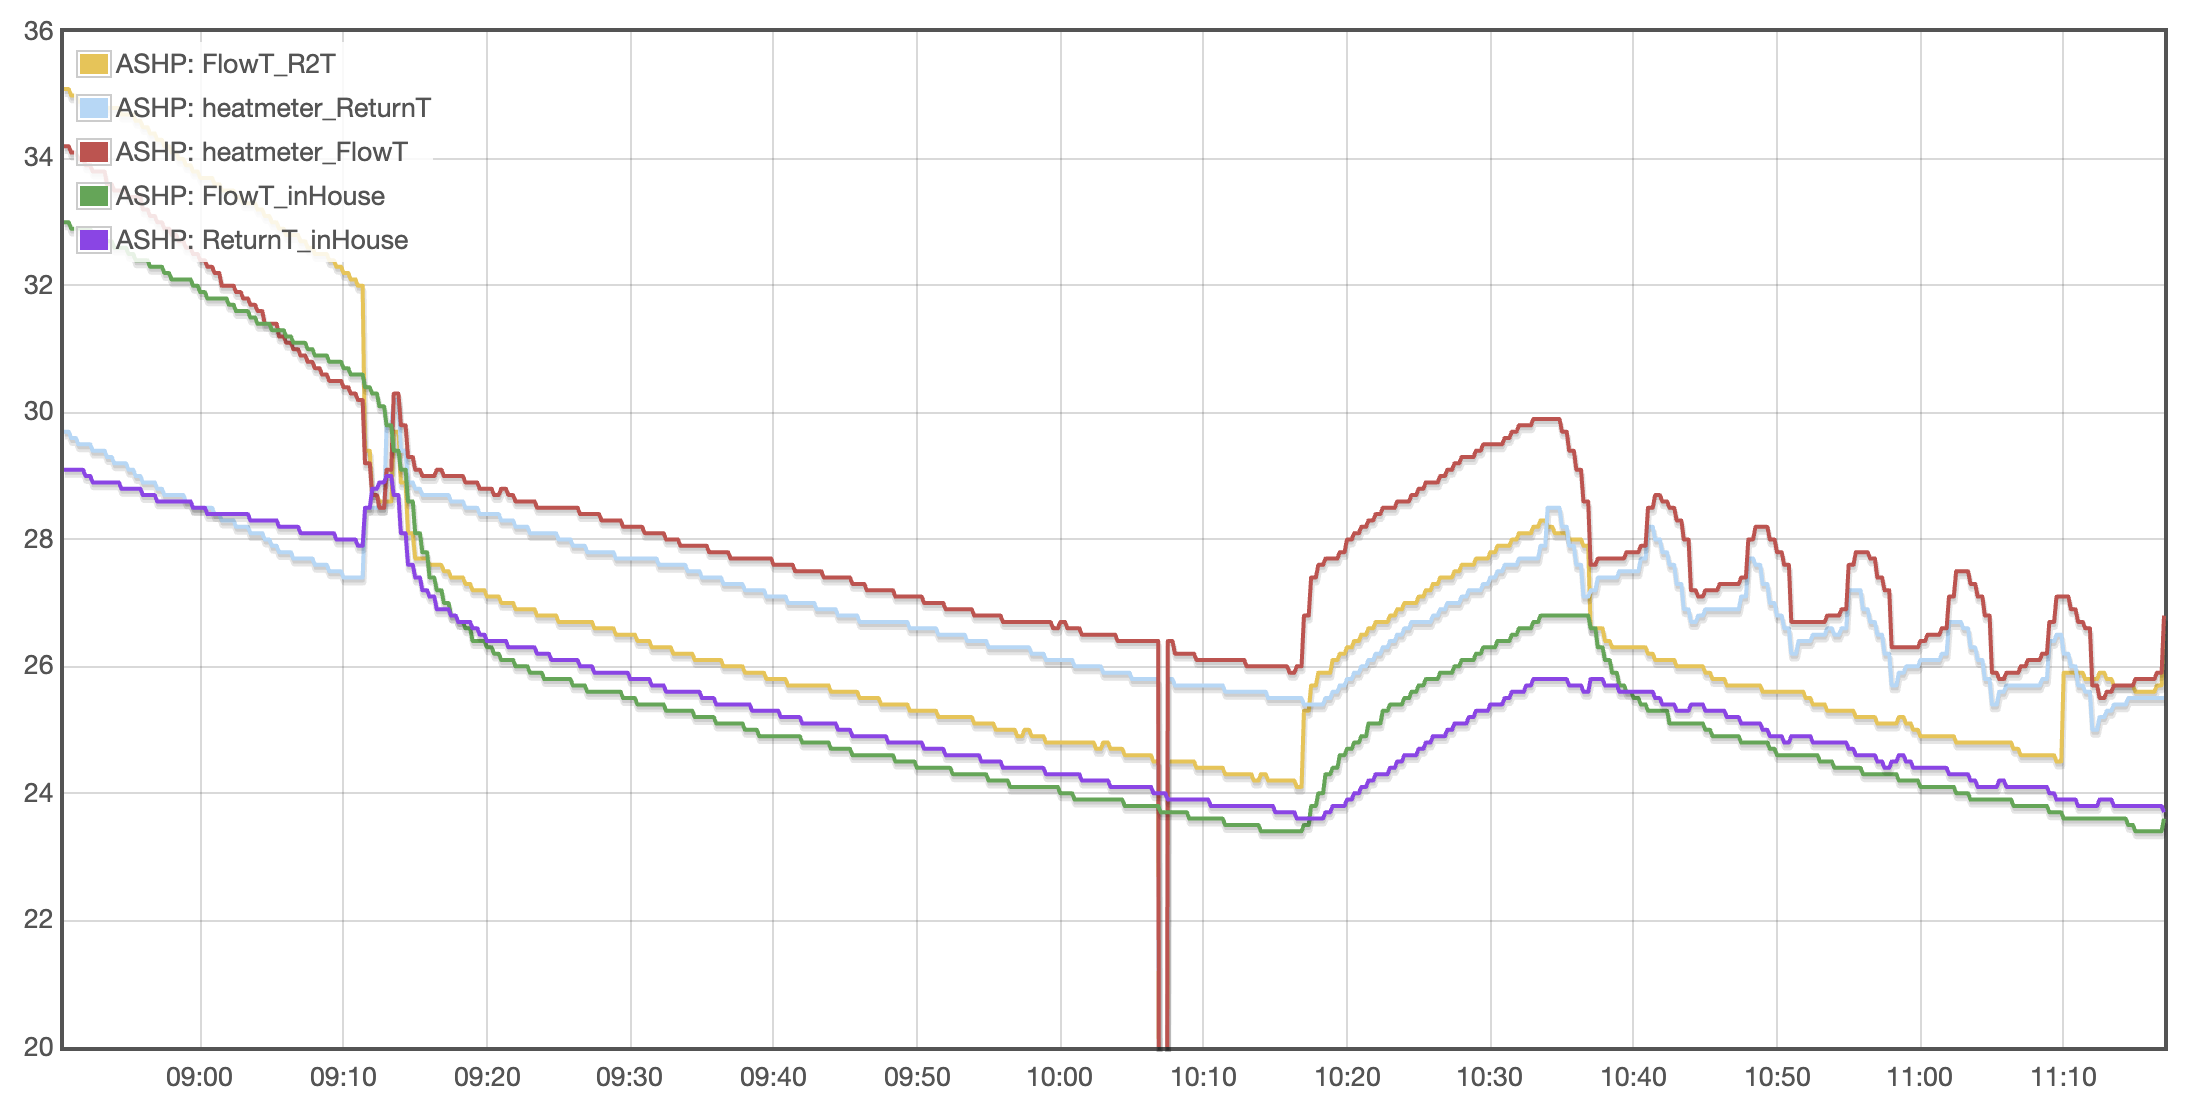
Following my own experiences with ESPAltherma and the use of R1T & R2T (Before and After BackUp Heater respectively), I would suggest that users would be wise to “calibrate” the temperature sensors in the HP prior to using their data for meaningful measurements. These are NOT certified or calibrated sensors, intended for accurate billing measurements, merely devices intended to allow the HP to function.
Simply, by allowing the heating circuit water temperature to even out, one can compare the readings of R1T, R2T and R4T (return flow temperature) directly, and make adjustments to the values received to compensate for variations in thermistor performance. This is probably best done when the heating system is not in use! In my case, given I wanted some reasonable data now (in December), I
manually set the LWT to -10C offset i.e. stopped the compressor working
using Installer mode in the MMI, set [F-0D] to 0 i.e. circulation pump always on
allowed the flow water temperature to drop for an hour or so, at which point it levelled out
took the readings of the three sensors
returned the settings to the normal running state
The observed sensor values were:
R1T - 26C
R2T - 24.1C
R4T - 25.5C
In addition, I have two other independent sensors on the exterior of flow/return pipes in the house, which read the same values within their level of accuracy. I thus had a reasonable degree of confidence that the flow water was at the same temperature throughout the system.
I have adjusted the values received by EmonHub/CMS to account for the difference. As a BUH installation, I’m using R2T and R4T, so I bumped up my received R2T value by 1.4C, using the Process “Add a constant” operation in Inputs. Arguably, I should have adjusted R2T by 1.9 and R4T by 0.5, but I’m not too concerned about R1T-relative values.
I will of course do this again when the heating goes off and it’s not generating DHW, but for now this at least provides some measure of confidence in the critical Flow dT I’m measuring.
good call @John , I do have a DS18b20 with thermal paste in the house measuring the same flow, its tracking and good enough for me to have a baseline and detect anomalies not sure I can stretch the budget for a calibrated system.
If you can though, do the same on the return (inlet), as its not absolute values and their accuracy by themselves that determine heat output (and therefore CoP).
It is the accuracy of the dT between flow (leaving water) and return (inlet) that then gives accuracy to heat output and CoP.
Great to see it tracking so closly for flow on your system though.