I’ve just posted a blog post on PlatformIO, as you will realise I am quite excited about the potential of PalatformIO to make compiling and uploading Arduino and ESP code easier and even compiling and uploading directly from a RaspberryPi to an emonPi. For easy reading, I have copied the post in here below.
I would be interested to hear if anyone else has been using PatformIO and what your experience has been:
Reposted from: Part 1/3: PlatformIO open-source embedded development ecosystem - Blog | OpenEnergyMonitor
Part 1/3: PlatformIO open-source embedded development ecosystem
Getting an Arduino based project (or other embedded platform) to compile and upload can be a pain. Making sure all the libraries are installed in the correct locations and of the correct versions can be tricky and time-consuming.
I’m sure many developers will agree that the tools we use for embedded development are generally not as good as those used for web application development.
The Arduino team have done a good job with their IDE to try and make the embedded development tool-chain setup as easy as possible. However, I still find library management a cause of frustration. Especially since I move between computers and OSes frequently.
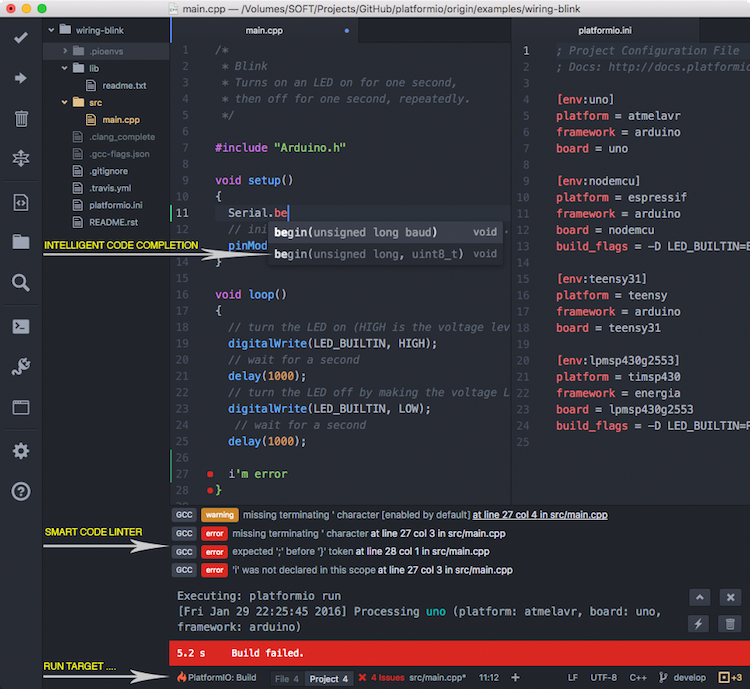
Recently I have been using PlatformIO and am rather impressed with the ease of setup, speed of compilation, uploading (auto port detection), and most importantly an excellent library manager.
PlatformIO is an open-source ecosystem for IoT development.
Cross-platform build system, IDE integration and continuous testing. Arduino, Espressif, ARM and mbed compatible.
This post got quite long, therefore, It’s been split into three posts:
- PlatfomIO overview & compiling + uploading locally and on a Raspberry Pi
- Continuous testing and auto release binary generation using PlatformIO & TravisCI
- Continuous Deployment (OTA to ESP8266)
Here are some things that have impressed me about PlatformIO (pio) after using it for a couple of weeks:
- Fully open-source with active and friendly dev community.
- Easy to install - Pure python based installed using pip
- Tool-chains are auto installed on first compile / upload e.g.
- If trying to upload to Arduino avrdude will automatically be installed
- If trying to compile an ESP8266 project the ESP toolchain will be installed
- Cross-platform (Linux, Windows and mac all work the same), this will make support much easier
- Tool-chains are auto installed on first compile / upload e.g.
- Supports all the main embedded platforms
- atmelavr (Arduino), espressif (ESP8266), ststm32 (ARM etc.)
- Command line and IDE
- At work I use pio via Atom IDE on Ubuntu
- At home, I use a Chromebook with Caret IDE and interact with pio via command-line
- When developing directly on an emonPi / RaspberryPi pio command-line works great - Yes, that’s right pio works on a RaspberryPi to compile and upload code directly!
- Excellent library manager
- Libraries can be searched and reviewed using command-line or web 2.0 manager
- Required libraries can be specified in the
platformio.inifile and if not present install is prompted upon compilation - Specific library version (as defined in
library.json(emonLib example)) or git commit SHA
- Fast compilation & pain-free uploading
- PlatformIO’s compiler is the fastest in the business
- USB / Serial ports auto detected
- Since the emonPi has been added as a custom board PlatformIO can even upload direct to emonPi via RaspberryPi GPIO and trigger GPIO AVR reset, not more hacked avrdude.
- Easy integration with continuous testing & deployment
Example: Compiling emonTx / emonPi firmware
PlatformIO has some excellent quick start docs to cover setting up your first ‘blinky’ project, therefore I will not duplicate here. In this example I focus on setting up pio and compiling emonTx / emonPi firmware. This example assumes a totally bare metal machine with nothing installed except python (2.7 recommended). Pio works great on a Raspberry Pi.
This guide used command-line steps on Linux, if using windows or if you want to use the platformio IDE see PlatformIO Getting Started Page.
The PlatformIO IDE or Atom IDE is excellent and very easy to use (self explanatory). This guide uses pio via command line as this gives a more hands-on experience to how pio is working.
1. Install PlatformIO
The easiest way if running Linux is to install use the install script, this installed pio via python pip and installs pip if not present. See PlatformIO installation docs:
$ sudo python -c "$(curl -fsSL https://raw.githubusercontent.com/platformio/platformio/master/scripts/get-platformio.py)"
2. Clone emonTx / emonPi repo
We’ll use the emonTx (V3 discrete sampling) as an example here but the steps are exactly the same for emonPi.
emonTx V3
$ git clone https://github.com/openenergymonitor/emontx3`
$ cd emontx3/firmware
emonPi
$ git clone https://github.com/openenergymonitor/emonpi`
cd emonpi/firmware
3. Compile with PlatformIO
$ platformio run
or shorthand for the lazy
$ pio run
That’s it! That’s all that’s needed to setup pio from scratch and compile emonTx firmware ![]()
The first time platformIO is run it will ask to install the required libraries (at the specific version) and avr toolchain. The required libraries are defined in platformio.ini in the emonTx discrete sampling firmware folder:
e.g.
lib_deps =
  DallasTemperature @3.7.7
  EmonLib
  JeeLib@c057b5f4c0
Libs version can be defined by github commit ID, version number (git tag) or latest version (no specific version specified.)
The latest version of the libraries are automatically cloned from their native git repos into the .piolibdeps folder in the project dir.
3. Upload using PlatformIO
3a. Via USB to UART programmer to emonTx
$ sudo pio run -t upload
Pio will attempt to auto detect the USB programmer and upload ![]()
Note: you will need sudo unless you have correctly configured udev rules.
There is even a built in serial monitor
$ pio device monitor
3b. Using ttyAMA0 GPIO to upload direct to emonPi
This is where things get very exciting, pio can compile the code directly on a Raspberry Pi. The latest version of pio (due to be released in the next few weeks) will have built in support for the emonPi auto-reset on upload using GPIO4
The emonPi board is defined in platformio.ini in the emonpi/firmware folder:
board = emonpi
upload_port = /dev/ttyAMA0
All that is needed to compile and upload directly on the emonPi is:
cd ~/emonpi/firmware
$ sudo pio run -t upload
Thanks a lot to Ivan Kravets for helping integrate emonPi into the PlatfomIO ecosystem. View commit changes
Stay tuned for part 2/3 of the PlatformIO post series which will cover setting up firmware continuous testing using Travis CI and auto compiled binary generation on release tag directly on github. This is currently live on the emonPi & emonTx repos if you want a sneak preview. See travis.yaml file and Travis build status icon on the main emonpi repo Readme.md.