Since a couple people have asked here a howto for the emontx shield. using a wemos R3 UNO
download the mega version of espeasy
and a copy of arduino IDE - plus install the emonlib - I believe you can do that through manage library now in arduino IDE)
Before you flash uno portion with a basic emonTx fw . there are some slight modifications -
change serial from 9600 to 115200,
disable all unnecessary serial prints
and add these lines
Serial.print(“TaskValueSet,1,1,”); Serial.println(emontx.power1);
Serial.print(“TaskValueSet,1,2,”); Serial.println(emontx.power2);
Serial.print(“TaskValueSet,1,3,”); Serial.println(emontx.power3);
Serial.print(“TaskValueSet,1,4,”); Serial.println(emontx.power4);
and
Serial.print(“TaskValueSet,2,1,”); Serial.println(ct1.Vrms);
Example:
/*
 emonTx Shield 4 x CT + Voltage example

 An example sketch for the emontx Arduino shield module for
 CT and AC voltage sample electricity monitoring. Enables real power and Vrms calculations.

 Part of the openenergymonitor.org project
 Licence: GNU GPL V3

  Authors: Glyn Hudson, Trystan Lea
 Builds upon JeeLabs RF12 library and Arduino

 emonTx documentation: 	http://openenergymonitor.org/emon/modules/emontxshield/
 emonTx firmware code explination: http://openenergymonitor.org/emon/modules/emontx/firmware
 emonTx calibration instructions:
http://openenergymonitor.org/emon/modules/emontx/firmware/calibration

 THIS SKETCH REQUIRES:

 Libraries in the standard arduino libraries folder:
- JeeLib		https://github.com/jcw/jeelib
	- EmonLib		https://github.com/openenergymonitor/EmonLib.git

  Other files in project directory (should appear in the arduino tabs above)
	- emontx_lib.ino

*/

/*Recommended node ID allocation
------------------------------------------------------------------------------------------------------------
-ID-	-Node Type-
0	- Special allocation in JeeLib RFM12 driver - reserved for OOK use
1-4     - Control nodes
5-10	- Energy monitoring nodes
11-14	--Un-assigned --
15-16	- Base Station & logging nodes
17-30	- Environmental sensing nodes (temperature humidity etc.)
31	- Special allocation in JeeLib RFM12 driver - Node31 can communicate with nodes on any network
group
-------------------------------------------------------------------------------------------------------------

emonhub.conf node decoder:
See: https://github.com/openenergymonitor/emonhub/blob/emon-pi/configuration.md

[[6]]
    nodename = emonTxShield
    firmware =emonTxShield
    hardware = emonTxShield
    [[[rx]]]
   names = power1, power2, power3, power4, Vrms
   datacode = h
   scales = 1,1,1,1,0.01
   units =W,W,W,W,V

*/

#define FILTERSETTLETIME 5000                                           //  Time (ms) to allow the filters to settle
before sending data

const int CT1 = 1;
const int CT2 = 1;                                                      // Set to 0 to disable
const int CT3 = 1;
const int CT4 = 1;

   /*
#define RF_freq RF12_433MHZ                                                // Frequency of RF12B module can be
RF12_433MHZ, RF12_868MHZ or RF12_915MHZ. You should use the one matching the module you
 have.
const int nodeID = 6;                                                  // emonTx RFM12B node ID
const int networkGroup = 210;                                           // emonTx RFM12B wireless network group -
needs to be same as emonBase and emonGLCD

#define RF69_COMPAT 0 // set to 1 to use RFM69CW
#include <JeeLib.h>   // make sure V12 (latest) is used if using RFM69CW
*/
#include "EmonLib.h"
EnergyMonitor ct1,ct2,ct3, ct4;                                              // Create  instances for each CT channel

// Note: Please update emonhub configuration guide on OEM wide packet structure change:
// https://github.com/openenergymonitor/emonhub/blob/emon-pi/configuration.md
typedef struct { int power1, power2, power3, power4, Vrms;} PayloadTX;      // create structure - a neat
way of packaging data for RF comms
PayloadTX emontx;

const int LEDpin = 9;                                                   // On-board emonTx LED

boolean settled = false;

void setup()
{
  Serial.begin(115200);
   //while (!Serial) {
    ; // wait for serial port to connect. Needed for Leonardo only

  //Serial.println("emonTX Shield CT123 Voltage example");
  //Serial.println("OpenEnergyMonitor.org");
  //Serial.print("Node: ");
  /*Serial.print(nodeID);
  Serial.print(" Freq: ");
  if (RF_freq == RF12_433MHZ) Serial.print("433Mhz");
  if (RF_freq == RF12_868MHZ) Serial.print("868Mhz");
  if (RF_freq == RF12_915MHZ) Serial.print("915Mhz");
 Serial.print(" Network: ");
  Serial.println(networkGroup);
   // }
   */
  if (CT1) ct1.current(1, 60.606);                                     // Setup emonTX CT channel (ADC input,
calibration)
  if (CT2) ct2.current(2, 60.606);                                     // Calibration factor = CT ratio / burden resistance
  if (CT3) ct3.current(3, 60.606);                                     // emonTx Shield Calibration factor = (100A /
0.05A) / 33 Ohms
  if (CT4) ct4.current(4, 60.606);

  if (CT1) ct1.voltage(0, 146.54, 1.7);                                // ct.voltageTX(ADC input, calibration,
phase_shift) - make sure to select correct calibration for AC-AC adapter
http://openenergymonitor.org/emon/modules/emontx/firmware/calibration. Default set for Ideal Power
adapter
  if (CT2) ct2.voltage(0, 146.54, 1.7);                                // 268.97 for the UK adapter, 260 for the Euro and
130 for the US.
  if (CT3) ct3.voltage(0, 146.54, 1.7);
  if (CT4) ct4.voltage(0, 146.54, 1.7);

  /*rf12_initialize(nodeID, RF_freq, networkGroup);                          // initialize RFM12B
  rf12_sleep(RF12_SLEEP);
*/
  pinMode(LEDpin, OUTPUT);                                              // Setup indicator LED
  digitalWrite(LEDpin, HIGH);


}

void loop()
{
  if (CT1) {
    ct1.calcVI(20,2000);                                                  // Calculate all. No.of crossings, time-out
    emontx.power1 = ct1.realPower;
 //  Serial.print(emontx.power1);
    Serial.print("TaskValueSet,1,1,"); Serial.println(emontx.power1);
  }

  emontx.Vrms = ct1.Vrms*100;                                            // AC Mains rms voltage

  if (CT2) {
    ct2.calcVI(20,2000);                                                  // Calculate all. No.of crossings, time-out
    emontx.power2 = ct2.realPower;
   // Serial.print(" "); Serial.print(emontx.power2);
     Serial.print("TaskValueSet,1,2,"); Serial.println(emontx.power2);
  }

  if (CT3) {
    ct3.calcVI(20,2000);                                                  // Calculate all. No.of crossings, time-out
    emontx.power3 = ct3.realPower;
  //  Serial.print(" "); Serial.print(emontx.power3);
     Serial.print("TaskValueSet,1,3,"); Serial.println(emontx.power3);
  }

   if (CT4) {
     ct4.calcVI(20,2000);                                                  // Calculate all. No.of crossings, time-out
    emontx.power4 = ct4.realPower;
  //  Serial.print(" "); Serial.print(emontx.power4);
     Serial.print("TaskValueSet,1,4,"); Serial.println(emontx.power4);
  }

 // Serial.print(" "); Serial.print(ct1.Vrms);
   Serial.print("TaskValueSet,2,1,"); Serial.println(ct1.Vrms);

// Serial.println();
  delay(100);

  // because millis() returns to zero after 50 days !
  if (!settled && millis() > FILTERSETTLETIME) settled = true;

  if (settled)                                                            // send data only after filters have settled
  {
  //  send_rf_data();                                                       // *SEND RF DATA* - see emontx_lib
   digitalWrite(LEDpin, HIGH);
    //delay(2000);
   // Serial.print("help ");
    delay(2); digitalWrite(LEDpin, LOW);      // flash LED
    delay(2000);                                                          // delay between readings in ms
  }
}
On your Wemos R3 uno
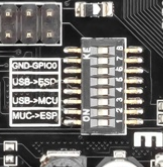
change the jumper to 3 and 4 to on and the rest off set arduino IDE to Arduino/Genuine UNO and flash the above firmware. (the firmware is set for my local conditions you will have to change it for yours)
Once done unplug the wemos R3 change the the jumpers to flash the ESP
changing the jumpers to 5,6 and 7 to on and the rest to off
holding the esp reboot button plug in the wemosR3 again -
start the mega espeasy software – ESP.Easy.Flasher
( if font folder opens up along with the program you will need to install the require font but not necessary it will just display funny but is still usable)
Select the com port that your wemos R3 is connected to.
Select the firmware > ESP_easy_mega-XXXXXXX_normal_ESP8266>4046.bin
Select post Flash action ----- add in your particulars
example:
Unit - EnergymonR3 number 1 (password if you want)
WIFI - what ever your local setting are
then press > flash ESPEasy FW
wait about 5 minutes or until it says done-- chances are it will not display the IP of the unit you will have to obtain that off your router manually .
once you finished flashing the ESP portion of the Wemos device unplug device again change the jumpers to 1 and 2 on and the rest to off.
now plug it in again you now can use the power adapters to power it. log into your router to obtain the devices ip if you have not it already. it will be listed with the Unit name ie :EnergymonR3 ( from above example)
once you are log into the espeasy go to devices and create a dummy device with the name of taskvalueset
(edit; it seams at first it did not seam to work with out the use the term of taskvalueset for the name-- but after it starts collecting data you can change it whatever name you choose- probably bug in the version of espeasy that I use)
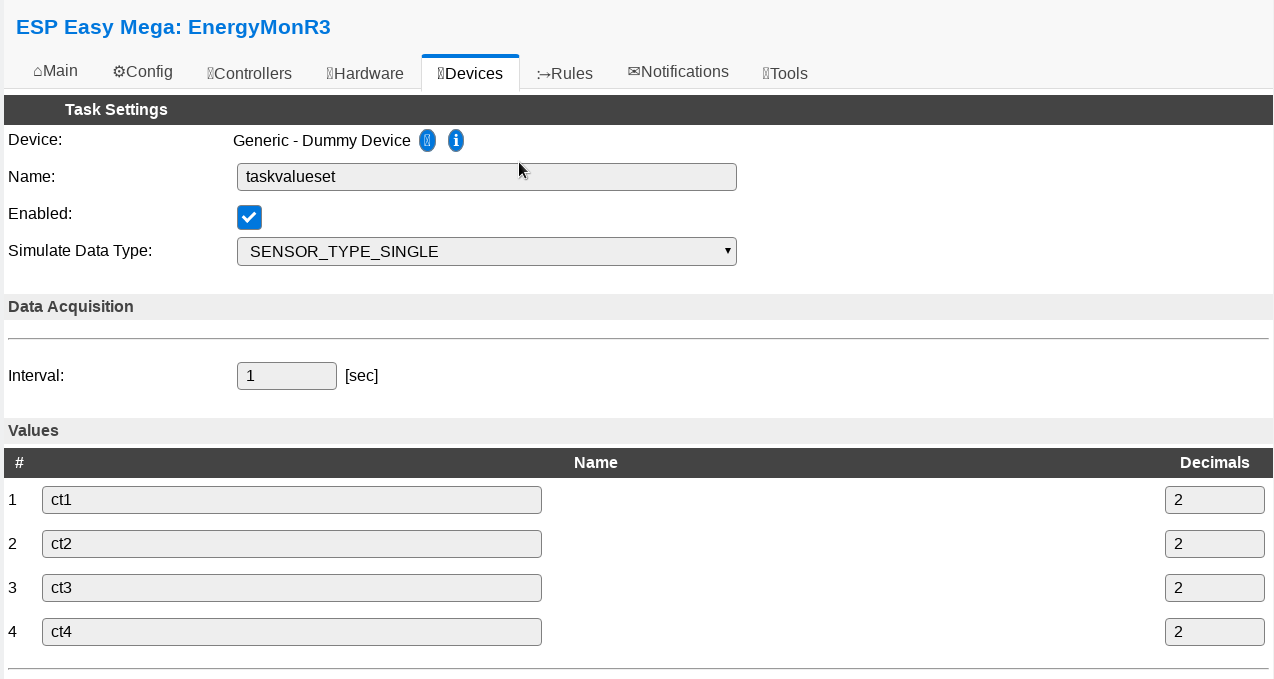
create a second dummy device with the name taskvalueset2 for your volts
once done you will receive the info from arduino – emoneTx Shield

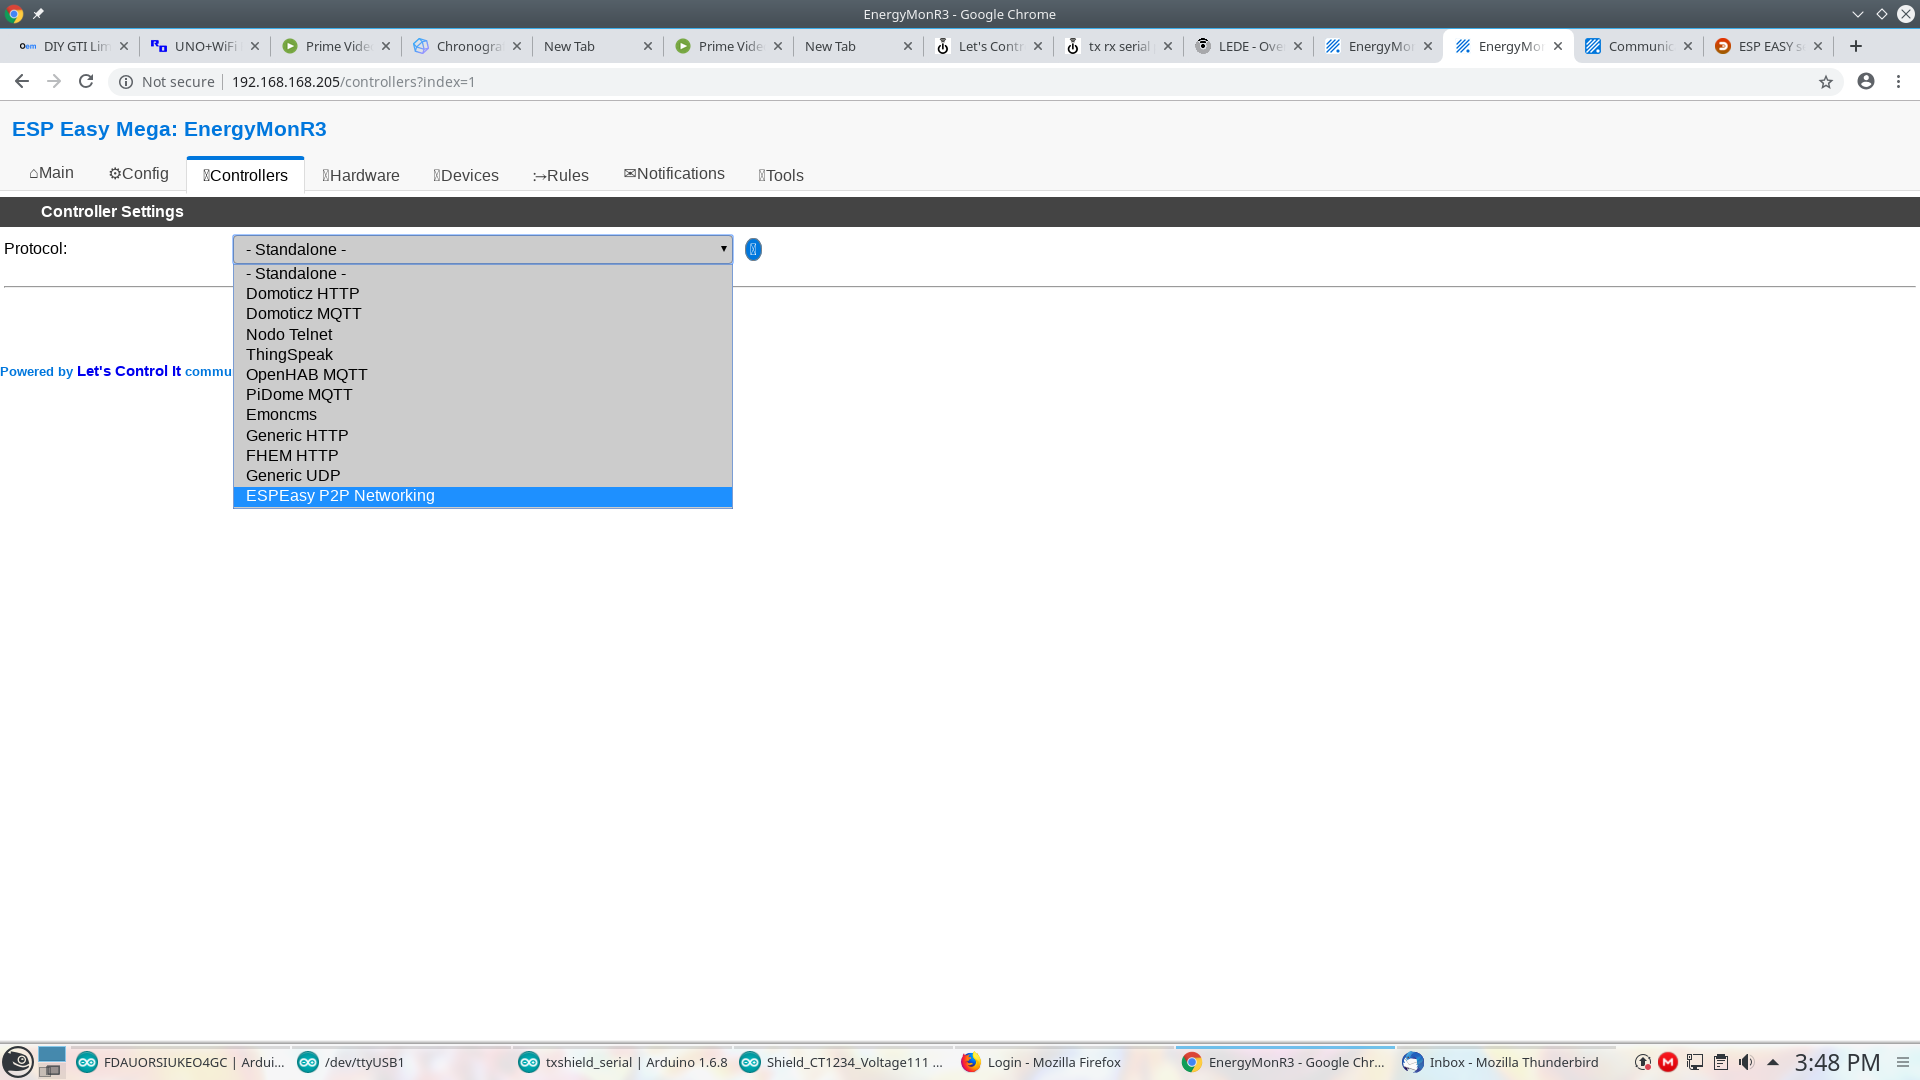
once it is working you can can then add in what ever controller you wish to use :
and you are now finished
good luck have fun
