Emoncms Demand Shaper module

Updated: 12 March 2019

The emoncms demand shaper module uses a day ahead forecast and user set schedules to determine the best time to run household loads. An example could be charging an electric car, the user enters a desired completion time and charge duration, the demand shaper module then works out the best time to charge the car, generally there will be higher power availability overnight and during sunny midday hours. The demand shaper attempts to avoid running appliances at peak times while ensuring that the appliance has completed the required run period.

The demand shaper supports the following forecasts:

  • UK Grid Carbon Intensity forecast
  • Agile Octopus tariff forecast
  • EnergyLocal power availability forecast

Github: GitHub - emoncms/demandshaper: Appliance, Smartplug, OpenEVSE demand scheduler: Find the best time to run household loads

See extended discussion on demand side response here:
https://community.openenergymonitor.org/t/openenergymonitor-demand-side-response-development/9095/2

See the github repository readme for the installation guide and requirements:
https://github.com/emoncms/demandshaper

The demand shaper process publishes the schedule configuration to a MQTT topic that the device subscribes to, e.g:

emon/smartplug1/in/ctrlmode On/Off/Timer
emon/smartplug1/in/timer 1300 1600

There are a number of interesting elements that happen behind the scene when the demand shaper module is used in conjunction with the latest emoncms & device module and EmonESP firmware for the Sonoff S20. I have copied in the guide for using the demand shaper module with the sonoff s20 plug from the readme here for illustration. Note the sections “What happened here?” :slight_smile:

Using the Demand Shaper module with a SonOff S20 smart plug

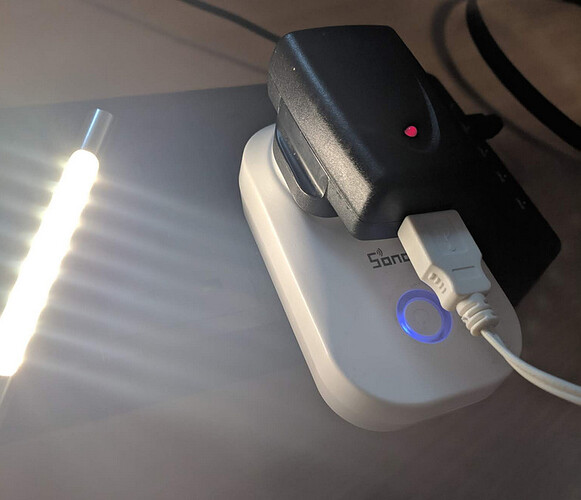
Install the EmonESP (timer branch) firmware on a Sonoff S20 smartplug. There are pre-compiled binaries to make this step easier as well as the option to compile from source. See guide here:
https://github.com/openenergymonitor/EmonESP/blob/timer/sonoffS20.md

User guide

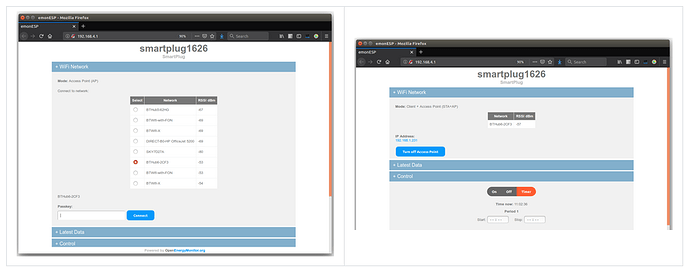
1. The Sonoff S20 smartplug creates a WIFI access point, connect to the access point and enter home WIFI network. That is all the configuration required.

2. Connect back to your home WIFI network. Login to emoncms and navigate to the DeviceShaper module (in the extras menu). Wait until a popup appears asking to connect:

What happened here?: The smart plug discovers the emonbase/emonpi automatically by listening out for the periodic UDP packet published by the emonbase/emonpi, enabled by the UDP broadcast script and triggered by keeping the demandshaper page open

3. After clicking allow and waiting a minute or so, the smart plug will then appear:

What happened here?: The smart plug received the MQTT authentication details from the emonbase/emonpi automatically as part of a pairing process enabled by clicking on Allow. After connecting to MQTT the smartplug sent a descriptor message that automatically created and configured an emoncms device based on the smartplug device template in the emoncms device module.

4. Configure a schedule and wait for the plug to turn on!

The module currently supports the following day-ahead forecasts:

  • Octopus Agile tariff
  • UK grid carbon intensity forecast
  • EnergyLocal Bethesda trial forecast

Updated: 12 March 2019
3 Likes

From my experience, the cloud cover forecasts compared to what is actually generated and when can be very different. Note I am referring to SE Queensland (Australia), so different forecasts. Even so I find it very challenging. I have tried using sky observing cameras, satellite images (30 minute delay) and the cloud cover forecasts. To date I have only achieved load matching with a level of priority.

I hope this module works out well.

Thanks @whatsupskip yes I imagine that integrating local weather forecasting will be the harder challenge :slight_smile: this is a longer term goal for the module with the use of available forecasts (carbon intensity, octopus agile) the primary starting point.

Do you have any examples of the differences in forecast and actual (both good and bad)? What forecast service did you use?

Could you elaborate on, sounds interesting:

Making progress on the demand shaper module development.

In particular section 5, bullet point 3 & 4 from: OpenEnergyMonitor Development Plan Outline - #6

  • automated and regular schedule recalculation to attempt to improve schedule timing based on newer forecasts.
  • re-scheduling of schedules in progress, take into account time already run and time left to run in re-scheduled run period.

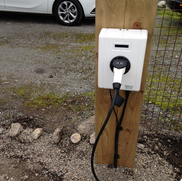
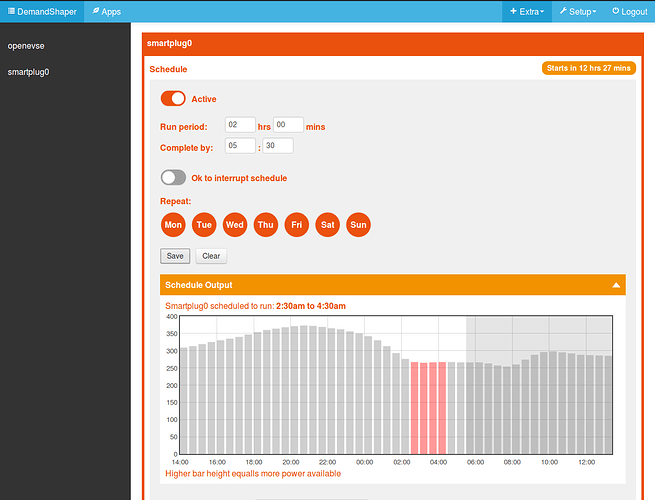
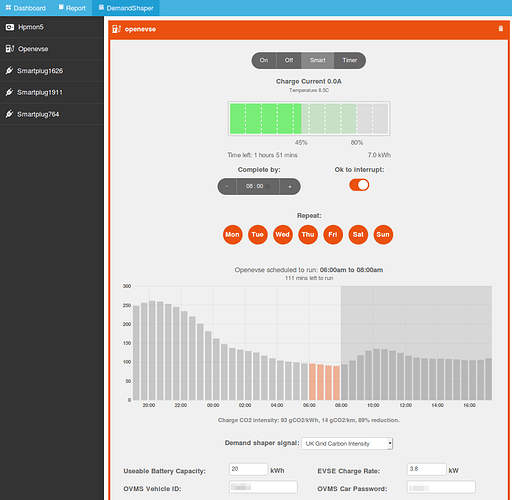
This is now implemented and in testing. I have been using the module to charge my EV via an EmonEVSE, setting the schedule every evening, e.g ready for 8am, charge for 1 or 2 hours. The module then finds the best time and reschedules multiple times as more up to date forecasts from the UK grid carbon API become available.

image

To enable this I have added OpenEVSE support to the module using the $ST set charge period command. Here’s an example log of the schedule recalculation through the night:

2018-12-04 23:08:00 emon/openevse/rapi/in/$ST 6 0 7 30
2018-12-05 00:09:00 emon/openevse/rapi/in/$ST 4 0 5 30
2018-12-05 01:09:00 emon/openevse/rapi/in/$ST 4 30 6 0
2018-12-05 02:09:00 emon/openevse/rapi/in/$ST 5 0 6 30
2018-12-05 03:09:00 emon/openevse/rapi/in/$ST 5 30 7 0
2018-12-05 04:09:00 emon/openevse/rapi/in/$ST 6 0 7 30

It just so happens that the adjustments ended up coming back to the original schedule in this example, but that’s unusual.

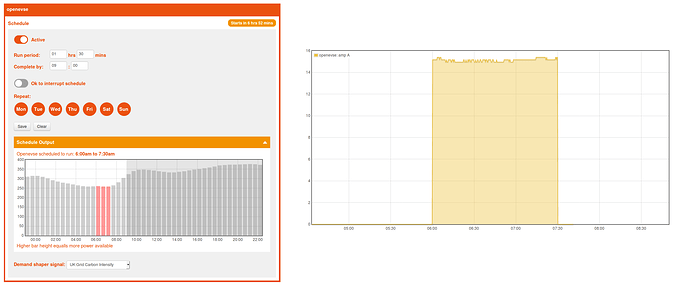
Screenshot of schedule created last night and resulting charge this morning:

There is also a new sidebar menu and a link in the emoncms Extra’s menu to the demand shaper:

I’ve updated the original post above to reflect the current state of the demandshaper module. There has been a lot of work done to improve how the module works and talks to: smartplugs, openevse, heatpump control since the last update.

A number of key changes are:

  • EmonESP used by the smartplug, wifi relay and heatpump monitor now uses a timer based scheduling command rather than simple on/off state. This means that once the device has been scheduled by the demand shaper module, the device can continue to follow the last set schedule independently of the basestation.
  • The latest EmonESP firmware allows for turning on/off the device and setting the timer in the EmonESP interface, the state is reported back to the demand shaper module, so that the state is kept in sync.
  • Initial device discovery is all done via the demand shaper module rather than having to go via the inputs interface.
  • The interface has had a significant overhaul to make it more responsive and usable on mobile devices
  • There are now new interfaces specifically for EV car charging and Heatpump control

Demand Shaper module modes of operation:

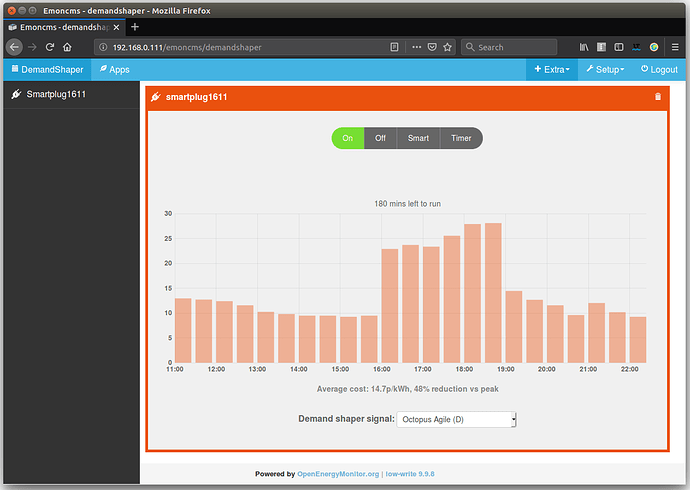
Option 1: Turn On/Off directly

The most basic mode of operation, turn on/off device from the interface:

Option 2: Use the smart scheduler

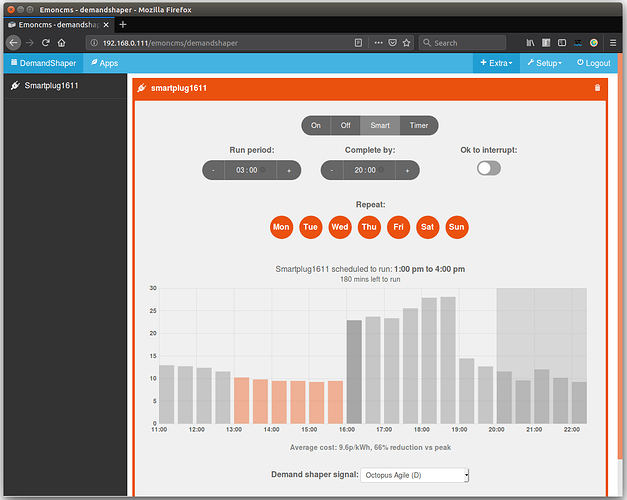
Enter the period and end time of the schedule you wish to set and the demand shaper module will do the rest, automatically optimising the schedule for the lowest cost or lowest carbon time.

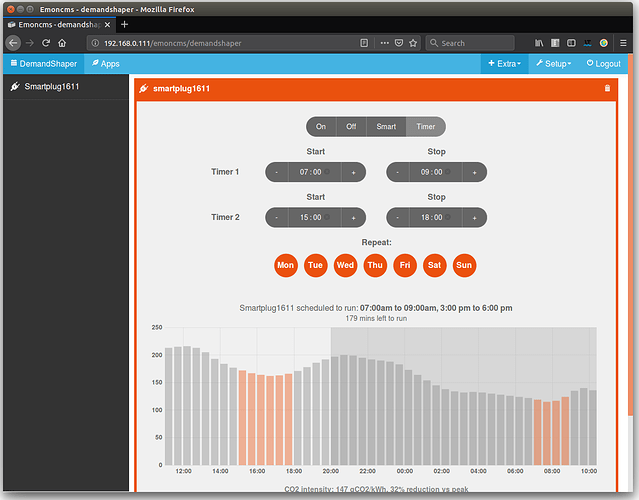
Option 3: Set a manual timer:

Set a manual timer for specific run times:

OpenEVSE / EmonEVSE electric car charger interface

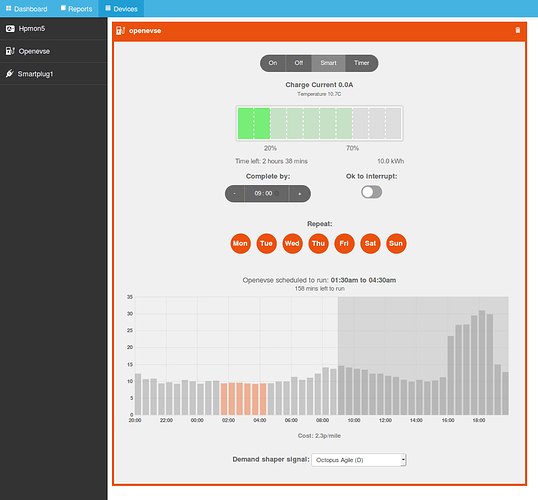
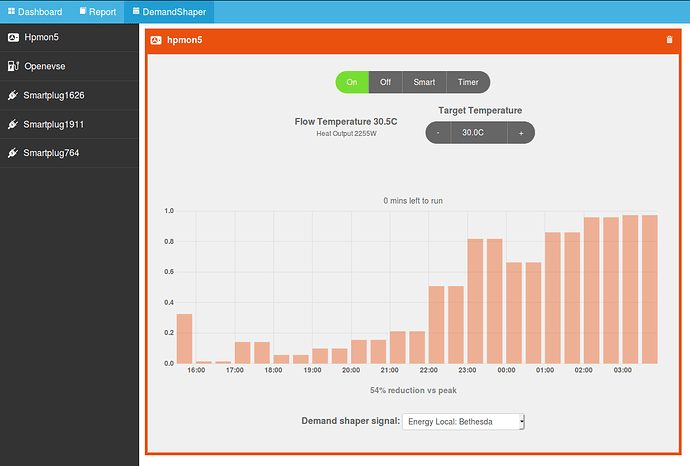
The module contains custom interfaces for applications such as EV charging where you can drag drop the battery level state of charge to the desired target, the module then calculates the required run time based on the battery size and charger charge rate (hard coded at present, but will be configurable from the interface):

Heatpump Control

Integrates the ability to control a Mitsubushi EcoDan heatpump with FTC2B controller connected to the OpenEnergyMonitor HeatpumpMonitor. Flow temperature and heating On/Off is settable from the interface. The heatpump control does not yet make use of the smart scheduling side of things, but that’s something I would like to explore in time.


I use both the OpenEVSE and Heatpump control interface myself day in day out. Having everything in one place, being able to easily switch between heatpump and ev charge control and then to the heatpump app module dashboard is really nice.

1 Like

Remote Control using MQTT remote access and the DemandShaper module

The DemandShaper module works with the MQTT remote access concept discussed here:
https://community.openenergymonitor.org/t/emoncms-remote-access-concept-using-mqtts/10154
allowing for remote control of devices wherever you are.

This can of course be done with services such as dataplicity as well. I currently use a mixture of both as I test & develop and where I need remote SSH access & full web ui access.

The potential promise of the basic MQTT remote access route (if it scales ok) is that it provides a way to integrate remote access directly into a remote emoncms installation combining benefits of both remote access to a local emonbase/emonPi and loading heavier html,css,javascript directly from the remote server. The remote access is only a basic & user restrictable emoncms API tunnel, it does not provide more advanced features such as SSH access, but it provides enough functionality to view feeds, graphs, emoncms apps and also control things - any action that is possible via the emoncms api.

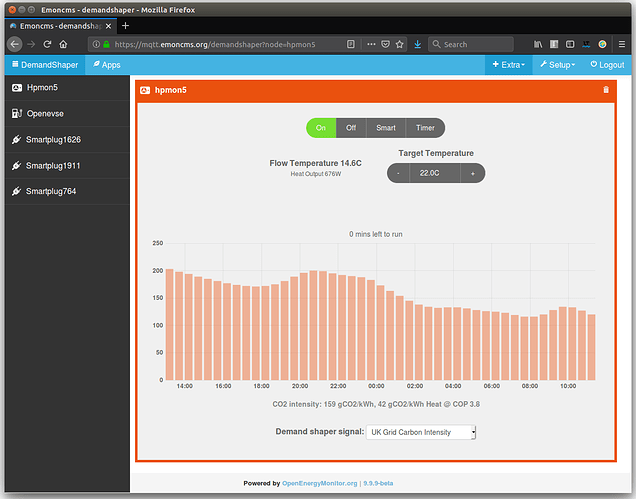
Here’s a screenshot of the same heatpump control interface above but now via our remote access test site, I’ve also changed the demand shaper signal to grid carbon: mqtt.emoncms.org:

Development next steps
The above is still work in progress. While a functional stage for initial testing, there is a lot that can be improved.

EV Charging

  • Read EV state of charge automatically for integration in interface using OpenVehicles module https://www.openvehicles.com
  • Add settings for EV battery capacity and EVSE charge rate, so that charge period is calculated for different EV models and charge rates.
  • Add balancing charge time when 100% charge is selected.
  • Add option to favour charging nearer time of departure even if price is a little higher in order to reduce the amount of time the EV battery is at a high state of charge.

Octopus Tariff Integration: ability to select from the regional octopus agile tariff options (it is hard coded to region D at the moment):

Reporting of scheduling results, e.g this month on average you charged the car at 140gCO2/kWh or at 10 p/kWh. Graph of averaged daily charge profile to demonstrate reductions in peak-time consumption.

Develop a hybrid approach that combined tariff forecasts with real-time solar data as discussed OpenEnergyMonitor Demand Side Response Development

Example of controlling the WIFI Relay module for hot water heating, incorporating temperature sensing in order to calculate ‘state of charge’ of hot water cylinder and therefore ‘charge time’ for use with the demand shaper algorithm. The same approach could be used with storage heaters.

Hi @TrystanLea

This all looks great, just what I am needing, thanks for all the effort.

I have one other smartplug scenario I personally would like to see. A setting where a plug is on except when electricity cost is above a certain threshold with perhaps a safety setting where off time cannot exceed a second threshold.

I see this used for freezers and dehumidifiers. We live in an old damp cottage and use dehumidifiers. They don’t come on very often but as we are just about to go on Octopus Agile tariff it makes sense not to let them come on at peak cost.

Thanks @ian, That’s a good idea, it looks like dehumidifiers will be a common application for the EnergyLocal project we are involved in that’s using the above as well, plenty of old damp cottages here in North Wales :slight_smile:

With @glyn.hudson’s help earlier we now have the OpenEVSE interface working with OpenVehicles to pull in the car’s SOC, the battery capacity and charge rate are also specifiable:

OVMS integration is documented here:

Any updates on how this is coming along?

Hi
There have been a number of changes to demandshaper over time as @TrystanLea is working on improvements.
It is getting getting better bit by bit.
Are you self hosted?
If so I would do a git pull on demandshaper.

I had a play with it a few months ago but functionality was a bit limited. I use agile Octopus but you can’t change the region at the moment for one example and I just wondered if any further developments had happened yet.

Trystan has advised that the Agile regions will be made selectable. My understanding is that the current development is aimed at making the whole setup more robust before adding features.

Yes, we’re planning to make the region easily configurable. If you want you can edit the region by editing the API call directly

Currently the API is hard set to GSP Group D (Merseyside and Northern Wales)

Here is an example of how to edit the API taken from: Octopus Energy Integration · Issue #175 · OpenEVSE/ESP8266_WiFi_v2.x · GitHub

The relevant API call is: https://api.octopus.energy/v1/products/{product_code}/electricity-tariffs/E-1R-AGILE-18-02-21-{gsp_id}/standard-unit-rates/

Where product_code for the Agile tariff is AGILE-18-02-21 (I dont think this will change but worth bearing in mind it is a parameter) and where gsp_id corresponds to the GSP Group ID as found in the MPAN https://en.wikipedia.org/wiki/Meter_Point_Administration_Number#Metered_Supply_Point.

Note that some DNO’s are associated with more than one GSP group.

So for a customer in GSP Group D (Merseyside and Northern Wales) the URL would be:

https://api.octopus.energy/v1/products/AGILE-18-02-21/electricity-tariffs/E-1R-AGILE-18-02-21-D/standard-unit-rates/

This should return a JSON with the unit prices for each 30 minute period.

Hi guys, I’m trying to get the demand shaper working with a SonOff S20 loaded with the emonESP timer branch.

The smartplug is not being discovered. How could we go about debugging this?

On a separate note, I’ve also tested loading the S20 with tasmota 6.6.0 and am able to publish mqtt to the emonbase.

Hi

Have you logged direct into the ESP in Access point mode and set the WiFi up first. If so you should be able to see the IP address allocated to the ESP on your network. You then access the ESP at the allocated address. From there you can set up MQTT. There are a few issues with the MQTT defaults and you may need to complete broker address, port, credentials and password and hit save. I don’t know what they are as I have a custom broker. Once you hit save the ESP shows MQTT connection status. Until you are connected nothing will happen. I have found it sometimes takes quite a while to connect and I re-enter the broker IP address and hit save several times to get it to connect.

Thanks. All good now got it working. Had to do a bit of waiting and refresh the module page.