How to set up freeboard IoT for use with emontx sheild and other purposes
to get emontx shield to connect you will need to be able to send mqtt to do so,
just install a esp8266 to it and and follow these direction.
Simple daughter board to transmit emontx shield data, web, mqtt etc - #7 by stephen
getting started
- I did this on a ubuntu mini laptop but it will apply to
raspberry pi / orangepi or other linux compatible devices with some slight
modification
Setting up apache server and node red
sudo apt update
sudo apt upgrade
sudo apt install apache2 ( not really needded but good to have)
- Make sure you have the mod_headers Apache module installed. to do this check
out /etc/apache2/mods-enabled/ and see if there’s a ‘headers.load’ in there. If
there isn’t then just
sudo ln -s /etc/apache2/mods-available/headers.load
/etc/apache2/mods-enabled/headers.load
add line to /etc/apache2/apache2.conf
Header set Access-Control-Allow-Origin “*”
this is required only if you want to send json directly to freeboard
Reload apache server.
sudo /etc/init.d/apache2 reload
sudo apt install mysql-server mysql-client
sudo apt-get install php libapache2-mod-php php-mcrypt php-mysql
sudo apt install nodejs
sudo apt install nodejs-legacy
sudo apt install npm
sudo apt install git
npm install -g grunt-cli
make directory for you Iot server ( use sudo when installing with npm )
cd ~
mkdir IoTServer
cd IoTServer
git clone GitHub - node-red/node-red: Low-code programming for event-driven applications
cd node-red
npm install
grunt build
We can now run the nodered server with the command node red.js -v. I use -v at
the end to see if any error crops up and also to see if any node modules are
missing, and need to be installed.
you can install node modules arduino, rpi-gpio, redisout and mongodb if you like .
If you going to use them, we just need to install them with the npm tool.
. If we want to change the bind address or add authentication, we should change the settings.js file.
Take a look at http://nodered.org/docs/configuration.html for more information, and start
nodered with: node red.js -v -s settings.js
to access node red localhost;1880 in your browser
We can now start designing our nodered workflows that receive data from the
esp8266 via MQTT protocol or even by simple REST based HTTP protocol, process
it and store the data payload, if any.
For storing data into a database, we can use MongoDB, or mysql,
For mysql we can do:
cd ~/IoTServer/node-red
npm install bignumber.js require-all readable-stream
npm install mysql
npm install node-red-node-mysql
restart nodered. The mysql node should be available now in
storage pallet.
to start automatically in ubuntu just use startup application and enter it in there to start on boot
Step 2a: Installing Mosca MQTT broker (Alternative 1 for the MQTT Broker)
We can use several brokers, Mosca or mosquitto here how to install Mosca
cd ~
sudo -s
sudo npm install mosca bunyan -g
And to run it just do: mosca -v | bunyan
For running it with websockets enabled, on TCP port 3000, just do:
mosca -v --http-port 3000 --http-bundle --http-static ./ | bunyan
Step 2b: Mosquitto MQTT broker with Websockets support (Alternative 2 for the
MQTT Broker - )
sudo apt install mosquito
sudo apt install mosquito-client
/etc/mosquitto or some other directory and add the following lines, for example
at the end of the file:
listener 1883
listener 9001 127.0.0.1
protocol websockets
Then we run it with:
mosquitto -c /etc/mosquitto/mosquitto.conf
mosquitto will become an automatic service after install mosca you will need to setup as a service or start with start up application
Step 3:
Installing freeboard two options for install ( the first one is the easiest,
but will require you to make
node red flows - but also is the most compatible)
install node red contrib freeboard
Just install this plugin in your Node Red installation root directory by using npm:
npm install node-red-contrib-freeboard
if you get an install error create a directory in node modules folder called
freeboard and try again
restart node red
and to access freeboard
by entering in yourURl of your browser :
localhost:1880/freeboard
now you can send mqtt and other functions,easily to freeboard by connecting
mqtt to the freeboard in node red
second option for freeboard
cd ~/IoTServer
git clone GitHub - Freeboard/freeboard: A damn-sexy, open source real-time dashboard builder for IOT and other web mashups. A free open-source alternative to Geckoboard.
For now we’ll just use apache to serve the freeboard dashboards that is
installed in my server. Because freeboard is not installed on the root web
directory we need to make the freeboard available to Apache. The easiest way to
do this, as long as Apache has the FollowSymLinks option enabled for the
document root, is to create a link to the freeboard directory on the web
document root:
sudo -s
cd /var/www/html
ln -s /home/(your account name)/IoTServer/freeboard iot
And now freeboard is available at the url http://myserveraddres/iot.
now install mqtt plugin for freeboard
download freeboard-mqtt from
GitHub - alsm/freeboard-mqtt: MQTT and IBM IoT Foundation plugins for freeboard.io
To use these plugins within your own copy of freeboard copy the files into a
directory where freeboard will be able to see them, such as plugins/thirdparty
in the freeboard main directory
You will also need a copy of the paho mqtt javascript library (
https://raw.githubusercontent.com/eclipse/paho.mqtt.javascript/master/src/
mqttws31.js) and will need to insert the link to it into the following sections
in the plugin files
“external_scripts” : [
“”
],
To load the plugins in your instance of freeboard you will have to add them to
the list used to initialize freeboard, for example below is a section of the
default index.html that I have extended to load the two plugins.
you can install other freeboard plugin if you wish just follow the howto on
the respective pages:
suggested;
freeboard-jqplot
freeboard-flot-extended
freeboard-dynamic-highcharts
to install plugins in the node red version freeboard. just search node modules folder
for the freeboard directory and and follow the same direction as above
good luck have fun
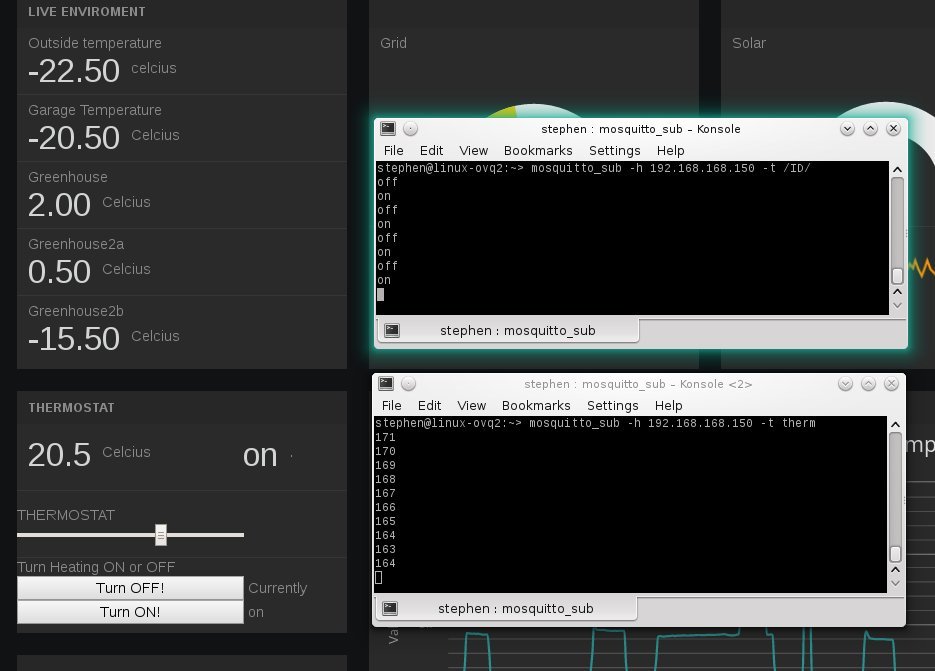
 - installed all my other modules into free board . reconfigured freeboard to have multiple display pages… end product looks good and easy on the eyes. displays nice on a tablets. tvs and computers. used framing ( iframe did not work that well) and multiple freeboard index pages (index1, index2 …etc) configured differently to handle stuff (I e dimming and controlling lights and thermostats in the dwelling page)