Howto prepare a BananaPI R1 (BPI-R1) for EMONCMS, Freeboard and others

Preparing a BPI- R1 for your IOT Data logging software such as EMONCMS, FreeBoard (and others)- actually the BPI-R1 is pretty nice- little bit of a bugger to configure off the top to get networking to work but works very nice afterwards…

here a simple howto for preparing BPi-R1.

fist download your image for your version of BananaPI

http://www.banana-pi.org/r1-download.html.

I used bananian as my base.

https://www.bananian.org/download

extract and write your image to your SD card
in windows use Win32 Disk Imager
in linux it is by commandline

dd if=bananian-1604.img of=/dev/<your-sd-card> bs=1M && sync

or use SUSE Studio Imagewriter ( which is what I use)

after you finish writing your image to your SD card insert into your bPI-R1 and boot up with your network cable connected
log in with putty/ ssh (ssh root@IPADDRESS) or connected directly with
root and the password pi

Preparation

Make sure the system is up to date:

apt-get update
apt-get upgrade

once that is done:

Run ​bananian-config

to edit configuration ie: password, keyboard, timezone …etc

Install needed software:

apt-get install bridge-utils iptables-persistent nethogs dnsmasq

Now Reboot

shutdown -r now or Ctrl-Alt-Del (if connected directly)

Configuration

swconfig — switch configuration

nano /etc/network/if-pre-up.d/swconfig

the base file is already configured in bananian all you need to do is edit out

exit 0
change it to #exit 0

save and exit

save => Ctrl-x then y then Enter

Interfaces

nano /etc/network/interfaces

edit your interface config to this adjusting the IPs to match your configuration

auto lo
iface lo inet loopback

allow-hotplug eth0
allow-hotplug wlan0
#link aggregation = use 2 Ethernet-Connections (bond0) to increase the speed
##### ** LAN config VLAN 1** ##########################
##### receive IP-Address from your DSL modem or cablemodem
auto eth0.101
iface eth0.101 inet dhcp
##### * LAN config VLAN 2, for the 4 ports * ###############
##### generate IP-Address for connected devices
auto eth0.102
iface eth0.102 inet manual
##### ** WLAN config ** ###############################
##### generate IP-Address for connected devices
auto wlan0
iface wlan0 inet manual
# you can take this option if you have a ​/etc/init.d/hostapd
# post-up service hostapd start
# -B run daemon in the background
# post-up hostapd -dB /etc/hostapd/hostapd.conf
# post-down, actions taken right after the iface is down
post-down rm -rf /run/hostapd/wlan0
##### ** Bridge config ** ###############################
auto br0
iface br0 inet static
bridge_ports eth0.102 wlan0
bridge_waitport 0
address 192.168.9.2
network 192.168.9.0
netmask 255.255.255.0
# ​adjust the gateway to your configuration​, to match your internet gateway
gateway ​192.168.0.1

Configuring dnsmasq

Configure the IP-Addresses:

mv /etc/dnsmasq.conf /etc/dnsmasq.conf.example

nano /etc/dnsmasq.conf

edit/add these to your config file

interface=br0

listen-address=127.0.0.1
domain=home
domain-needed
bogus-priv

dhcp-range=192.168.9.150,192.168.9.250,24h

dhcp-host=dc:9f:dc:dc:dc:dc,192.168.9.149

Save and exit.

Configure DNS:

nano /etc/hosts

add this to your host conf

192.168.9.2    router

Save and exit nano.

Enable dnsmasq

​nano /etc/default/dnsmasq

Look for the line that says:
ENABLED=0
and change it to:
ENABLED=1

Turn on IP forwarding in the Kernel:

to enable make changes here:

nano /etc/sysctl.conf

​and uncomment line

net.ipv4.ip_forward=1

IPTABLES

to get VLans to talk to each other

iptables -t nat -A POSTROUTING -o eth0.101 -j MASQUERADE
iptables-save > /etc/iptables/rules.v4

now reboot and you should have a functioning router ( as an option reboot before entering and saving your iptables then you can pre test your firewall rules once they are working then save them)

For easier configuration install webmin (optional)

  apt-get install perl libnet-ssleay-perl openssl libauthen-pam-perl libpam-runtime libio-pty-perl apt-show-versions python

  wget http://prdownloads.sourceforge.net/webadmin/webmin_1.840_all.deb

   dpkg --install webmin_1.840_all.deb

if you need 1:1 NAT function on the router I found this to be the easiest way:

nano /etc/network/if-pre-up.d/swconfig

edit to look like this to create a third Vlan

ifconfig eth0 up
swconfig dev eth0 set reset 1
swconfig dev eth0 set enable_vlan 1
swconfig dev eth0 vlan 101 set ports '3 8t'
swconfig dev eth0 vlan 102 set ports '0 1 2 8t'
swconfig dev eth0 vlan 103 set ports '4 8t'
swconfig dev eth0 set apply 1

save and exit

then edit interface

nano /etc/network/interfaces
Based on the above for mention interface config file

iface eth0.101 inet dhcp

change this line to:

iface eth0.101 inet manual

then add these lines to it

auto eth0.103
iface eth0.103 inet manual

auto br1
iface br1 inet dhcp
bridge_ports eth0.101 eth0.103

save and exit

reboot

now the routers first 3 ports will assigned IPs for private network
the last two will act as bridge between each other for public IPs

-if installing NTOPNG it has issue with the and will crash but that because the version is abit outdated. but NTOP works fine if you wish to monitor both internal and external ports use the bridges br0 and br1 and or only one eth0.10X vlan
otherwise ntop will complain about identical MAC

Now you can install emoncms or FreeBoard (and others to capture your IOT data) from other howtos

emoncms/LinuxInstall.md at master · emoncms/emoncms · GitHub

A Howto install freeboard with MQTT for emontx shield

next project converting old MXQ android tv box to a armbian for my kids piano keyboard and turning sound station
http://mxqproject.com/files/MXQ-Debian-8/MXQProject-Linux-Desktop/

okay good luck have fun…
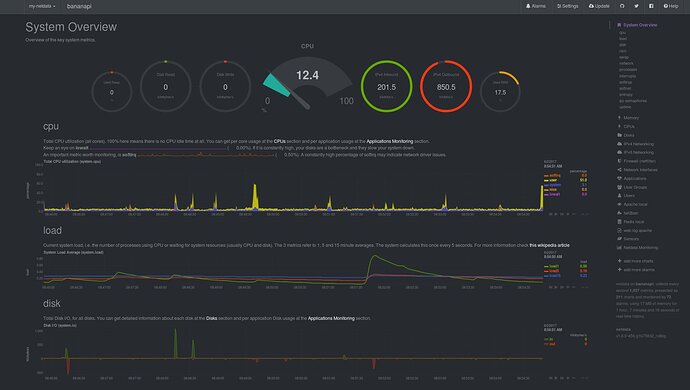
just a small update to this Banana pi R1 - it works very nice . i was able you pull out my routers, NAS, and armbian IOT manager . and every thing run from one small pi… . currently the this bpi-r1 runs at 12% so it not exactly over worked. until you boot up desktop then it runs at 75%. so thats the only reason i might buy the bpi-r2.

– but here are some added software details to make it easier for others–
install Bandwidthd - tell the usage of users on your network
fail2ban - intrusion detection
or ntop - logs webages and usage of user and even the protocol they are using. so if you are wondering what your kids are doing on the web. this give you a pretty good break down of it…
samba - for the NAS to set up the shared network drive

apt-get install apache2 samba
apt-get install fail2ban bandwidthd

set bandwithd set to br0 interface

#NTOP
ntop slight slightly broken on install to fix install ntopng first before installing ntop it installs the missing dependency then just uninstall right after ( ntopng is a newer version of ntop but give less detail then ntop but also not very stable on pi’s- stick to ntop)

apt-get install ntopng
apt-get remove ntopng
and then
apt-get install ntop

set to br0 interface

it seems sometime on setup the rdd folder will be locked just do this after you install it
chown -R nobody:nogroup /var/lib/ntop

it also it installs broken as serviceon a pi . ( it does not draw the usage and communication graphs. stop the service and disable it and set it up to run at boot through cron ( use webmin to do this)

#netdata
to view router Realtime data display ( webbased ) install netdata - it looks pretty good and has a very small foot print.
basically just use this script to install

bash <(curl -Ss https://my-netdata.io/kickstart.sh) all

again you can use cron to set it up to run on boot

( curiously if will display data for sma inverters too )

#SNMP
snmp - (remote network device monitoring)

wget http://sourceforge.net/projects/net-snmp/files/net-snmp/5.7.3/net-snmp-5.7.3.tar.gz

apt-get install libperl-dev libtool

tar -xvzf net-snmp-5.7.3.tar.gz

cd net-snmp-5.7.3/
./configure

make
make install
apt-get install snmp-mibs-downloader
apt-get install snmpd

/etc/init.d/snmpd start
test if working
snmpget -v 2c -c public 127.0.0.1 SNMPv2-MIB::sysUpTime.0
snmpwalk -v2c -c public localhost system

nano /etc/snmp/snmp.conf

#mibs :

nano /etc/snmp/snmpd.conf

 #  Listen for connections from the local system only
 #agentAddress  udp:127.0.0.1:161
 #  Listen for connections on all interfaces (both IPv4 *and* IPv6)
agentAddress udp:161,udp6:[::1]:161


view   all         included   .1                80
rocommunity public  default    -V all

service snmpd restart

Now you can log your metric in cacti, observium , zabbix and other SNMP capable monitoring software ( thought at the moment I am trying to get influxdb and grafana (32 bit version) installed with influxsnmp on my pi --then I might might migrate to that as IOT manager over my current method – it such a pretty dashboard )
#Desktop Enviroment
for desktop:
xfce4
apt-get install xorg xfce4 xfce4-goodies hicolor-icon-theme gnome-icon-theme xfce4-power-manager

or lxde
apt-get install task-lxde-desktop

reboot and startx at login

just a small python script for the bananapi-r1 or r2 it just displays the real-time network usage on a LCD screen-- I really like these r1 and r2s you can make pretty nice router with them… and they work well hosting my IOT and NAT as well

lcd.py.zip (2.3 KB)

So I am almost ready to order the Banana Pi R2 in order to replace my NetGear home DSL Router and was wondering if anyone has tried to use the Banana-Pi-R2 as a DSL Router? I know OpenWRT is finicky when it comes to wireless chipsets. If anyone has used this as a DSL Router please let me know. I am eager to hear back please E-Mail me at:

[email protected]

Thanks You in advance…

-Brian-

here a link for you that list the pro/con of LEDE (openwrt) and the banana pi R2

from the doc–

Supported Features

Support WIFI module(package package/utils/wmt) (New)

Two pre-program image and one upgrade package are generated (New)

Add uboot package to this project(package/boot/uboot-mtk-bpi-r2) (New)

Two Ethernet interfaces and switch works

Both PCIe0 and PCIe1 works

sysupgrade tool is supported (New)

Both SATA interfaces works

Limitations

Both HDMI and MIPI interface do NOT work

PCIe2 (which is shared with USB3.0) does NOT work

BPI-R2 New image : Openwrt/LEDE 2017-09-08

Summary

The linux kernel from LEDE does’t work on banana-pi R2 board so far, so we are using the banana-pi R2 Linux 4.4.70 kernel and LEDE file system to make this image.

“”"""""""""""""""""""""""""""""""""""""""""""""""""""""""""
so it should work fine the wireless and all with the custom R2 image( with some limitations) -

But as a suggestion – the R1 has currently much better support in LEDE( directly support by openwrt images) as currently the R2 is a custom image only so you might have to install openwrt build system as well if you wish to compile extra software for openwrt using the latest firmware for it GitHub - garywangcn/bpi-r2_lede: Mirror of https://git.lede-project.org/?p=source.git Please send your PRs against this tree. They will be merged via staging trees and appear in this tree once the staging trees get merged back into source.git

But the R1 work wonderfully as a DSL router and openwrt as I currently Use mostly the BPI R1 as custom Router over the R2 platform and openwrt due to current ease of use . as building R2 image can take hours and hours to do…

here the link to Bpi R1 (lambo-r1) Index of /releases/17.01.4/targets/sunxi/generic/

Good Morning Stephen,
I just purchased and received a Banana Pi R2 and am looking forward to start programming it with the ultimate goal of using it as a home DSL switch/router. I would love if i could get ALL the ethernet ports working as well as the USB. I am eager to hear of your progress as you have posted here. Have you made any further progress in regards to getting full functionality using OpenWRT/LEDE.

-Brian-

you can get it to work using the above for mentioned links and following the instruction on the page. everything should work for you that you asked about. currently the hdmi does not work. so after it copied to the sd and you boot off it. you need to ssh via the network 192.168.1.1 or web interface . fully functioning lede not quite yet as it still in development stage hence why I suggested the R1

Excellent thank you!