Dumb question: I’ve updated to v 5.0, I read I should change the configuration.yaml file but I can’t find any file in HA but the general configuration.yaml that I assume is not the one.
Any help?
Yes that is the correct file.
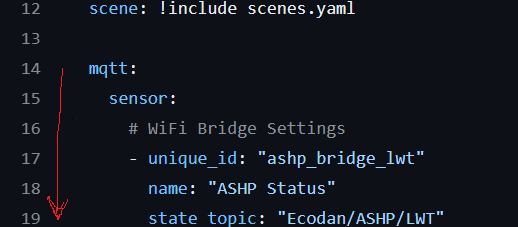
I generally just copy from the mqtt: line and below to stop any duplication conflicts, add that to the end of your configuration.yaml file.
As Ben said, yes that’s the correct file
You can copy & paste the lines all the lines if the file is currently identical - or as Ben said, copy from line 14 in the example onwards

Thank @Tango130 and @F1p for answering.
Adding from the MQTT line at the bottom of the file returns some errors.
Here’s my config file, it already has template and sensors listed, not sure if adding at the bottom will do the trick.
homeassistant:
  packages: !include_dir_named packages

default_config:
  template: !include template.yaml

# Load frontend themes from the themes folder
frontend:
  themes: !include_dir_merge_named themes

automation: !include automations.yaml

script: !include scripts.yaml

python_script:

scene: !include scenes.yaml

system_log:
  fire_event: true

device_tracker:
  - platform: luci
    host: 192.168.10.1
    username: admin
    password: XXXXXXXXX

energy_meter:
  daily_energy:
    source: sensor.power_meter_energia_importata_dalla_rete
    name: Daily Energy
    cycle: daily
    price_entity: sensor.pun_prezzo_fascia_corrente

  monthly_energy:
    source: sensor.energy
    name: Monthly Energy
    cycle: monthly
    price_entity: sensor.pun_mono_orario

http:
  use_x_forwarded_for: true
  trusted_proxies:
    - 172.30.33.0/24

# Example configuration.yaml entry
google_assistant:
  project_id: XXXXXXXXXXX
  service_account: !include SERVICE_ACCOUNT.json
  report_state: true
  exposed_domains:
    - switch
    - light
  entity_config:
    switch.kitchen:
      name: pirris
      aliases:
        - BRIGHT_LIGHTS
        - ENTRY_LIGHTS
    light.living_room:
      expose: false
      room: SALOTTO

template:
  - sensor:
      - name: "House power Consumption"
        unique_id: "house_power_consumption"
        unit_of_measurement: "W"
        device_class: power
        state_class: measurement
        state: >
          {% set meter_potenza = states('sensor.power_meter_potenza_attiva') | float %}
          {% set inverter_potenza = states('sensor.inverter_potenza_attiva') | float %}
          {{ (inverter_potenza - meter_potenza ) | float(0) }}

      - name: "Overproduction Company Injection"
        unique_id: "solar_power_Overproduction"
        unit_of_measurement: "W"
        device_class: power
        state_class: measurement
        state: >
          {% set meter_potenza = states('sensor.house_power_consumption') | float %}
          {% set inverter_potenza = states('sensor.inverter_potenza_in_ingresso') | float %}
          {% set battery = states('sensor.battery_potenza_di_carica_scarica') | float %}
          {{ (inverter_potenza - meter_potenza - battery ) | float(0) }}

      - name: "Consumo EDP"
        unique_id: "Consumo_EDP"
        unit_of_measurement: "W"
        device_class: power
        state_class: measurement
        state: >
          {% set consumo_rete_edp = states('sensor.power_meter_potenza_attiva') | float %}
          {{ (consumo_rete_edp * (-1) ) | float(0) }}

      - name: "energy_pv"
        unique_id: "PV Energy"
        state: >
          {{ (states('sensor.inverter_rendimento_giornaliero') | float) - (states('sensor.battery_scaricamento_totale') | float) + (states('sensor.battery_carica_totale') | float) }}
        device_class: power
        state_class: total_increasing
        unit_of_measurement: 'kWh'

      - name: "energy_pv_daily"
        unique_id: "PV Energy daily"
        state: >
          {{ (states('sensor.inverter_rendimento_giornaliero') | float) - (states('sensor.battery_scarica_giornaliera') | float) + (states('sensor.battery_carica_giornaliera') | float) }}
        device_class: power
        state_class: total_increasing
        unit_of_measurement: 'kWh'
You will need to add the entities under templates from @F1p 's into your templates section and the rest should be able to be appended.
Cool thanks, working now!
But how can I chose the holiday mode and other stuff?
Which card should I use?
(if you’ve youe own code please paste ![]() )
)
In Home Assistant you can now go + Add Card from one of your Dashboards
Then Choose Entities:
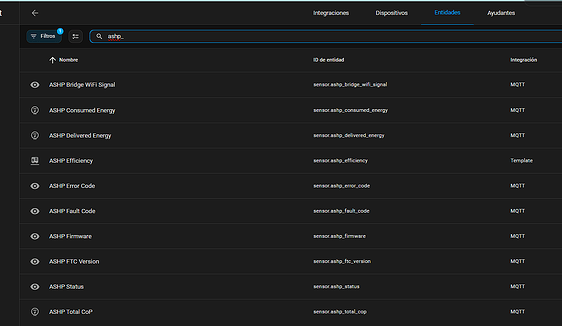
The Heat Pump ones should appear in the list now
e.g.
@F1p I have 2 DHW tank temperature probes attached to my FTC6.
THW5B is the normal DHW temperature probe but I also have THW5A attached that is the upper temperature probe. This is standard on the newest Ecodan cylinders but I’ve added it myself.
It allows you to have a temperature probe near the coil (THW5B) that is used during a reheat to decide the target temperature is reached but a separate probe (THW5A) higher up the cylinder that can be set as the one to monitor for temperature drop to trigger the recharge.
When you have both you can choose between Large (trigger based on THW5B) or Standard (trigger of THW5A) in the ‘DHW Recharge’ setting.
This is confusingly enabled using the following DIP switch

even though it doesn’t appear to change any behaviour except to enable this 2nd temperature sensor.
After all that waffle my actual question is do you think this temperature might me one of the ones that haven’t been identified yet? It would be useful to have access to this temperature as then I can also use it in Home Assistant to make decisions about reheating.
Are you able to Telnet to your Ecodan Bridge and send me the output displayed after “Triggering Heat Pump Query” has output the rows and it pauses?
In addition, what the value of THW5A & 5B is displaying at the same time so i can see if i can correlate the value.
Thanks!
Thanks @ajdunlop for providing your debug output, i hope you can try this out:
Excellent all working, thank you for the quick work.
Hi all, @F1p I’m checking your work with ecodan bridge and it’s very good. I’ve some questions about that. Is it possible connect esp32 or only 8266? I’m trying connect esp8266 for two day and I can’t. Wifi manager show and I connect but when I connector to ecodan nothing occurs. My board is a V3 nodemcu esp8266 340ch. In your code, you uses pins 16 and 14 and in my case the gpio16 is for user (led). Maybe I’m doing something wrong. Could you help me?
I did some features with some pull request in the broker repository and I would like test your last contributions.
Regards,
@limkinZero
My devices are based on Witty ESP8266 board - so yes compatible with your nodemcu.
-
You are powering board via CN105? - Ground will need to be connected to CN105 to provide a reference
-
Pin numbers seem to be different, on nodemcu GPIO 5 (Code) = D1 (Board) and GPIO 4 (code) = D2 (board)
-
If above is ok, can you Telnet to the IP and provide debug output?
Hi, thanks for reply.
I answer you.
-
You are powering board via CN105? - Ground will need to be connected to CN105 to provide a reference. Yes, the board is connected too CN105
-
Pin numbers seem to be different, on nodemcu GPIO 5 (Code) = D1 (Board) and GPIO 4 (code) = D2 (board). Yes, I use those pins.
- If above is ok, can you Telnet to the IP and provide debug output? Of course.
Welcome 192.168.1.72
(Use ^] + q to disconnect.)
\Triggering Heat Pump Query
Init 3
Send Message 1
fc, 42, 02, 7a, 10, 02, 00, 00, 00, 00, 00, 00, 00, 00, 00, 00, 00, 00, 00, 00, 00, 30,
Send Message 2
fc, 42, 02, 7a, 10, 03, 00, 00, 00, 00, 00, 00, 00, 00, 00, 00, 00, 00, 00, 00, 00, 2f,
Send Message 3
fc, 42, 02, 7a, 10, 04, 00, 00, 00, 00, 00, 00, 00, 00, 00, 00, 00, 00, 00, 00, 00, 2e,
Send Message 4
fc, 42, 02, 7a, 10, 05, 00, 00, 00, 00, 00, 00, 00, 00, 00, 00, 00, 00, 00, 00, 00, 2d,
Send Message 5
fc, 42, 02, 7a, 10, 07, 00, 00, 00, 00, 00, 00, 00, 00, 00, 00, 00, 00, 00, 00, 00, 2b,
Send Message 6
fc, 42, 02, 7a, 10, 09, 00, 00, 00, 00, 00, 00, 00, 00, 00, 00, 00, 00, 00, 00, 00, 29,
Send Message 7
fc, 42, 02, 7a, 10, 0b, 00, 00, 00, 00, 00, 00, 00, 00, 00, 00, 00, 00, 00, 00, 00, 27,
Send Message 8
fc, 42, 02, 7a, 10, 0c, 00, 00, 00, 00, 00, 00, 00, 00, 00, 00, 00, 00, 00, 00, 00, 26,
Send Message 9
fc, 42, 02, 7a, 10, 0d, 00, 00, 00, 00, 00, 00, 00, 00, 00, 00, 00, 00, 00, 00, 00, 25,
Send Message 10
fc, 42, 02, 7a, 10, 10, 00, 00, 00, 00, 00, 00, 00, 00, 00, 00, 00, 00, 00, 00, 00, 22,
Send Message 11
fc, 42, 02, 7a, 10, 13, 00, 00, 00, 00, 00, 00, 00, 00, 00, 00, 00, 00, 00, 00, 00, 1f,
Send Message 12
fc, 42, 02, 7a, 10, 14, 00, 00, 00, 00, 00, 00, 00, 00, 00, 00, 00, 00, 00, 00, 00, 1e,
Send Message 13
fc, 42, 02, 7a, 10, 15, 00, 00, 00, 00, 00, 00, 00, 00, 00, 00, 00, 00, 00, 00, 00, 1d,
Send Message 14
fc, 42, 02, 7a, 10, 16, 00, 00, 00, 00, 00, 00, 00, 00, 00, 00, 00, 00, 00, 00, 00, 1c,
Send Message 15
fc, 42, 02, 7a, 10, 26, 00, 00, 00, 00, 00, 00, 00, 00, 00, 00, 00, 00, 00, 00, 00, 0c,
Send Message 16
fc, 42, 02, 7a, 10, 28, 00, 00, 00, 00, 00, 00, 00, 00, 00, 00, 00, 00, 00, 00, 00, 0a,
Send Message 17
fc, 42, 02, 7a, 10, 29, 00, 00, 00, 00, 00, 00, 00, 00, 00, 00, 00, 00, 00, 00, 00, 09,
Send Message 18
fc, 42, 02, 7a, 10, a1, 00, 00, 00, 00, 00, 00, 00, 00, 00, 00, 00, 00, 00, 00, 00, 91,
Send Message 19
fc, 42, 02, 7a, 10, a2, 00, 00, 00, 00, 00, 00, 00, 00, 00, 00, 00, 00, 00, 00, 00, 90,
Send Message 20
fc, 42, 02, 7a, 10, 00, 00, 00, 00, 00, 00, 00, 00, 00, 00, 00, 00, 00, 00, 00, 00, 32,
Update Complete
In Home Assistant, I can see several sensors like wifi quality or some templates but no temperature sensor.
So I think there isn’t any information received from Ecodan. Could it be due to pin configuration or baud rate issues?
In the Telnet output, “Init3” shows a connection request to the heat pump, then in the Send Commands there is no answer line.
It means Pin or Hardware issue:
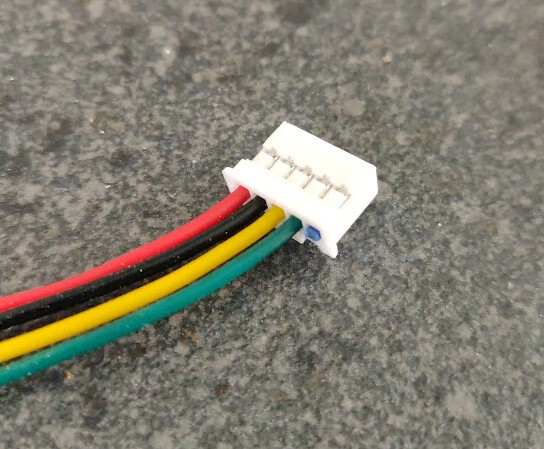
With the connector like this:

12V - Blue - N/A
GND - Green - GND (nodemcu)
5V - Yellow - Vin (nodemcu)
Tx - Black - D2 (nodemcu) - RxPin 4 (Code)
Rx - Red - D1 (nodemcu) - TxPin 5 (Code)
Please check & confirm
Hi @F1p
I’m already receive data from Ecodan HP. I’ve changed the baud rate of the serial port to 2400.
Have you thought about uploading the project to a new repo? You are more than 150 commits above the original repo branch. You cannot create issues that apply to this fork. It could help you to document a little more the process of connecting to other cards.
Also, it is likely that the format of the messages that are published in the queue can be improved so that the integration with MQTT of home assistant detects the type of control, vendor, model, …
Regards and thanks for help me!
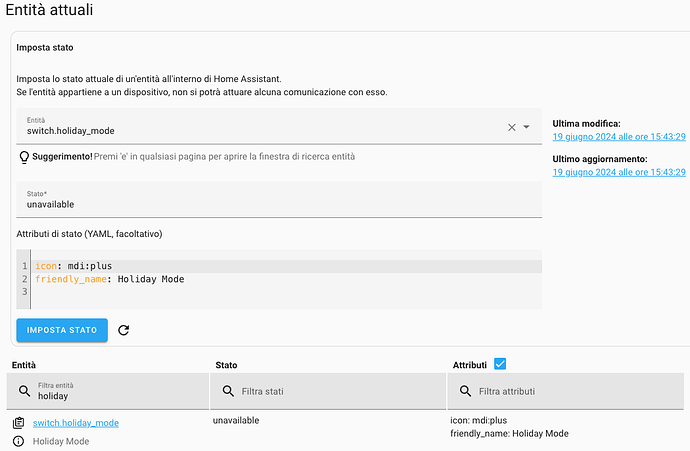
Hello, I’m having the following issue: the holiday mode switch is not available.
How can I solve it?
Could you post your YAML for the switch?
Mine looks like the below …
   - unique_id: "BEF43EE8-C5B3-4CFF-BEB6-2923F22A1EC6"
     name: "Ecodan Holiday Mode"
     state_topic: "Ecodan/ASHP/Status/System"
     value_template: "{{ value_json.HolidayMode | int(0) }}"
     icon: "mdi:plus"
     state_on: 1
     state_off: 0
     command_topic: "Ecodan/ASHP/Command/System/HolidayMode"
     payload_on: 1
     payload_off: 0
     availability:
       - topic: "Ecodan/ASHP/LWT"
         template: "{{ value_json }}"
         payload_available: "online"
         payload_not_available: "offline"
Sure thing, here it is:
- unique_id: "ashp_holidaymode"
  name: "Holiday Mode"
  state_topic: "Ecodan/ASHP/Status/System"
  value_template: "{{ value_json.HolidayMode }}"
  icon: "mdi:plus"
  state_on: 1
  state_off: 0
  command_topic: "Ecodan/ASHP/Command/System/HolidayMode"
  payload_on: 1
  payload_off: 0
  availability:
    - topic: "Ecodan/ASHP/LWT"
      template: "{{ value_json }}"
      payload_available: "online"
      payload_not_available: "offline"
I also tried to add “| int(0)” which was the only difference between mine and yours and rebooted but still notfhing changed ![]()
Unless I missed something that should be just fine.
I’m a little paranoid so convert everything to int or float and set a default value of 0 in case of a non-valid value - so don’t worry about the | int(0).
Do you have something that you can look at the MQTT with?
I use an app called MQTT Explorer - output below.
You want to look for the MQTT data that HASS turned into an entity via your switch.
In this case, you want to check the LWT as that determines your switches availability, and also the HolidayMode value.
Could you post what you see?


