Monitoring & Controlling Ecodan via CN105

I’ve finally managed to get one of my systems hooked up using a direct serial connection using this Arduino sketch running on an ESP32 which is now reporting in via MQTT → Home Assistant → Emoncms.

Much respect to the author (Richard Broker according to his github profile) for writing and sharing a fabulous project building on the work done in some of the other github projects (credited in his github readme).

I’m not doing any control yet but thought it was worth sharing, in case anyone else is thinking of doing similar. Particuarly as it’s been a trying couple of weeks getting to this point! Probably worthy of its own topic once I’m out of rehab.

4 Likes

[I split into this post off as a new topic]

Nice work! How frequently do you get updates through this interface?

Thanks for the split @Timbones.

Looking at the MQTT data for temperature sensors, the updates are every 30 seconds.

In the past couple of days the code has been updated to support getting and setting the zone 1 flow set temperature which I have just tested (I’ve got this system running in fixed flow temp at the moment) and the updates are instant when setting values. I shouldn’t be amazed by this in 2023 but having used MELcloud for the past few years it feels like a big step up :rofl:.

2 Likes

Does it accept control commands over mqtt? If so, does it really need HA?

@Dan_Nichols - is there a discussion on the HA forum on this addin?

@mjr - Looks like it must be possible directly via MQTT. Ask the question on GitHub.

Looks like a neat integration!

I assume this can only obtain the same information as the ListDevices Json that can be scraped from MelCloud?
Although doing it locally and at a higher frequency sounds good.
Is it possible to have both the Wifi dongle (so MelCloud still also works) and this rigged up?

1 Like

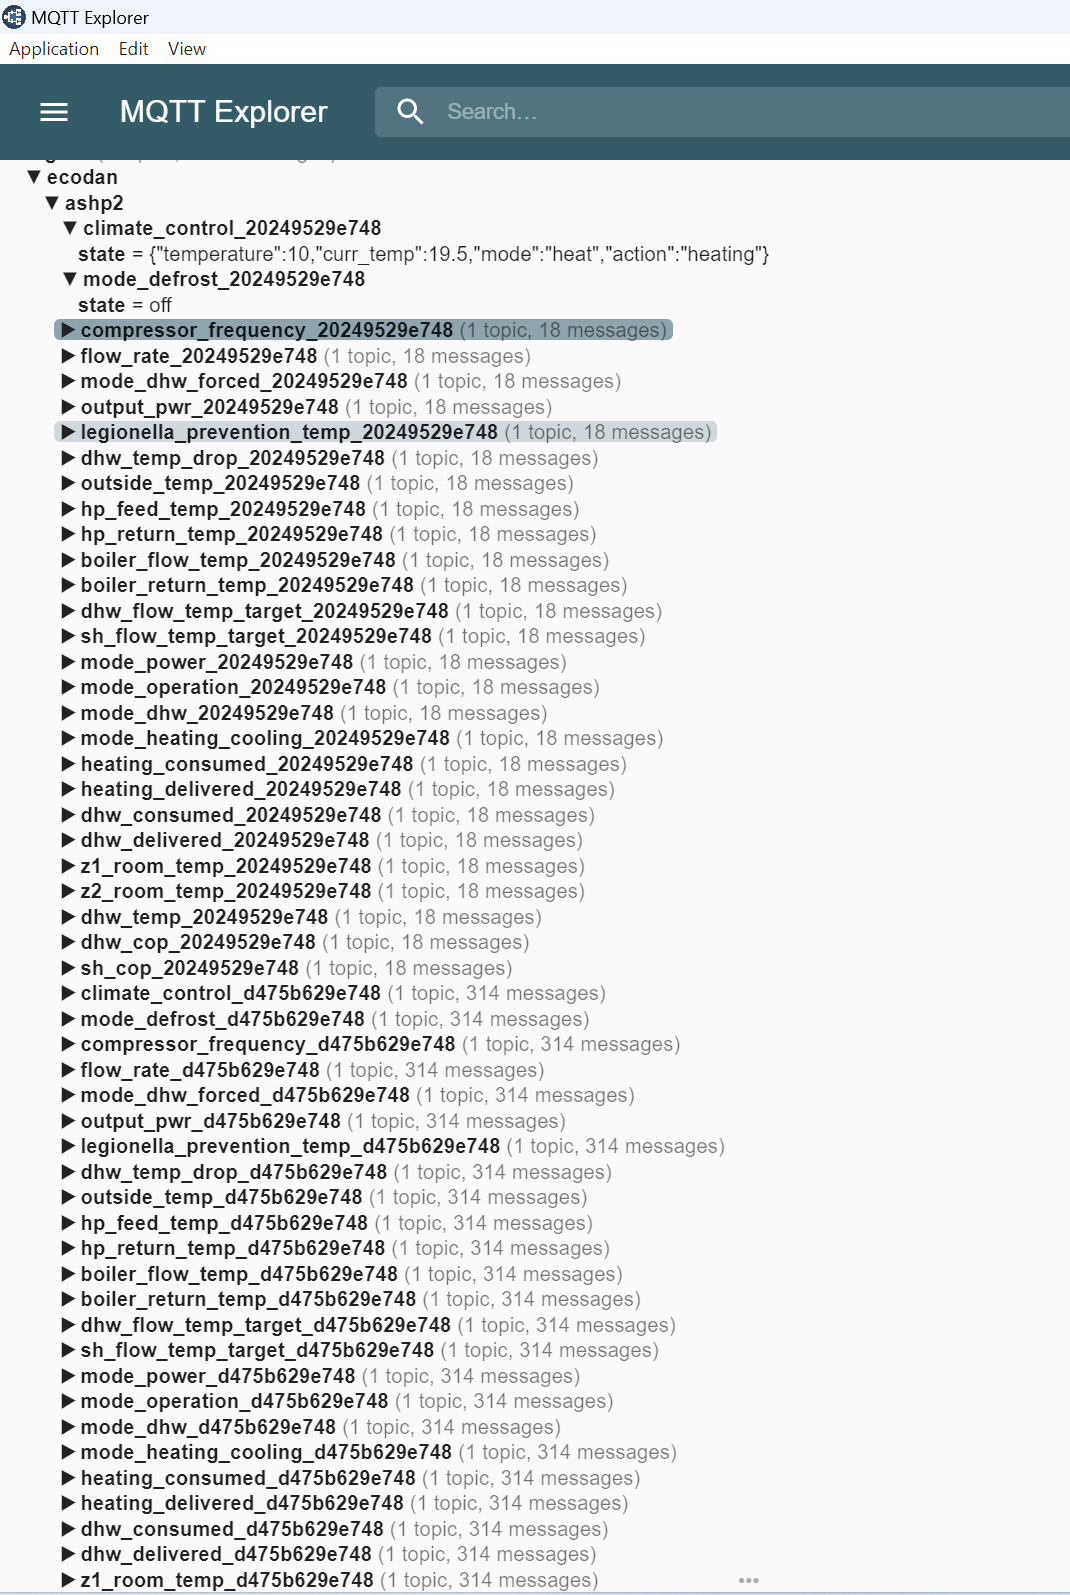
@mjr @borpin it is using the MQTT integration to create devices/entities within HA.

It maintains it’s own MQTT namespace where it stores running values and accepts commands.

So you could use MQTT directly if preferred.

You can see a couple of examples below, with the respective MQTT paths for HA to send commands;

Home Assistant Cimate Device:

{
  "name": "climate_control_d475b629e748",
  "unique_id": "climate_control_d475b629e748",
  "icon": "mdi:heat-pump-outline",
  "device": {
    "ids": [
      "d475b629e748"
    ],
    "name": "Mitsubishi A2W Heat Pump",
    "sw": "v0.1.4",
    "mdl": "Ecodan Air Source Heat Pump",
    "mf": "MITSUBISHI ELECTRIC",
    "cu": "http://192.168.0.118/configuration"
  },
  "mode_stat_t": "ecodan/ashp2/climate_control_d475b629e748/state",
  "mode_stat_tpl": "{% if (value_json is defined and value_json.mode is defined) %}{{ value_json.mode }}{% else %}off{% endif %}",
  "act_t": "ecodan/ashp2/climate_control_d475b629e748/state",
  "act_tpl": "{% if (value_json is defined and value_json.mode is defined) %}{{ value_json.action }}{% else %}off{% endif %}",
  "temp_stat_t": "ecodan/ashp2/climate_control_d475b629e748/state",
  "temp_stat_tpl": "{% if (value_json is defined and value_json.temperature is defined) %}{% if (value_json.temperature|int >= 8.00 and value_json.temperature|int <= 28.00) %}{{ value_json.temperature }}{% elif (value_json.temperature|int < 8.00) %}8.00{% elif (value_json.temperature|int > 28.00) %}28.00{% endif %}{% else %}21{% endif %}",
  "curr_temp_t": "ecodan/ashp2/climate_control_d475b629e748/state",
  "curr_temp_tpl": "{% if (value_json is defined and value_json.curr_temp is defined) %}{{ value_json.curr_temp }}{% else %}0{% endif %}",
  "temp_cmd_t": "ecodan/ashp2/climate_control_d475b629e748/temp_cmd",
  "temp_cmd_tpl": "{{ value }}",
  "initial": 10,
  "min_temp": 8,
  "max_temp": 28,
  "temp_unit": "C",
  "temp_step": 0.5,
  "modes": [
    "heat",
    "off"
  ]
}

Home Assistant Switch to Force DHW:

{
  "name": "force_dhw_d475b629e748",
  "unique_id": "force_dhw_d475b629e748",
  "icon": "mdi:toggle-switch-variant",
  "device": {
    "ids": [
      "d475b629e748"
    ],
    "name": "Mitsubishi A2W Heat Pump",
    "sw": "v0.1.4",
    "mdl": "Ecodan Air Source Heat Pump",
    "mf": "MITSUBISHI ELECTRIC",
    "cu": "http://192.168.0.118/configuration"
  },
  "stat_t": "ecodan/ashp2/mode_dhw_forced_d475b629e748/state",
  "stat_t_tpl": "{{ value }}",
  "stat_on": "on",
  "stat_off": "off",
  "cmd_t": "ecodan/ashp2/force_dhw_d475b629e748/set",
  "cmd_tpl": "{{ value }}"
}
1 Like

@borpin I haven’t looked to be honest, I found this trawling github after failed attempts to implement some of the other projects for various reasons.

Technically, not a HA integration (it’s using the MQTT integration) but yes it is very neat and so far working very well (after resolving the stability issue with the ESP32 - described here Connection · Issue #3 · rbroker/ecodan-ha-local · GitHub).

@ajdunlop the limits to what data can be pulled from the serial port are still being discovered looking at some of the github projects, certainly all of the data/control that is available through MELcloud should be possible (most is already avalailable).

The near realtime updates are a big improvement over MELcloud, if you want to take action etc. based on certain events (such as a defrost for example) often they get missed by MELcloud in the polling gap.

3 Likes

Yes it is using the HA MQTT Discovery mechanism to ‘appear’ in HA, but that in itself doesn’t make it an HA Component. Equally, because of that, a correctly crafted MQTT message will control the unit.

2 Likes

@Dan_Nichols I want to try monitoring my heatpump using CN105. How do you connect rx, tx to esp32?Directly or level shifter is needed?

Hi @pcman, you need to use a level shifter as the Ecodan is 5V. I used one of these https://www.amazon.co.uk/gp/product/B095H64XSV.

1 Like

EDIT: Figured out that the CN105 is connected to the FTC board inside the Ecodan unit. And first gen Ecodan does not have it. Oh well.

@ajdunlop and for anyone else thinking of building an ESP32 powered CN105 ready serial adapter with MQTT/Home Assistant integration here is what I have built which has been working well for me for several months now. My systems are Ecodan FTC5/R410a with PAC-IF062B-E controllers, I believe these instructions will also work for systems with FTC6/R32 with PAC-IF072 generation controllers.

Caution: check your CN105 pins for voltage before connecting anything to ensure that you are not sending 12V into your ESP32 module etc. or it will be destroyed. I accept no responsibility for damage caused to Ecodan controllers/ESP32s or anything/anyone else. Proceed at your own risk.

ESP32 Module - https://amzn.eu/d/auL8aAL

I am using AZ-Delivery ESP32 Dev Kit C v4 modules and having tried some cheaper modules which had some stability issues I’d recommend avoiding the cheaper options. I believe that all ESP32 modules run 3.3V across the GPIO pins, however this module can be powered by a 5V supply which the CN105 on the FTC5 (and I believe FTC6) Ecodan provides. This avoids having to run a separate power supply to the ESP32.

3.3V ↔ 5V Level Converter - https://amzn.eu/d/gwUKwT5

The voltage across the serial tx/rx pins on the Ecodan is 5V, the ESP32 is 3.3V so a level converter is required.

CN105 Connector - PAP-05V-S - 5pin Pa Series Pap-05v-s Wire To Board Jst 2.0mm Pitch Connector To Pap Wire Harness - Buy Pap-05v-s Wire Harness,Jst Pa Wire,5pin Pa Wire Product on Alibaba.com

I ordered a sample from Alibaba as these were not readily available in small quanities at a sensible unit price in the UK.

If you prefer screw terminals you can mount your ESP32 module in something like this (also makes swapping the module simpler) Amazon.co.uk

I used a length of 4 core 24AWG to make the cable from the CN105 long enough that the module can be housed externally from the controller box (in a plastic project box) - https://amzn.eu/d/8Ff3POd

Below is the wiring diagram.

Last piece of the puzzle is to download Arduino IDE - https://www.arduino.cc/en/software

Then install the Espressif ESP32 libraries for Arduino IDE - Installing - - — Arduino ESP32 latest documentation

Plus any other missing library dependencies listed in the ecodan-ha-local readme

Then download the the ecodan-ha-local sketch (ecodan-ha-local folder and contents from the github project), connect the ESP32 via USB and flash the sketch to the board then follow the instructions in the ecodan-ha-local github readme.

It’s been a while since I installed and configured Arduino IDE so forgive me if I have missed any steps out!

Good luck.

4 Likes

Thanks for that, just need to decide whether or when to take the plunge and put this together.

This is great info, thank you.

I’m planning on doing the same with mine, all the bits have arrived and I’ve flashed my esp32 so just need to connect it all together and connect it up.

I’ve got the WiFi adapter, do you know if you have to disconnect that to connect to it locally?

I’m not bothered about accessing it through Melcloud but it’s just started having some errors and the installer is speaking to Mitsubishi about it and they’ll be looking at the data it’s been uploading and I’d prefer not to lose that if possible.

1 Like

Massive thanks to Richard Broker for creating this amazing project. Shame that one man can create such a polished interface that works beautifully, whereas an enormous multinational corporation fails miserably to provide any sort of decent control. Having wrestled with Melcloud API based control in various different forms over the last year, which worked OK for a while, I finally gave up when they started throttling all the API based traffic recently. I wish I had made the jump earlier - it’s like going from a 1960s Lada to a 2024 BMW.

I thought I’d post my experience in case it helps someone else. Thanks for posting the schematic above (Dan_Nichols), I roughly followed this, using an ESP32 WROOM-32 board. On my board the 5v in pin is labelled VIN. Flashed it using Arduino IDE (chose ESP32 Dev Module as board type, although I think it worked with ESP32-WROOM-DA-Module too). After a few hiccups due to libraries, dependencies and Python packages it installed fine. Once rebooted it broadcast the WiFi network as outlined in Richard Broker’s Github repository, and followed the config instructions. I first mocked it all up using a 5v power supply from a butchered USB cable, to avoid constantly plugging/unplugging the CN105 plug and damaging it. Once connected to the heat pump I had to switch the PIN numbers to get Rx and Tx the right way round. The WiFi range seems fairly reasonable for the board I chose, despite not having an external antenna. It’s been pretty stable for the last few days. The web browser based config is excellent. All the MQTT sensors are populated automatically in HA from the Python package, and that part was seamless. It exposes more than I ever managed using the Melcloud API and works beautifully.

All in all very happy, and massive thanks again to Richard Broker

3 Likes

Yes you will have to disconnect the WiFi adapter as it uses the CN105 connector. There has been some discussion about connecting multiple devices but I imagine this could cause some issues and I’m not aware anyone has actually attempted it thus far.

I have kept my WiFi dongles around just in case I need them in future but I’m not missing MELcloud!

what about splitter like this one https://coolautomation-emea.com/product/cn105-splitter-for-me/ - anybody tried?

1 Like

I use a similar connection to connect CN105 ecodan to esp32-wrom-32d directly, without level converter. Power supply from pin3 +5V CN105 directly to Vin +5V esp32 module. Ecodan does not put voltage on the Rx, Tx outputs on CN105, you have to get the voltage through the 10k pull-up resistors. The size of the 10k resistors is enough to not destroy the inputs on the esp32. The voltage regulator LM3940 or similar is mounted on the esp32 module. It works fine with rbroker/ecodan-ha-local.

To connect to CN105 use a cable with a 5-pin PAP05V-S 2.0mm connector.