Hi @svas I am set to UFH and an overshoot of 4, DT5, the downstairs radiators are all open on the lockshield and upstairs have been set to a room temp. our outside temp is around 7 and we are getting a COP of 5.
Thanks Neil!
Why you switched from fan coils to UFH though ? Overshoot setting seems enabled in both scenarios. Were there any other settings you tweaked as well ?
Overshoot is set at 4 here, DT5 on pure wdc but it seems impossible to get a higher COP, no matter what.
on my 8kW unit to get the overshoot, I needed to change to UFH, on fancoil it was fixed to 1, no other reason, hope this helps?
if it helps, i raised my WDC -
40 @ -5
31 @ 11
Μine is also a 8kw Altherma 3 and although fancoil overshoot was set to 1, I was able to switch to 4 without changing to UFH.
Mind me asking why you raised the WDC ? I am afraid if I raise mine, I will see even higher consumption, let alone overheating.
the was recommended by Matt on another thread, and I can confirm it works and does not use more energy -
"You can’t run at 28c at 11c outside and get a dT of 5c because your radiators won’t give up the heat to lower the return to 23c at the minimum flow rate.
Maybe that is why it is overshooting for you but mine is not overshooting to get to a dT of 10c.
The overshoot is there to allow the heat pump to continue to run when the return gets too close to the flow.
I am pretty sure you have nowhere near enough radiators to run at 28c flow and keep the return under control for long, that is why it overshoots. I certainly don’t have and I have 50kw of radiators…
My experience is there is no point running at less than 30c when it is 10c or more outside. It doesn’t use any less electricity, or very little less, and is inefficient. I would rather run it less and turn it on and off as necessary
I find this heat pump is most efficient when it is most stable, a wildly fluctuating flow rate just adds to the instability for me."
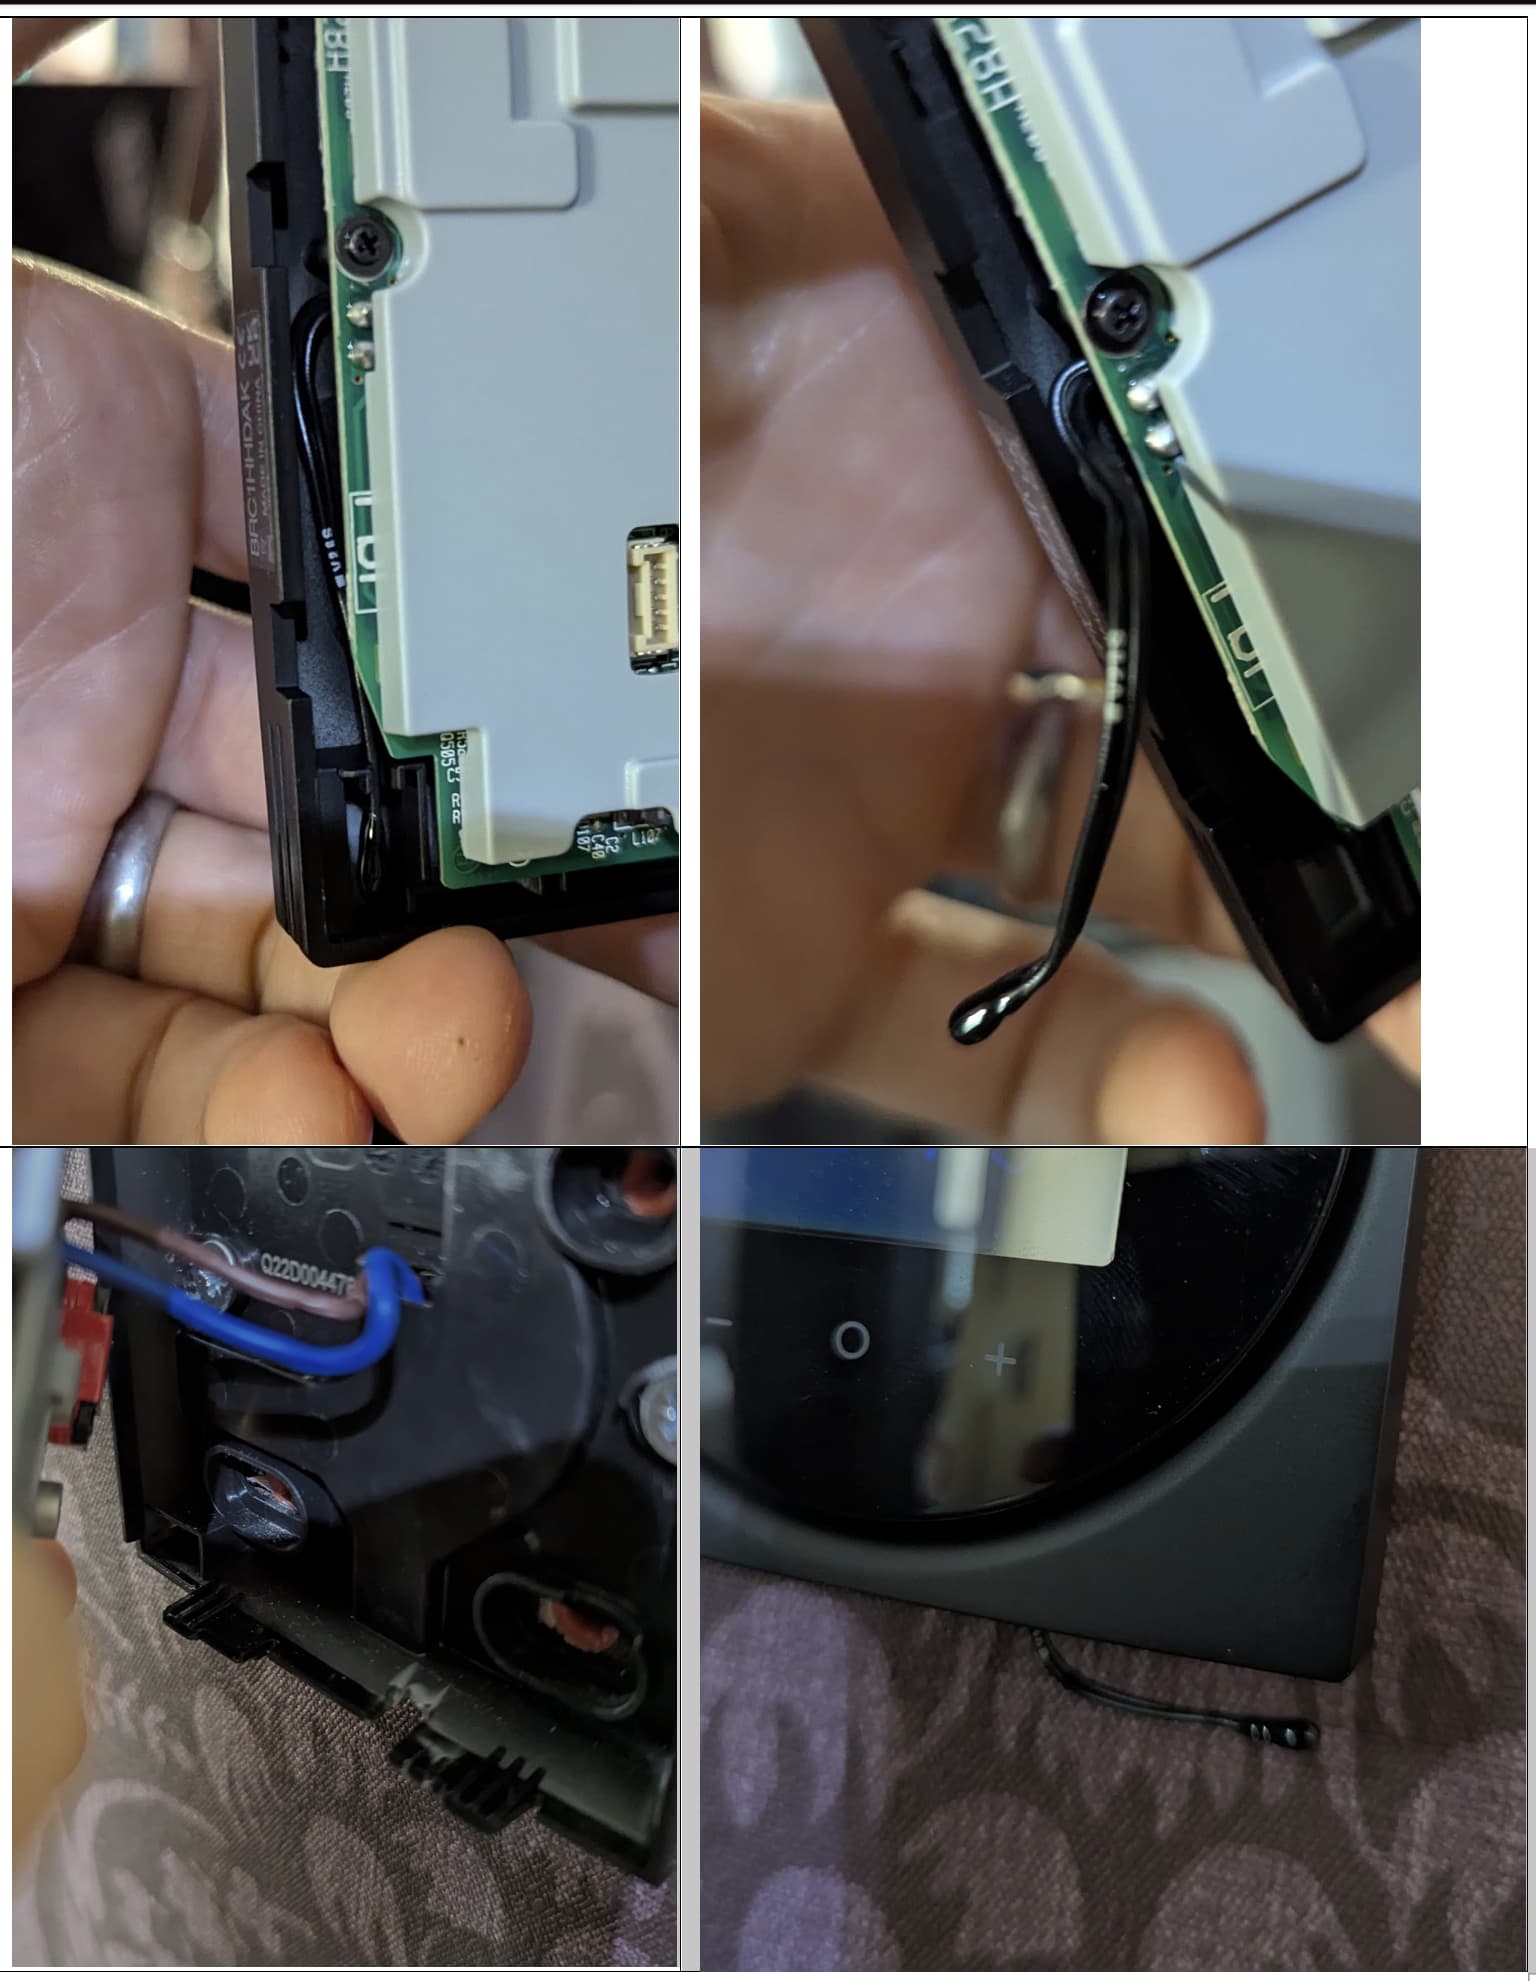
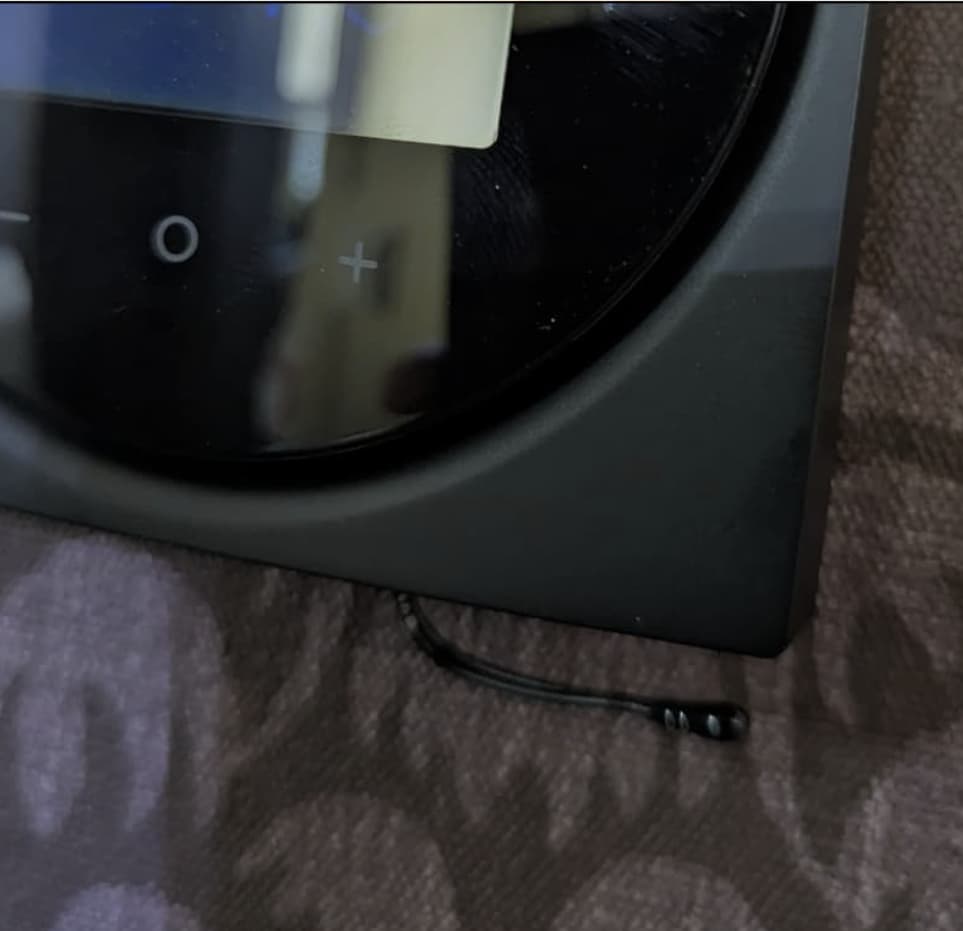
Hi @squarepeg77 taken a bold step and made a little Madoka modification to the back case (very soft plastic), it’s much better now the Madoka temperature sensor is not affected at all by the LED and backlight and is far more accurate with free air -
BTW back to Madoka controls as the house was way too hot on Pure Weather compensation
Nice! So the temperature probe is on a short piece of wire and not surface mounted. Good to know.
I’ve been messing around with thermostat control and modulation again as I don’t want to be relying on Home Assistant communicating via Daikin cloud to turn the heating on and off forever. The cloud service has only failed me a couple of times, but still.
Can’t say I’ve got the control how I want it yet.
Yes, it’s a soft cable to the sensor, I am in the same boat, I did not want to rely on the Daikin API.
The back case is also very soft and felt I could cut with some wire snips, if it did not work it’s on the bottom and would not be noticeable or an issue if I had to revert to the stock location.
The Madoka Sensor is tracking an ESP32 with a DHT22 in the same room, but I needed to add a room offset +0.5 within the MMI, I wonder if the Dakin team knew the LED and Backlight skewed the temps?
UPDATE
Removed the Daikin offset, its looks good at 20 degrees, but does drift/lag behind at higher values - an offset would not help here. It does track other sensors, so will leave at default.

You think they thought about it or care? ![]()
Neil wouldn’t lowering the high end of the curve be an option for Pure Weather compensation, in order to avoid overheating ?
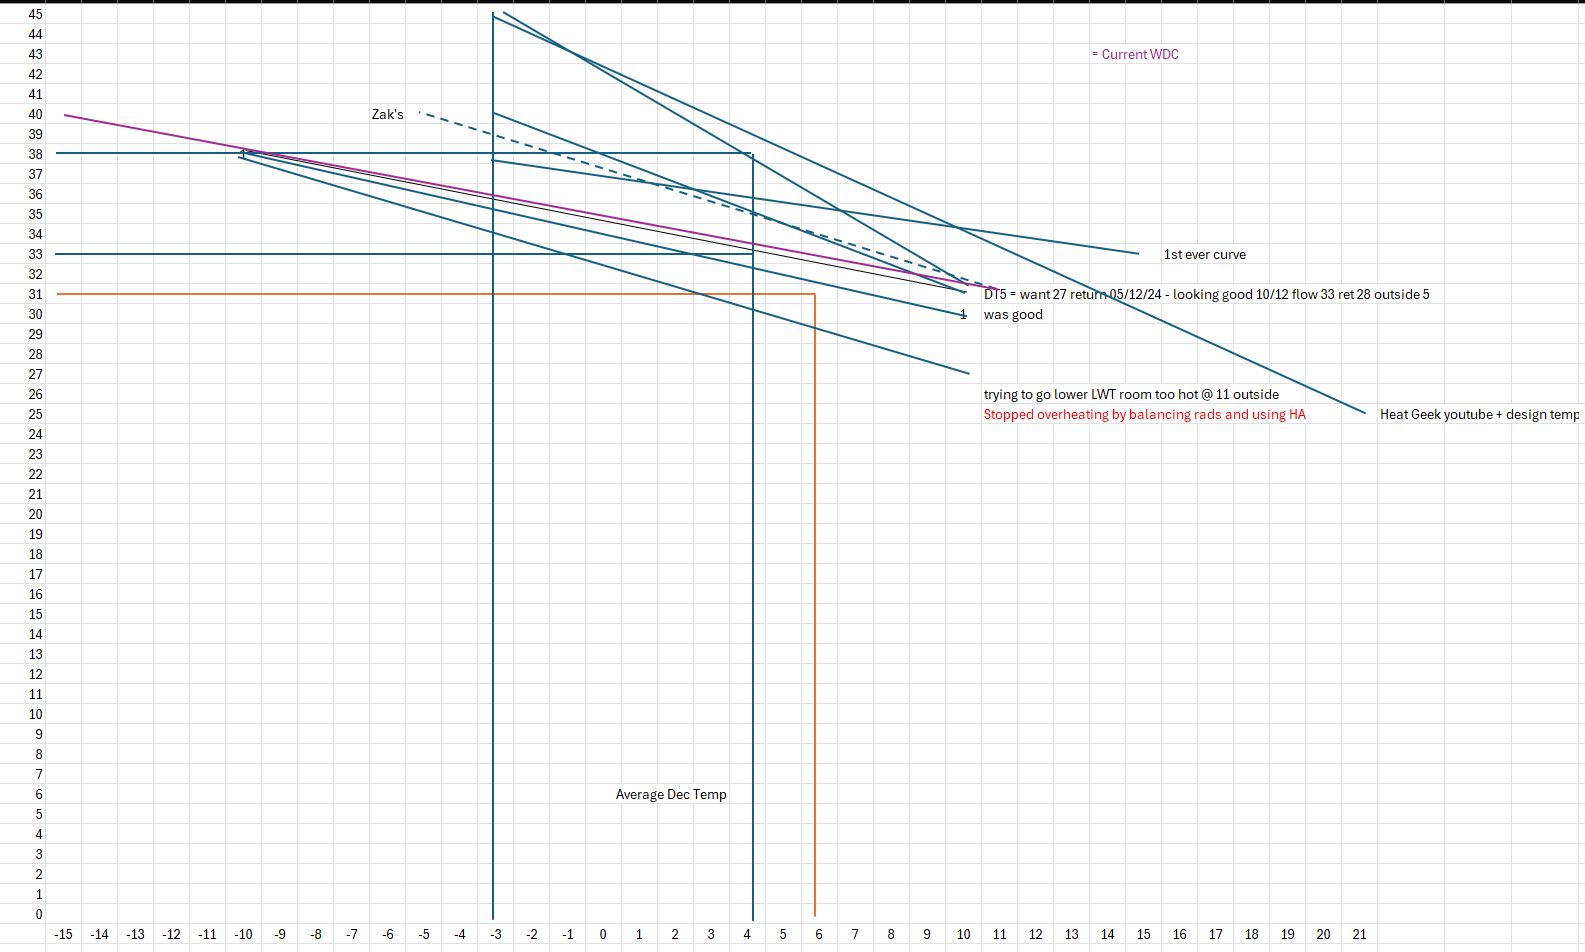
Hi @svas Yes, I was thinking the same last night, and kind of proved it by changing the LWT offset -2 to stabilise the temps, then i was thinking even at say 300W 24/7 would use more electric than on for say 6 hours per day…with UK weather its also tricky, recently temps have gone from 5 > 14 degrees within 6 hours, don’t you just love UK wet and humid winters…think I like the idea of modulation, it kind of worked well last winter…i may try pure WC again currently I am 40 @ -5, would you suggest lowering the max temp at say 38 @ -5 or moving the max at a lower outside temp 40 @ -10? my system is design for 45 @ -3…
Weather is the same here in Greece currently with lots of fluctuations. Modulation also worked for me as well but i am definitely seeing higher COPs based on LWT alone. I would lower the max inside temperature instead of outside but only because it looks more correct to me! To be honest though, either way you have really numbers you are possibly looking at diminishing returns.
Hi @svas, I also agree with the diminishing returns, its funny how we chase the most efficient machines, I try to not be wasteful, but another perspective, our IT equipment sucks ~250w 24/7 and I do not think twice about that, equally I would not think twice about driving my electric car to watch the rugby that would use a load of electrons…. I have gone back to LWT but flattened the curve to try to hit a LWT of 33 DT5 at 5 degrees and the house temps are now stable….we are in a privilege position of affording the electric bill and even if the HP is on 24/7 and uses 12kWh per day over the winter period (4 months) at 26p per unit (ignoring the solar, battery and 7p off-peak rate) we would spend £374, as noted on the ESPAltherma thread I have implemented a Generic Thermostat control to cover the warmer days if the house does overheat and just turns off the HP.
40 @ -15
31 @ 11
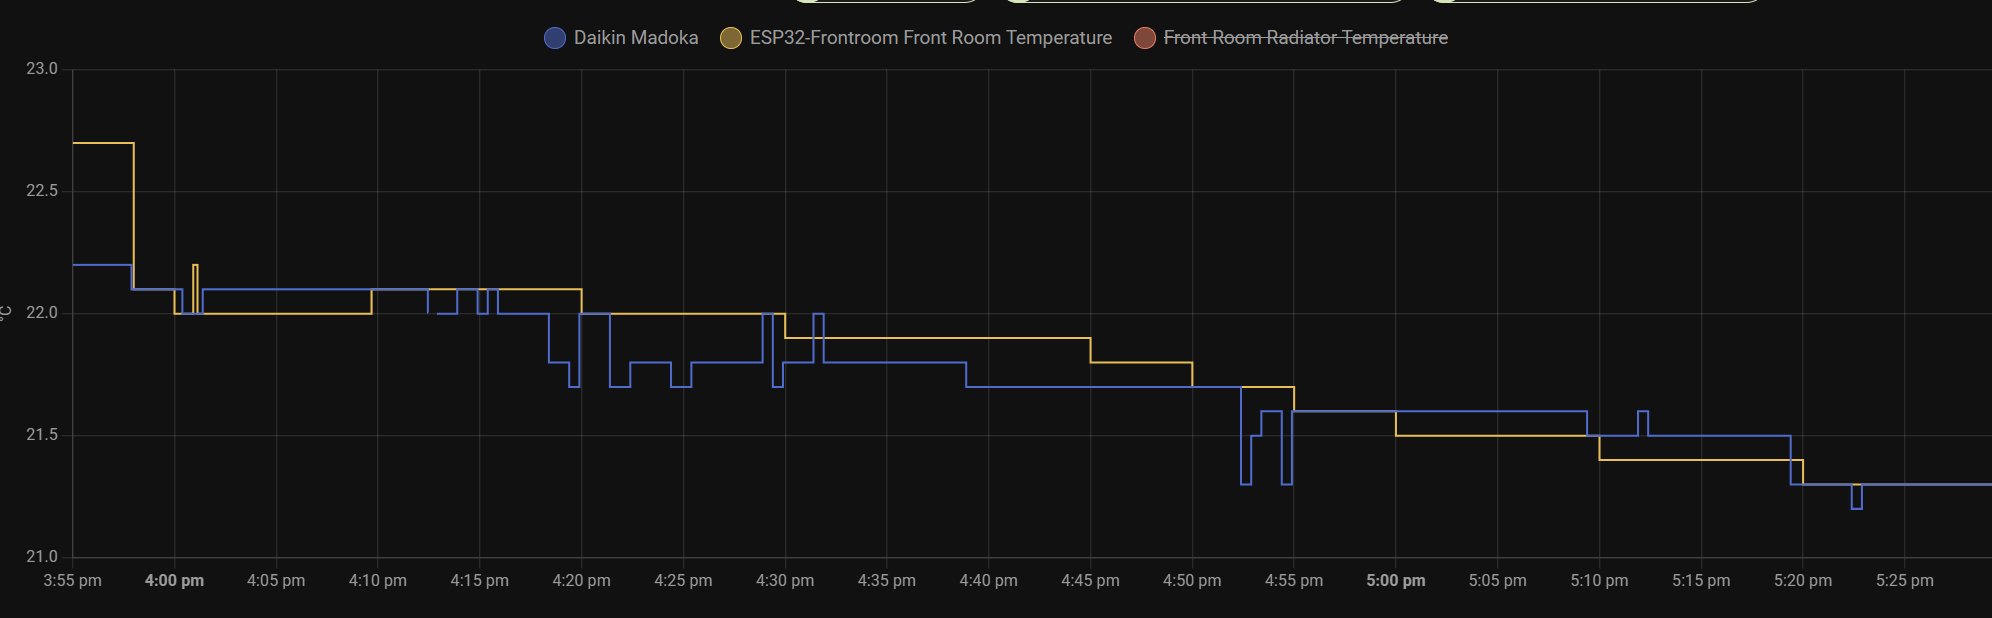
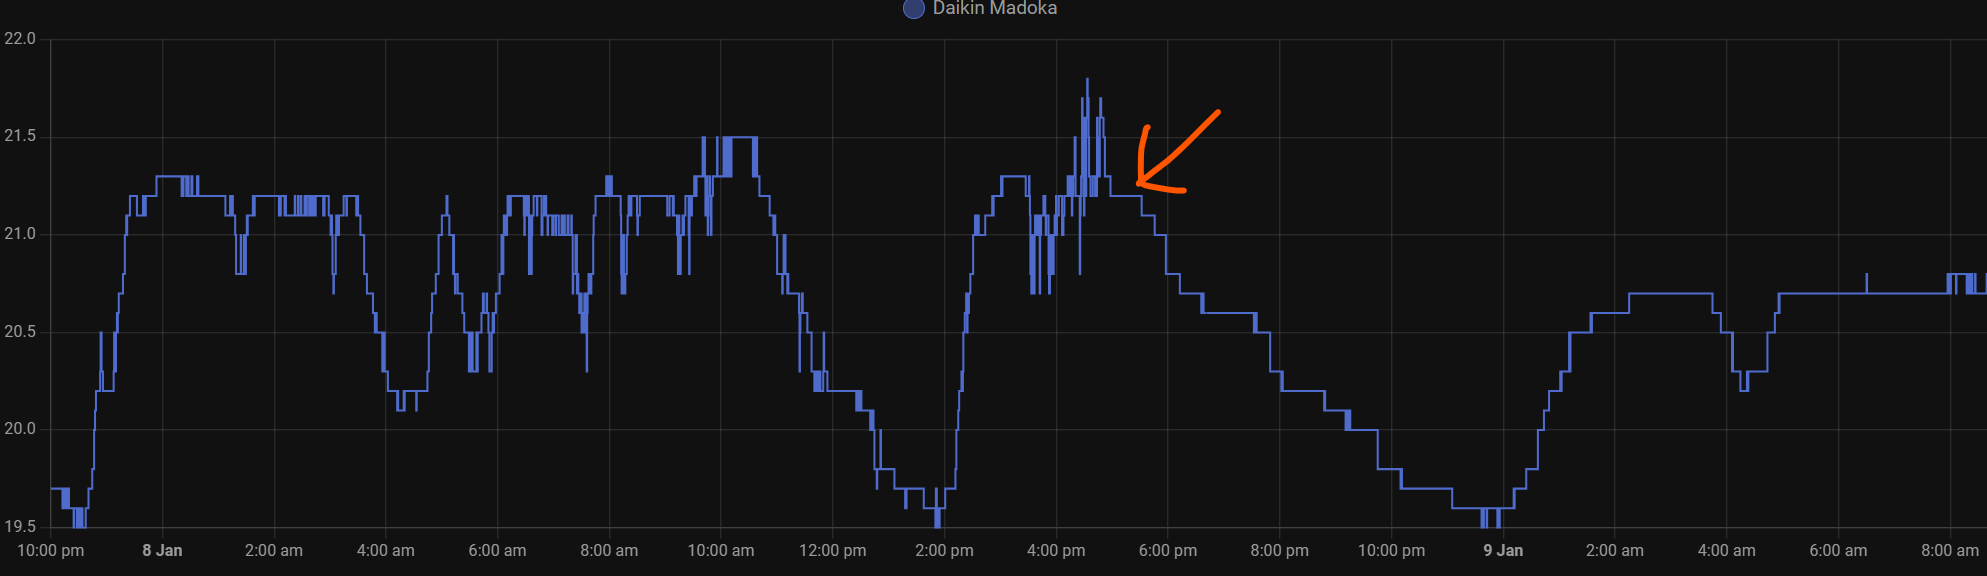
I tried your “take the sensor out of the case” hack yesterday, and I’m very impressed at the difference. I have a SHT3X sensor in another room, which has always shown ~2K lower that the Madoka, but take a look at the graph of the two for the last week…
Note how towards the end of the graph the Madoka temp (yellow) suddenly drops to match the figure from the other room. Yes, it’s a different room, but previously there was a consistent difference. The uptick on the blue line at the end is us sitting in the other room watching TV while the Madoka room is unoccupied. I think I might keep this change!
Thanks for the update @John,
Yes I agree, the Madoka sensor is really accurate and is much better with the case modification; I appreciate my decision making has been unpredictable but with this modification I have found using the Madoka with modulation has truly been a game changer, over the weekend the HP has not stopped, its changed the LWT without issue and has stopped the house overheating, I could not achieve this with pure WC and without human intervention with offsets.
That’s it now, I have found a set and forget option, after our second winter of fettling and tweaking I have a good WDC and only need a modulation of 2 to keep the house temps within the hysteresis on the sensor and comfort levels are on the money for a great COP.
In Conclusion what I did
Balance upstairs radiators to reduce the flow and temps (In my case the radiators were oversized).
Set the min LWT to a value that the Radiators could cope and handle at DT5 - 31 Degrees at 11 (IMHO I think this should be the starting point for everyone with Radiators and Daikin units).
To find the Max LWT, I am a visual person, and I used a graph in Excel to confirm a sweet line, I found 33 Degrees at 5 was ideal, crossed this value for a good slope starting from the foot temp.
Set a max LWT to heat the house, confirmed when the outside was a steady 5 or so degrees (average Dec temp is 6 in the UK) - 40 Degrees at -15.
Make sure the HP could achieve a flow rate of 24 L/min on a max air purge test.
Make the Madoka case modification.
Now the above is good, I set a modulation to 2, bingo, I hope this helps others?
Ps I believe the modulation only initiates when the house gets within 0.5 of the top end of the hysteresis, there is no way I am sitting around making changes to the offset and even if I use Home Assistant automations, its an external component I would rather not use for this situation
Hi @John I hope you are well? I have just 3d printed a shroud for the sensor, in ‘open air’ the sensor is really sensitive and accurate, but would read a slight breeze when walking past or breathing on it.
The shroud design is open backed, has two holes for air flow at opposite corners (bottom right not shown) + a slot for the cable at the top and I used sticky pads to stick to the Madoka; the sensor is still not affected by the design flaw of the LED influencing the reading within the original enclosure.
So far, I have wife approval, and the sensor is not affected by the design flaw of the LED influencing the sensors reading.
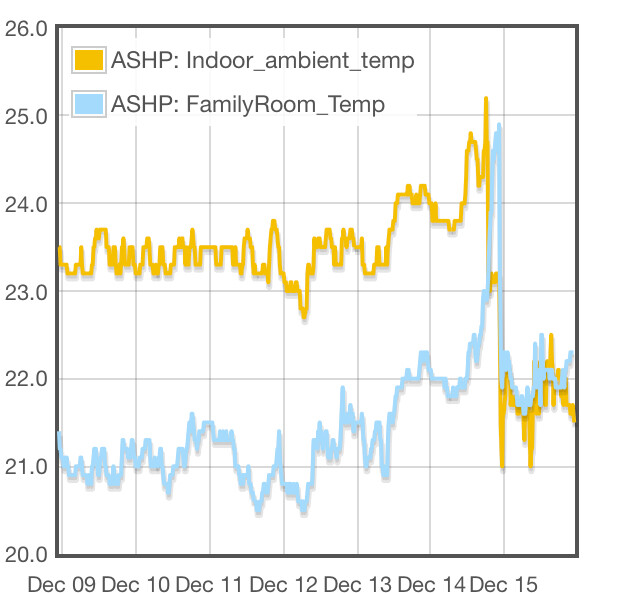
Early results are good with a shallower more defined stepped drop in temperature, and stepped increase in temperature when the heating starts.
Note - The 5pm peak is me moving the sensor and inadvertently stopping the heat cycle with my warm fingers.

arrow shroud fitted
I have just discovered ‘quiet mode’, that limits the initial peak demand of Watts (throttling the output), in our case max 1.1kW (I keep the pump unlimited (starts at 24l/min then reduced to 7l/min), so not to effect the logic or option/triggers in the HP), its ok for our house as we do not need the full capacity of the 8kW unit, one side note I have had to increase the off peak DHW heat schedule as it takes longer to heat up the cylinder ![]() Hope this helps others smooth out the initial power draw getting to a steady state faster while increasing efficiency?
Hope this helps others smooth out the initial power draw getting to a steady state faster while increasing efficiency?
Thanks to -
Some assistance required. How do I set a temperature offset on the Madoka thermostat. Some Madoka work with an App. but mine does not. Do I adjust through MMI?
Also can someone explain: ’ Increase around 0° ’ mine is set at Increase 2° span 4°.
Also ’ Overshoot’ mine is at 1°C
The only thing you can change on the Madoka is the desired room temperature. If you want to set the Leaving Water Offset you have to do it via the MMI or the Onecta phone app.
This is a setting which increases the leaving water temperature above what is calculated by the weather compensation when the outside temperature is around 0C. The idea is to compensate for lost heating ability due to doing defrosts. The Increase is how much the leaving water is increased by and the span is the range of outside temperatures it does it over. Yours is the default setting as I recall.
This controls how much the leaving water temperature can exceed the desired water temperature before the compressor shuts off. 1C is the default for radiators, some people’s heat pump allows it to be changed in the range of 1-4C, other people’s (including mine) doesn’t allow for any adjustment. Also the reality of the setting seems more complex than my initial description as I regularly see leaving water temperatures above set point + 1C without the compressor shutting off so there’s clearly some more involved logic going on.