For access to all of the settings in the MMI go to user profile and use the code 5678. This will unlock the installer menus and extra options.
The installer reference guide will explain all of these and is available from Daikin’s website.
When finished go back to user profile and set 1234 for advanced user.
Also make a note of all changes so you can revert them back if it goes wrong or in the installers menu page use the export MMI settings option (you will need a usb stick plugged into the controller but can export and save / share all settings).
Hi, happy to help if I can, here is the MMI guide to help with the parameters and menu tree, D series MMi.pdf (5.2 MB)
1st start with the WDC and then tweak the modulation, it goes without saying make one change and see the results, its tricky in the UK as it all depends on the outside temps, as from one day to the next could swing 10 degrees, and may take a few weeks to settle on a good profile for your house.
If you are using Madoka for thermostat control, rather than leaving water temp only, then I suggest you go into the Madoka settings and reduce the brightness of the screen and the blue ring light that indicates the heating is running.
I reckon the LEDs affect the reported temperature by at least 1C compared to local ambient. I’ve configured a -1C offset in the MMI for this.
In the case of the blue ring light, I was seeing a very quick drop of -0.5C as soon as soon the heating switched off. It played havoc with the thermostat control when I disabled modulation.
I’ve seen more consistent readings since changing these settings. I’ve turned it down until the values are just visible in daylight. There is also a “hotel mode” that switches off the backlight and blue light. I haven’t enabled that as I do like to be able to see the current temperature
Hi @squarepeg77 Jonathan, this is an excellent call, its incredible the Madoka was given a design award, negating the function of the unit….
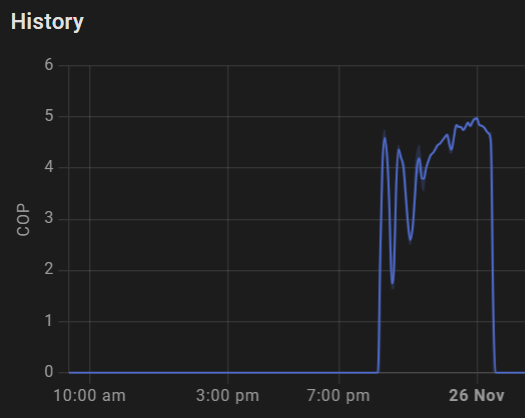
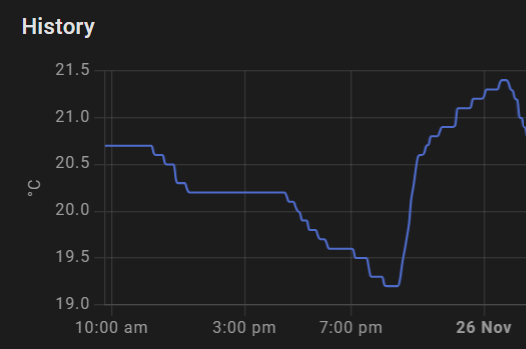
I have made the changes, all lowest brightness on the Madoka, its even resulted in longer cycles and a continuous COP around 5 (outside 5 – 8), our HP has not stopped (ie reached room set temp) since it started yesterday, we have a steady hovering 21-degree room temp (set to 20) knowing it will stop the HP at 21.5…its really improved the modulation effect.
I did see an article of someone cutting a small hole in the bottom of the Madoka to enable the sensor to be exposed outside the case, but I cannot find it again to share.
@squarepeg77 you know what, I thought it was just mine that did this…its a terrible issue given its’ function and why I can’t use it.
I had discovered this about a year ago, and turned the blue light it down to lowest setting and it is still really obvious something is not right as minutes after heating switched on, the indoor temp rises before any real heat delivered from the heating system!
I’d quite like to go back to Madoka control, as I’m a little uneasy relying on cloud functionality to turn the heating on and off. (I’m now using leaving water temp with Home Assistant temperature control.)
However I really need 0.5C control in the Madoka schedule, not 1C. It’s silly that you can offset by 0.5C, but not set a schedule with a 17.5C target temperature.
BTW I have turned down all the brightness on the madoka, LED and backlight etc with an offset of -0.5 to give a really accurate measurement, I have other sensors that confirm this is good!
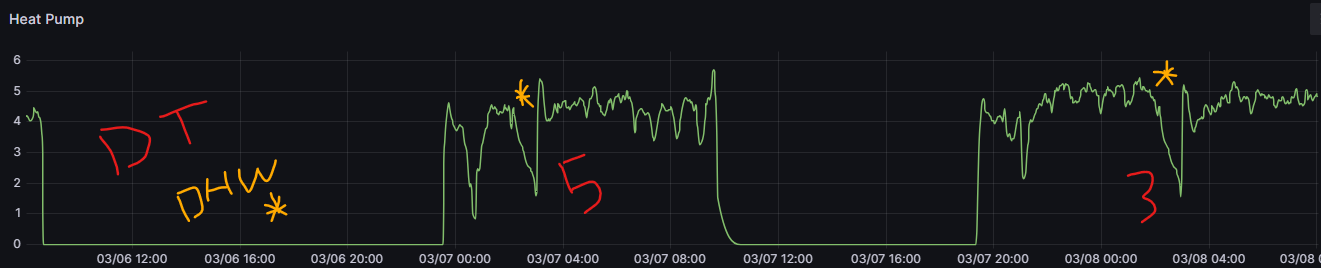
I have picked up a little config gem that I think works thanks @KnightPhoenix, after just one change setting the DT to 3 - after one heat cycle with similar outside temps the COP appears smoother and higher -
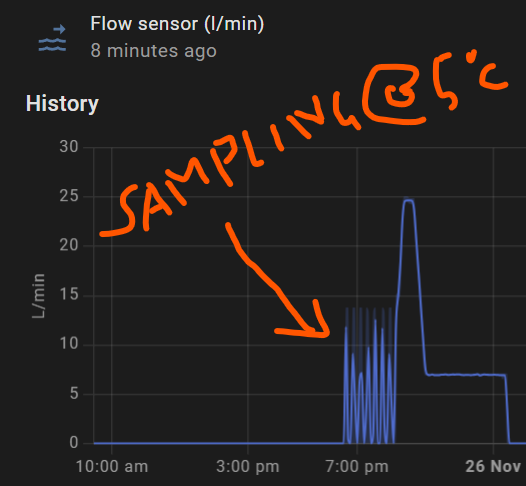
For my 9kW, I’ve found that lowering dT from 5C to 4C enables the flow rate to get above the minimum 10.7l/min more often.
I think (speculate!) this then enables the heat pump to modulate heat output by changing flow rate instead of having to vary compressor power, because flow rate is at the floor.
I’ve been running with dT 5C for a while, but your post reminded me to go back to 4C! I don’t think I’d tolerate 3C, that would probably give more noticeable noise from some of our lock shields.
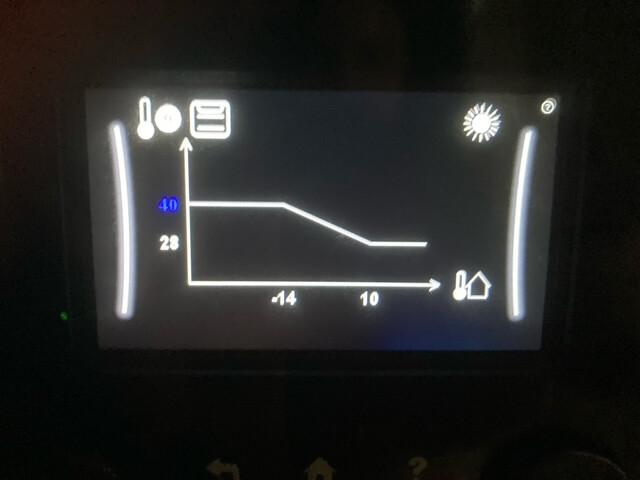
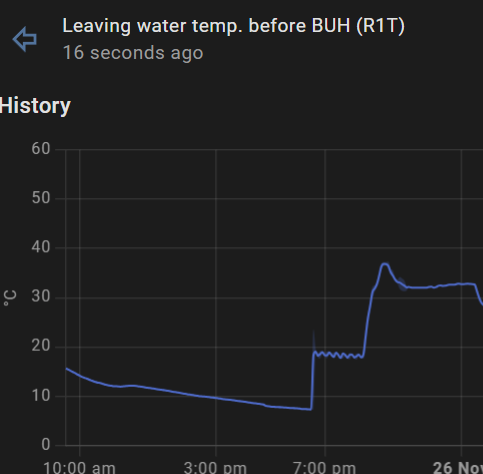
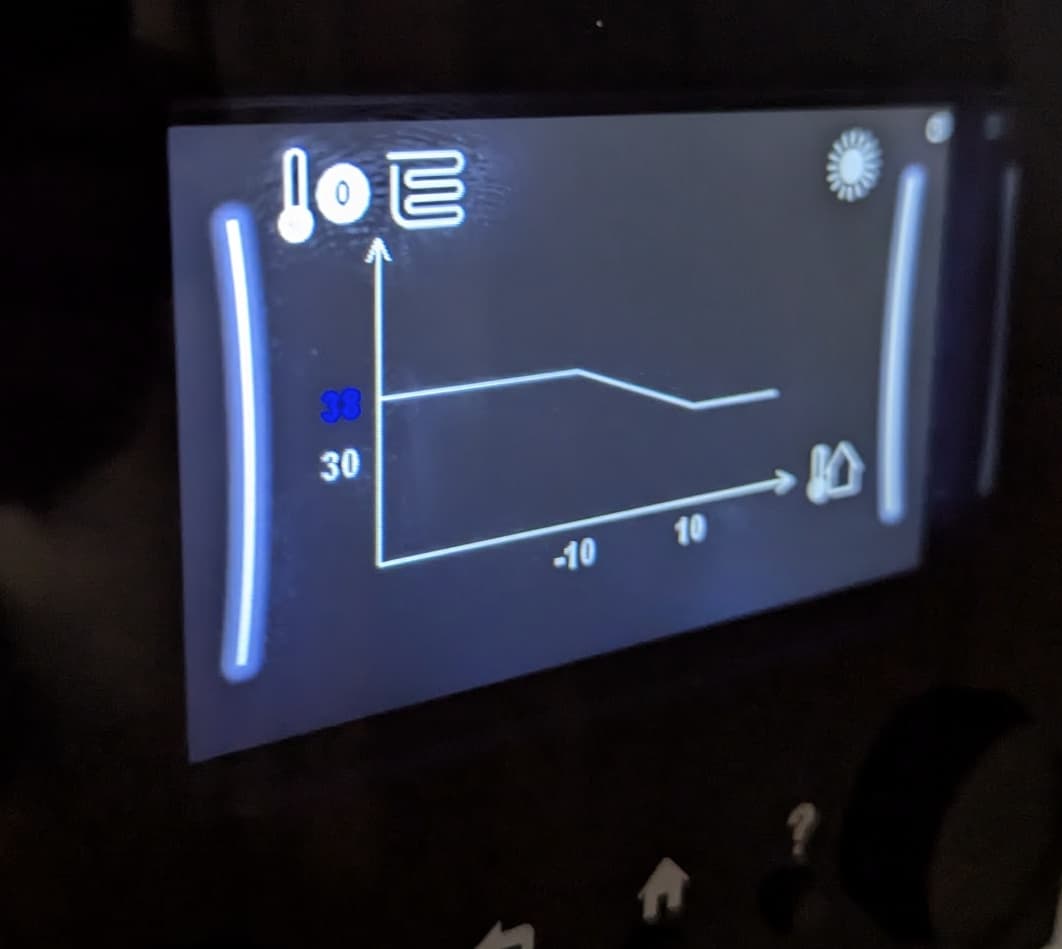
im still tuning my weather curve in below -2 ish so this might look a bit extreme but its working so far , im guessing eventually the -14 will be lower and the 40 hopefully wont need to go up but it might do
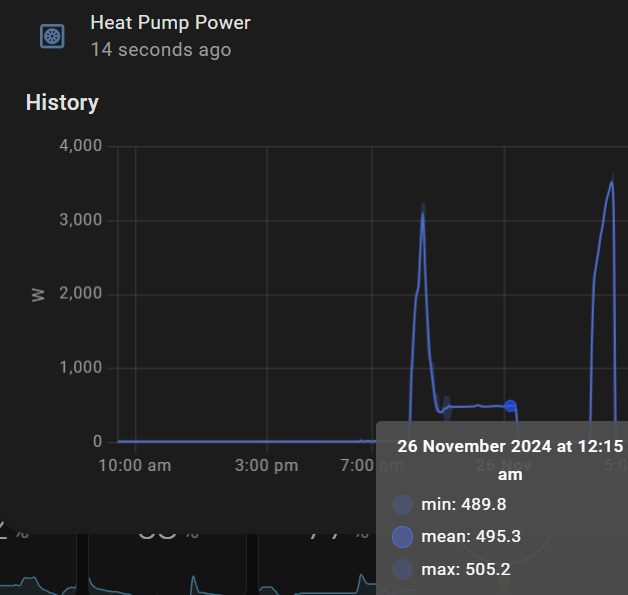
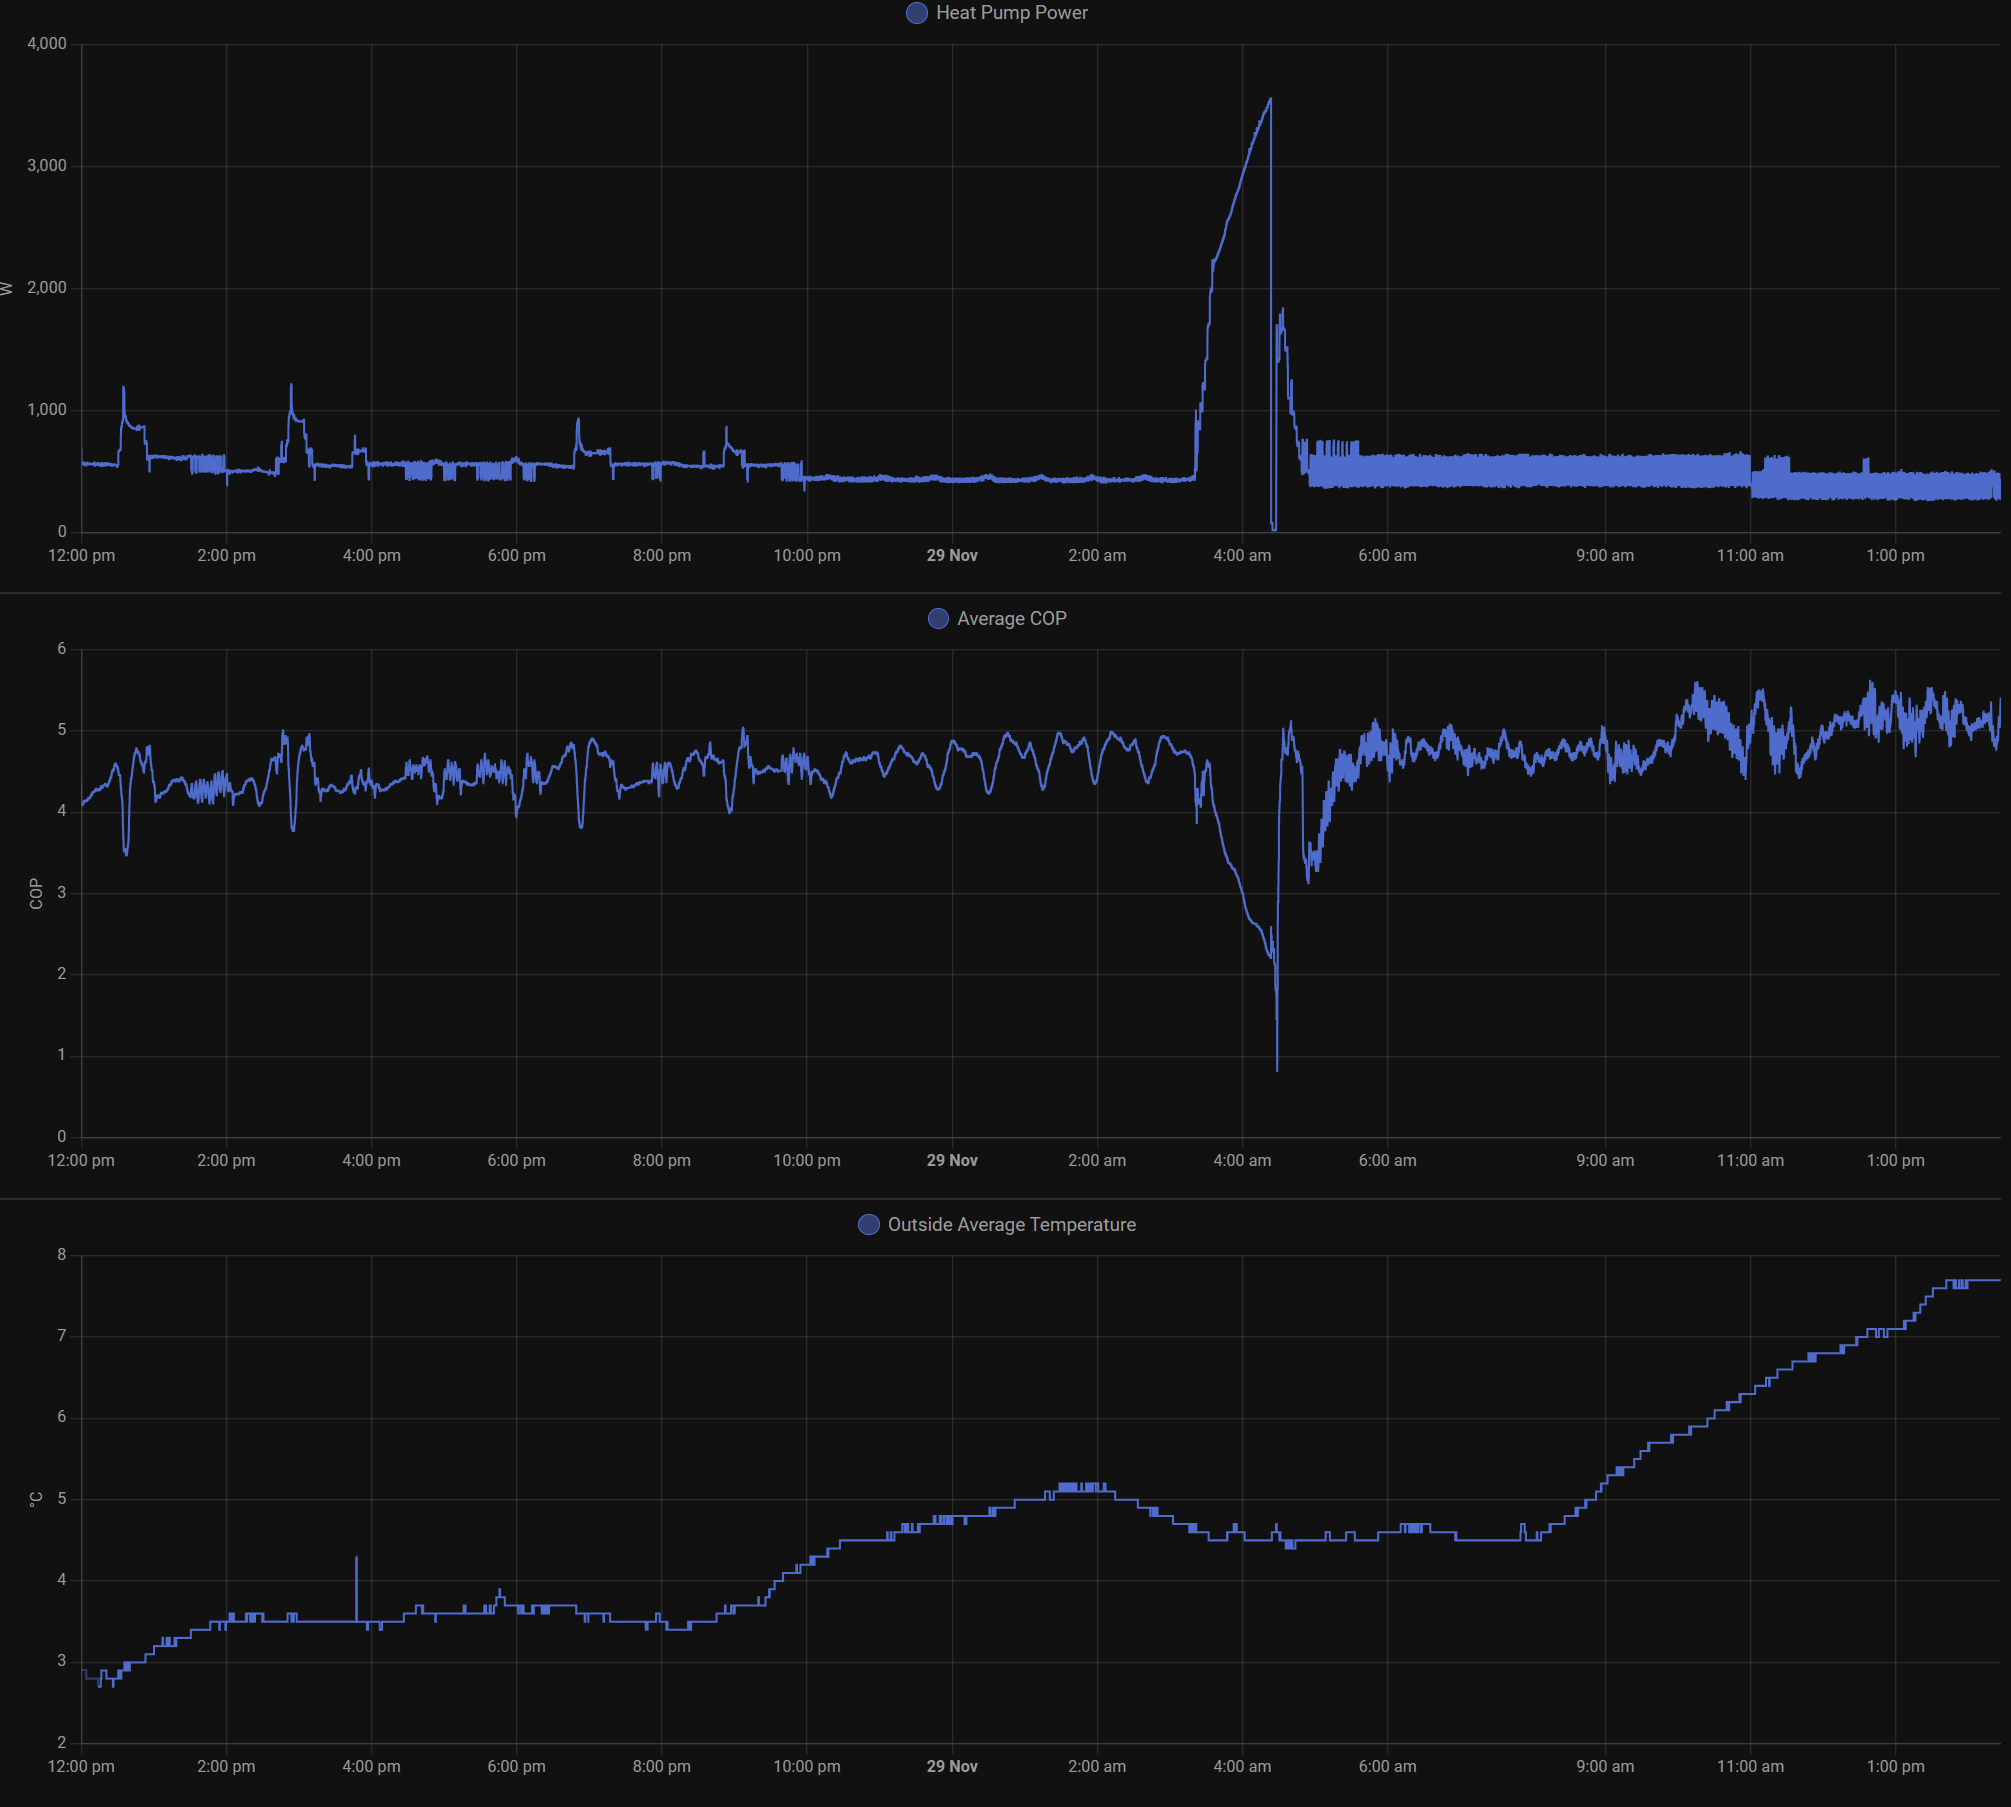
I think, I have figured it out, our Madoka room temp is set to 20, noting the hysteresis - on at 19.5, off at 21.5, when the room approaches 21 the HP starts to modulate ‘down’, our LWT gets to about 32 (modulation of 5) and uses ~500W of power but fluctuates up/down, we get the steady heat for hours. I am now experimenting with the overshoot of 4 (need to change the emitter to underfloor to configure) I would like to eliminate the COP peak and dip on initial start, the HP backing off and trying to get to the steady start ASAP, maybe it will keep the pump speed higher for longer to reduce the LWT?
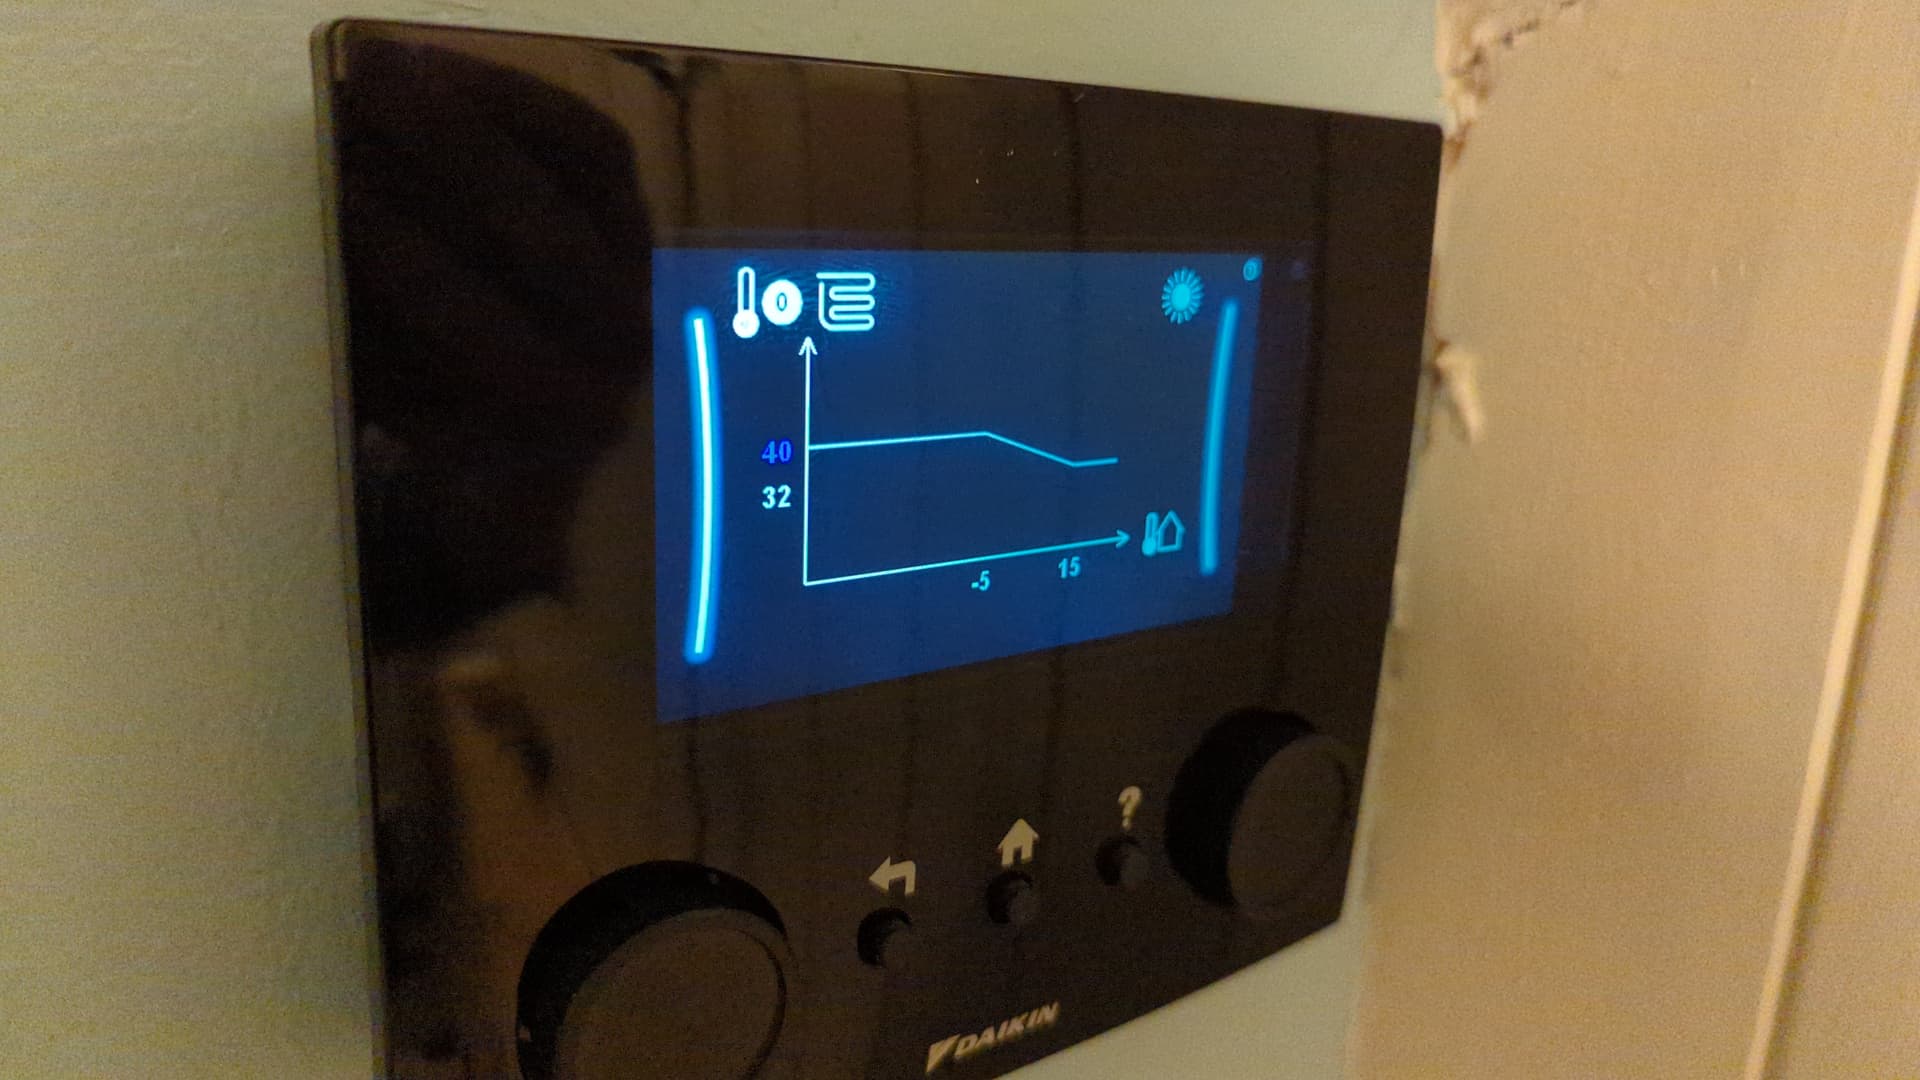
Took a bold step last night and went with ‘Pure Weather Compensation’, I cannot be happier, changed to UFH to get the overshoot 4 working, the HP has been at a constant ~500W and 7 l/min all day room temp is a bit high for me at 22 but the good wife will be happy. COP between 3.5 and 4.5 as the outside temp has risen from zero to three degrees.
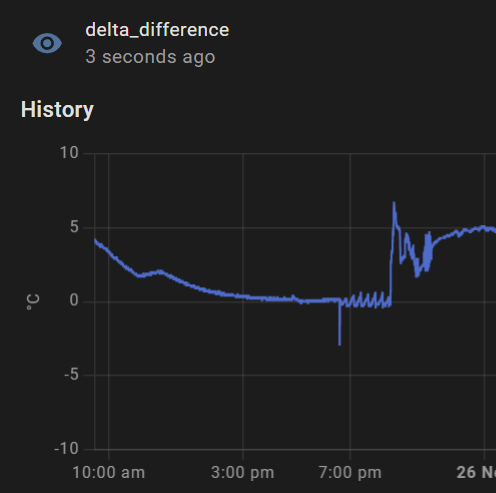
ps our design temp was 45 at -3, the LWT has been around 33, one other addition - the little micro power fluctuations are gone as i think the HP can modulate the DT and flow better.
I think I will stick with the ‘Pure Weather Compensation’ mode, at the moment I am not seeing a downside, the HP has not stopped in over 24hrs using very little power, it’s all good, BTW the micro power flutters are back when the outside temps increase. I did make an offset change -1 at 11am just to reduce the house temp.
One thing I am not sure of - when does the HP go into idle mode when the DT is near zero, I cannot find the answer when I RTFM…
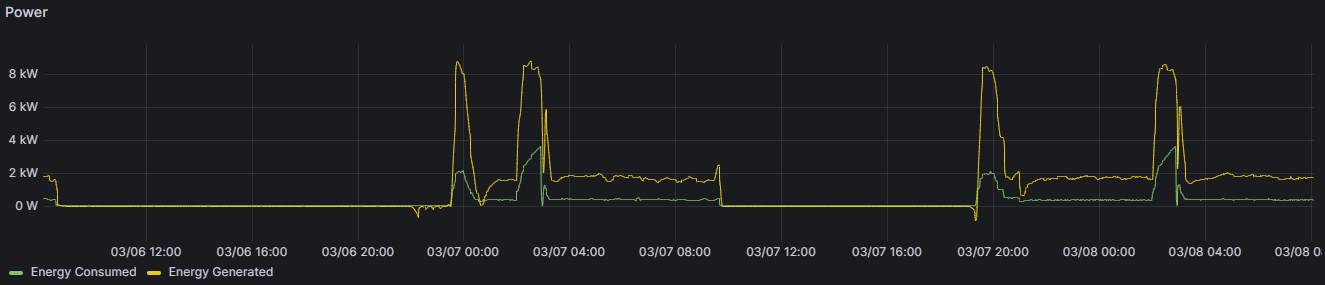
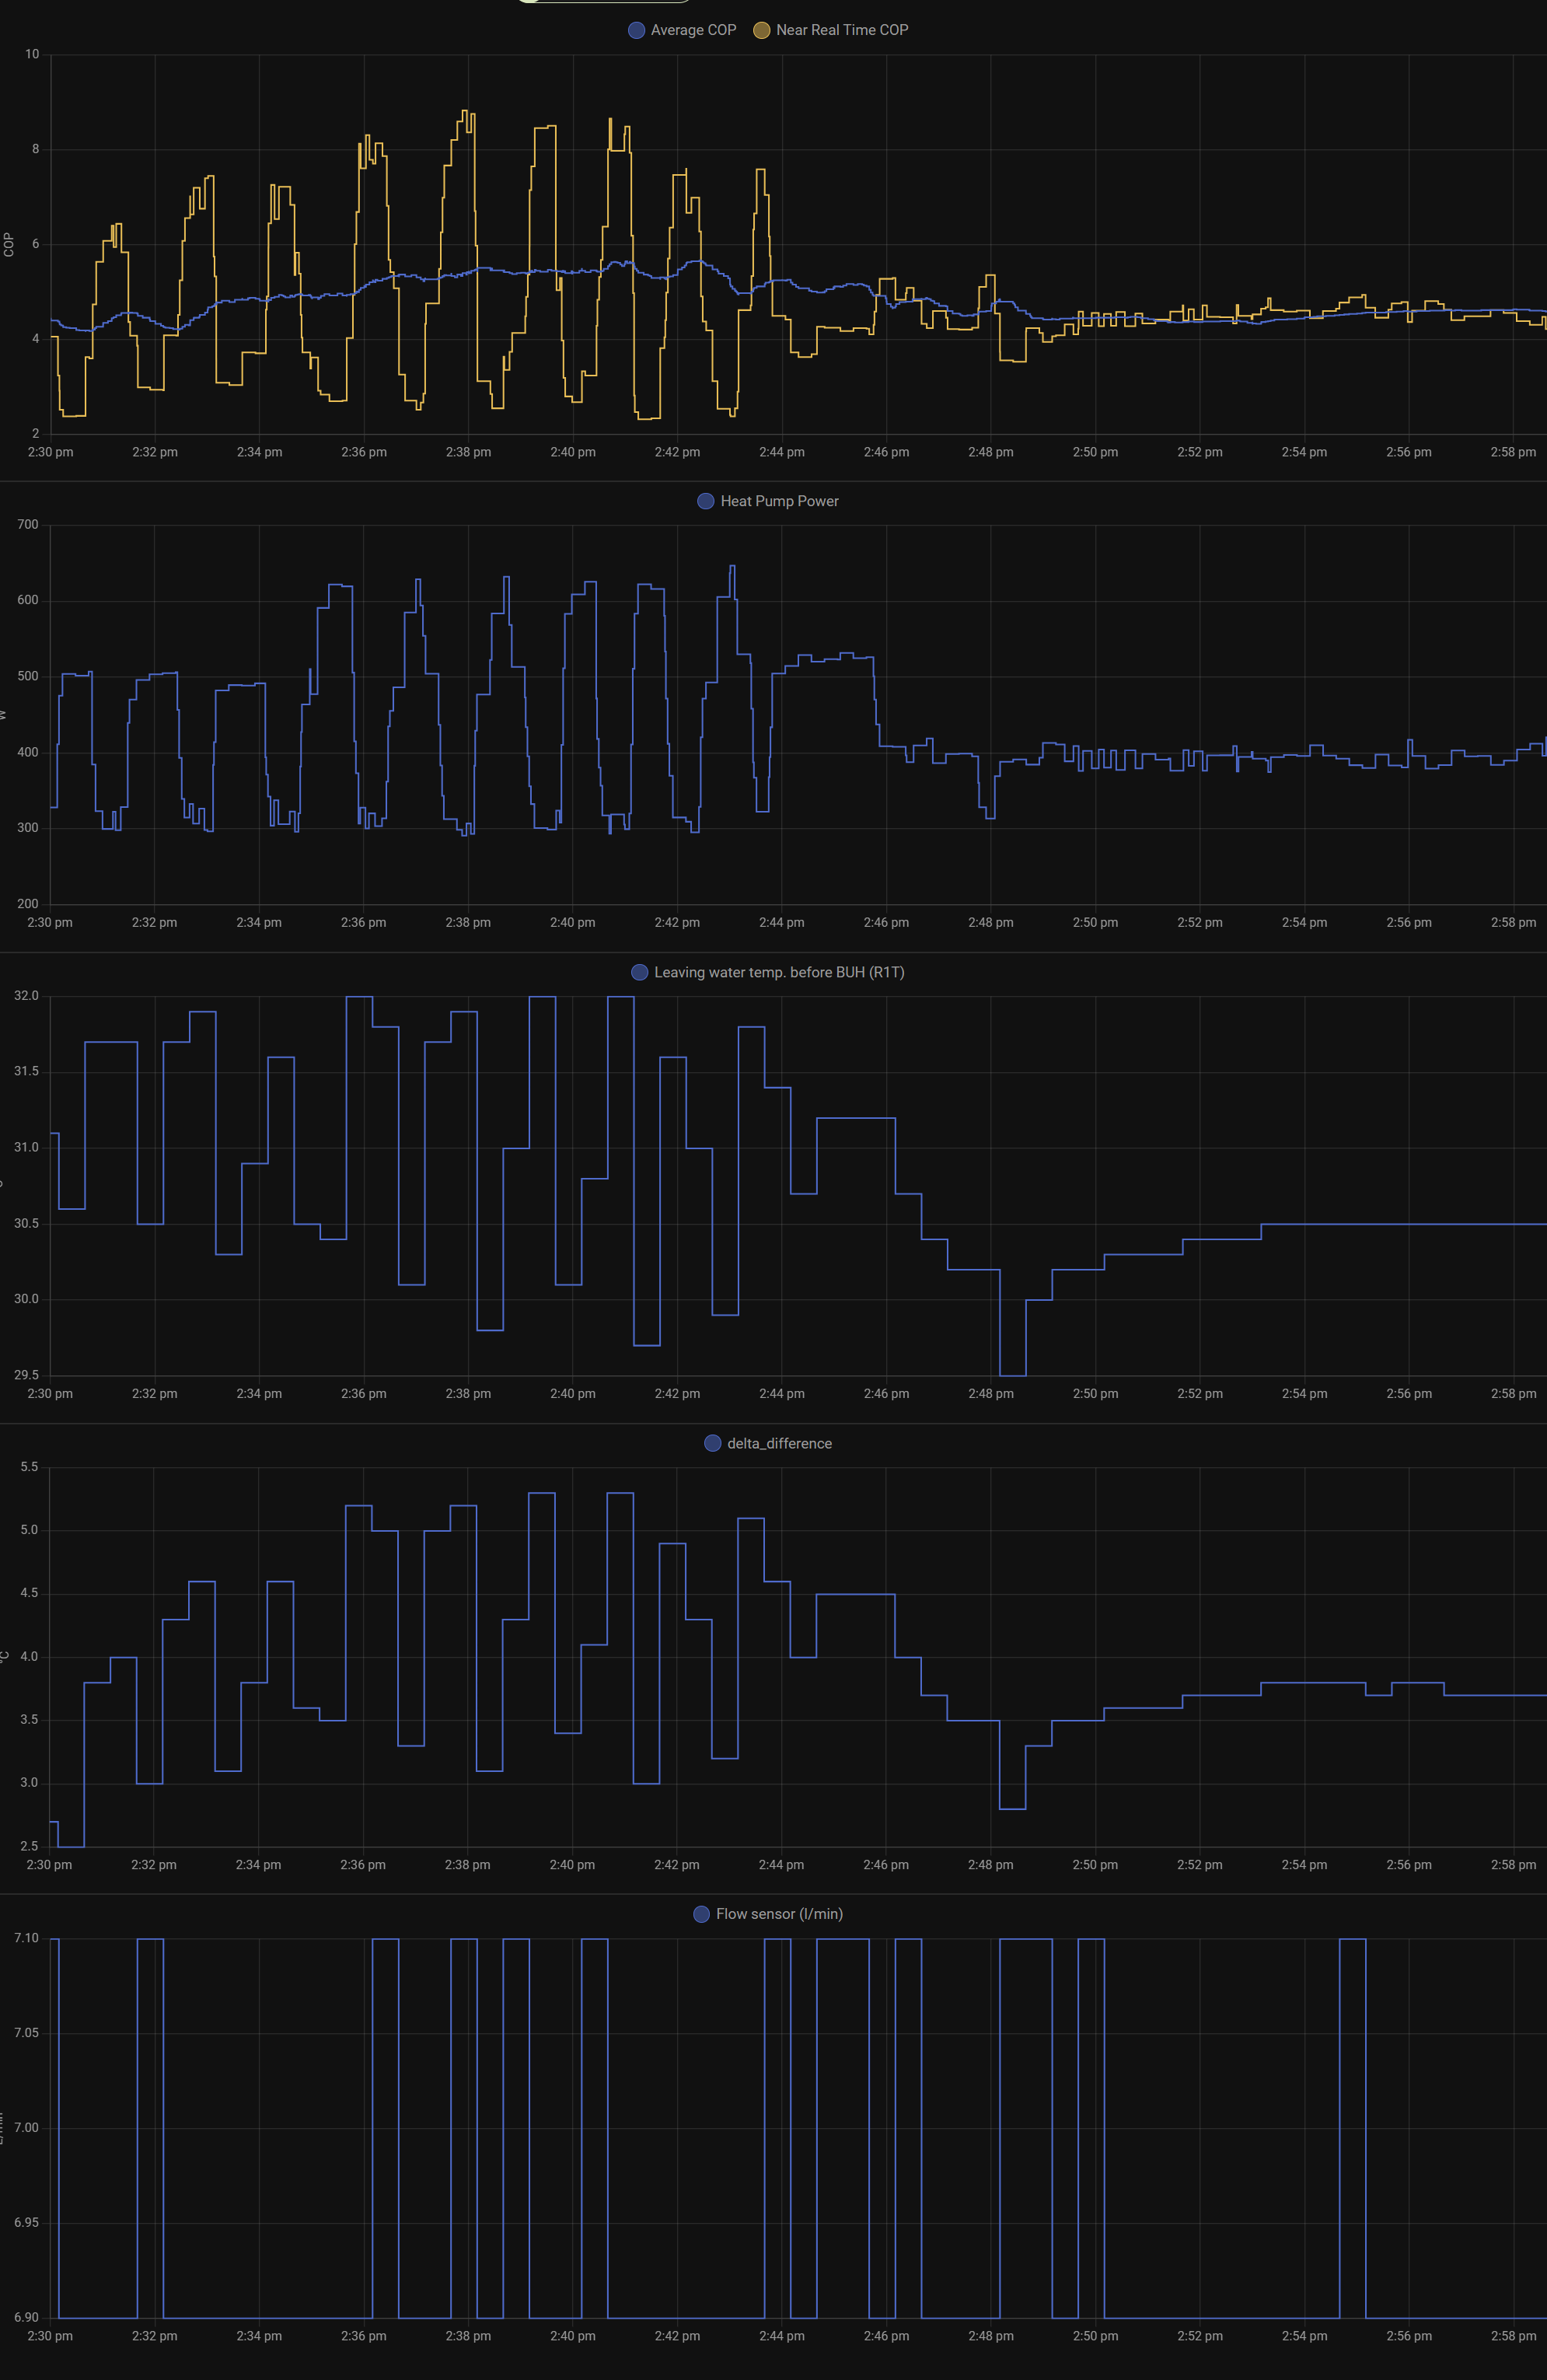
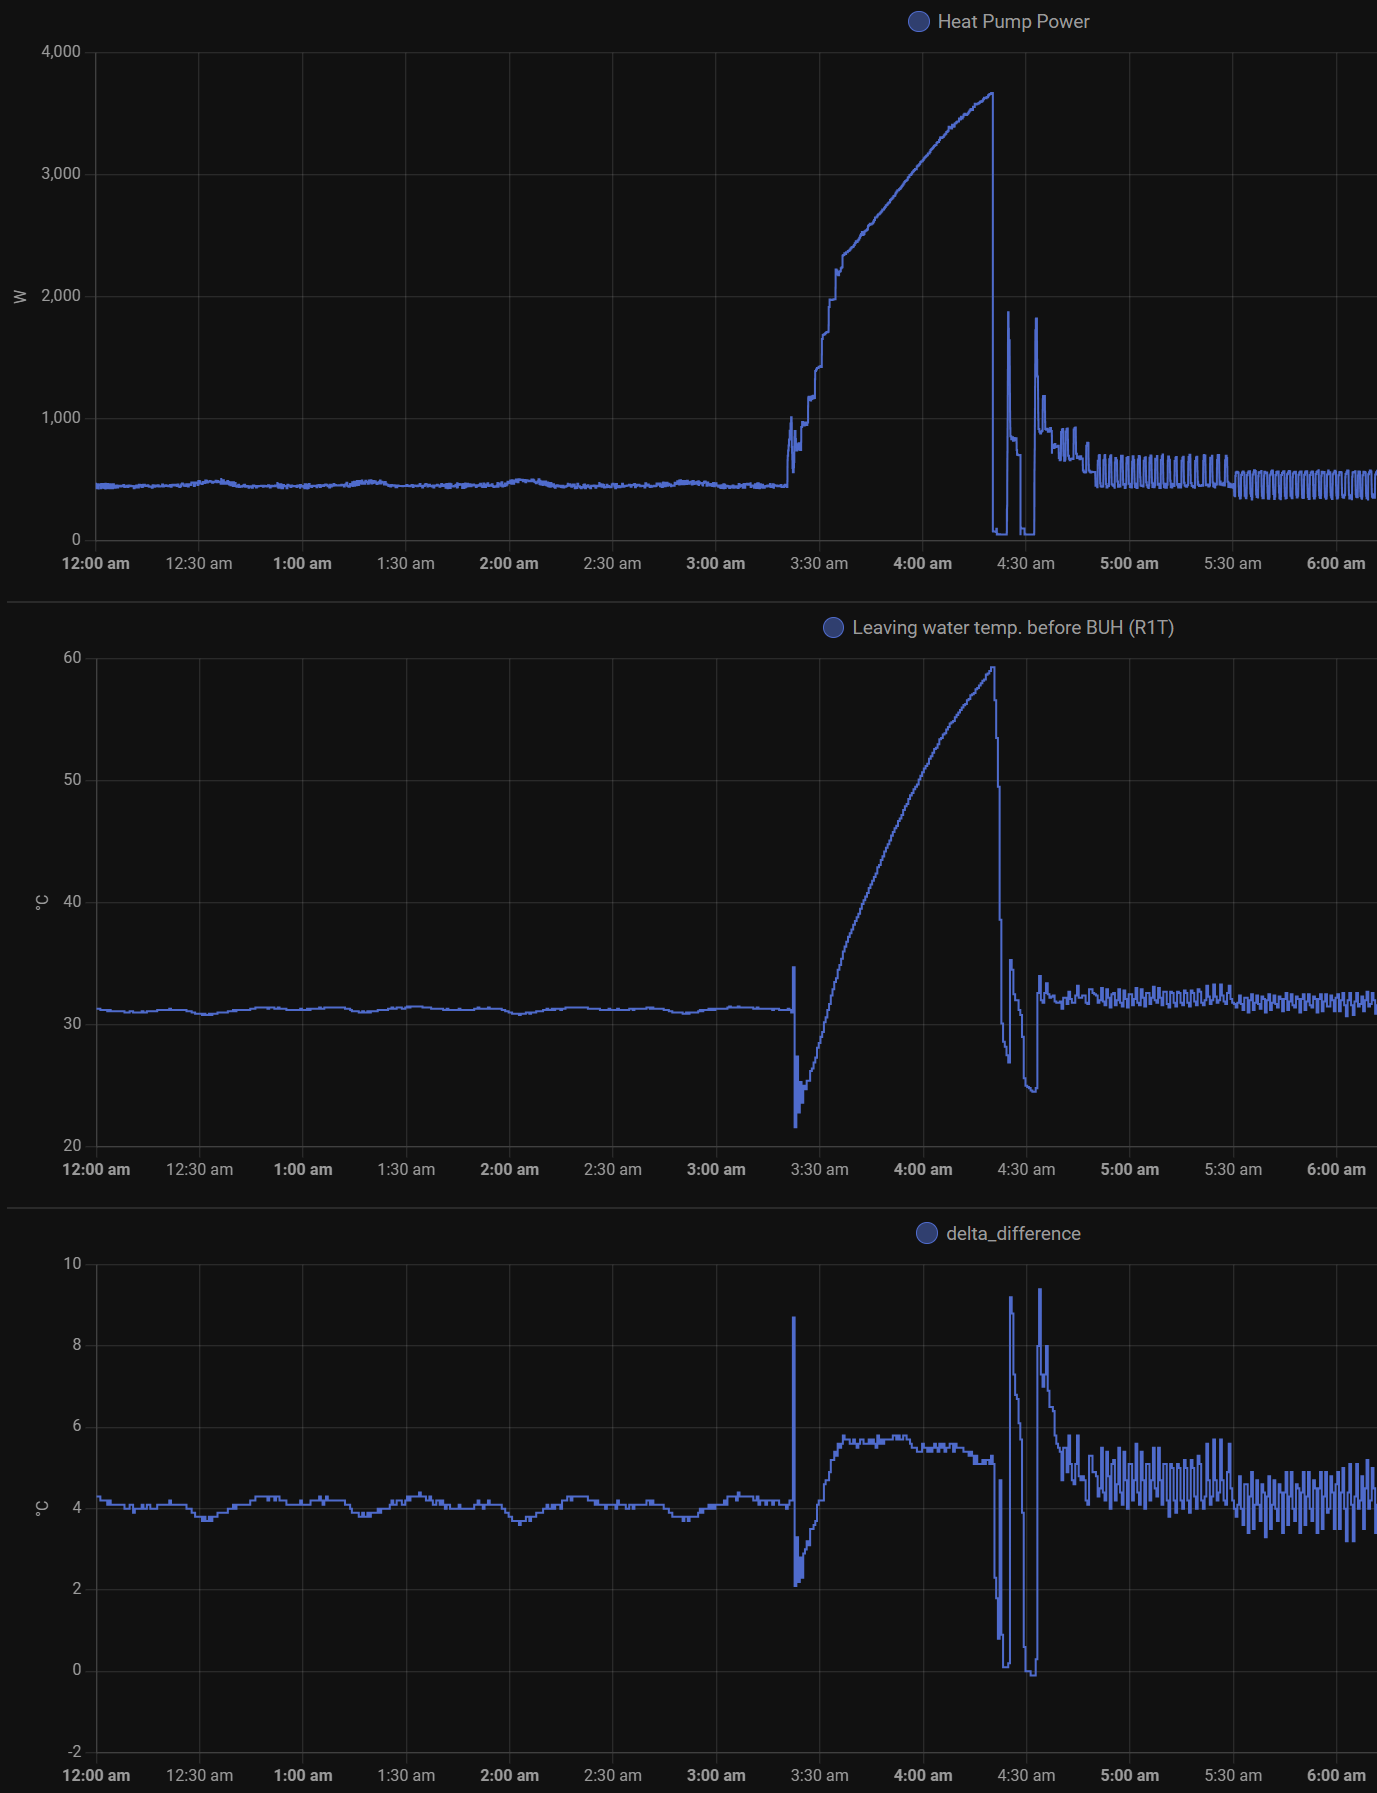
Probably a schoolboy error…… in my defence I am a telecoms Engineer lol - but i think i have figured it out, with pure weather comp - I have reduced the house from overheating by reducing the output of the radiators by balancing to the LWT of the emitter rather than a specific DT and a room comfort level, I was still seeing power fluctuations and erratic COP figures: but I did not touch the radiator/towel combo in the bathroom, I guess a short cut, now I have turned down that emitter it’s obvious in the graph below, the HP can now manage itself
I will be tuning the lockshields now further for the next few days…. One hack i am implementing, I go around with a drywipe pen and write on the DT and leaving water temp on each rad so i have a reference for the next tweak…. hopefully this will help others?
I really pay attention to your posts as they have helped me tweak my settings as well.
Quick question :
Although you have radiators installed, I recall setting the system to fan coils to be able to change the DT settings. Now you switched to UFH to get the overshoot working, however on my system although I am set on fan coils, overshoot is enabled. Is it not working ? Also is it better to leave DT to heat pump to modulate instead of setting at 5 ?
I am getting a lot of consumption and COP around 3.8 - 4.3 but outside temperatures are high meaning 12-17 Celsius, so I am not really happy.