ESP8266 howto reset eeprom and correct settings for arduino IDE

I have got a heatpump monitor… and some how the ESP8266 is not working…

got the following settings:

and the sketch folder looks like this:

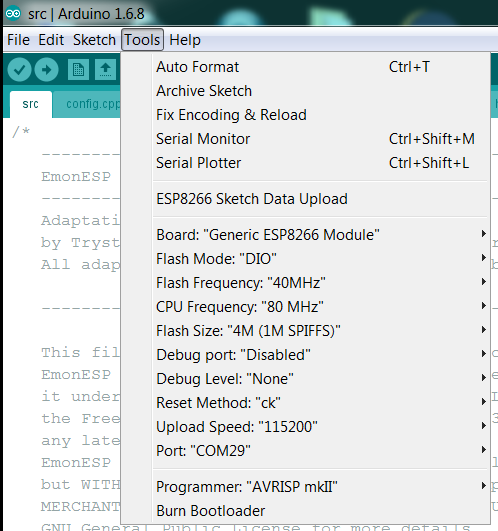
can anybody confirm that the settings in arduino IDE are correct…

and could sombody please guide me to wipe eeprom…

I am on a sharp deadline… I need to get the Heatpump module working… due to the fact that I have a big amount of funds that must be spent before the 1st of June… and it would be a shame to spend money on modules that do not work in this plant…

I like the specs on this module due to the fact it has a Mbus module that works in conjunction with a Kamstrup energi meter… and I need to log 3 heatpumps, 3 solar panels… some other water based energy storange…

regards
Henrik

got it working… will make a guide later…

Hi Henrik

I’m having the same challenge, my ESP is stuck in a boot loop and was looking for a way to wipe it.
How did you resolve it in the end?
Thx, Gordon

Hi Gordon

Disclaimer: following this guide is at your own risk… I cannot be made responsible if you damage your board.

First you will need this programmer: Programmer - USB to serial UART - Shop | OpenEnergyMonitor

I downloaded ESP-TOOL to erase the memory: GitHub - espressif/esptool: Espressif SoC serial bootloader utility
Follow the guide, install python 2.7

I made a wipe_all.bat file put the bat file in unzipped esptool-master folder

Remember to edit the comport number:

_esptool.py --port COM29 -b 115200 write_flash 0x000000 blank_1MB.bin 0x100000 blank_1MB.bin 0x200000 blank_1MB.bin 0x300000 blank_1MB.bin
pause

put the ESP into bootloader mode.
This is done my moving the jumper from TX pins to GPIO0 pin.

and run the wipe_all.bat file

That done go to the next step.

This guide works for the ESP8266 mounted on a Heat pump monitor board…

but same approach should also work on at esp8266 stand alone board.

I follow the guide from thil link GitHub - openenergymonitor/EmonESP: ESP8266 WIFI serial to emoncms link

Look for Option 2: Using Arduino IDE

read the entire guide, there are mentioned some libraries at the end of the the guide that you need to install in arduino IDE.

> If compiling fails because PubSubClient.h library cannot be found. Open the Library Manager again (Sketch > Include Library > Library Manager) and search for ‘PubSubClient’, install.

See attached PDF to get a picture guide.

ESP8266 wipe and reinstall.pdf (505.3 KB)

Good luck
Henrik

Hi Henrik

Many thanks for that it was the re-setting process that I really needed.

So when going though your really helpful process, I faced two challenges:

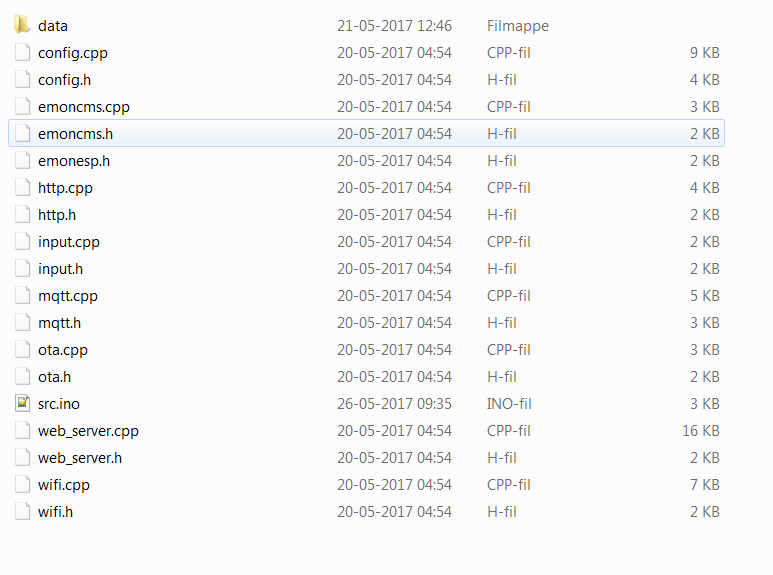
  1. The latest EmonESP web_server.h has 2 includes:

#include <Hash.h> #include <ESPAsyncTCP.h>

and they seemed to be missing, so I went back to an earlier version, which complied and uploaded OK (after re-installing PubSubClient :slight_smile: )

After rebooting the Heatpumpmonitor card, the data sketch uploaded fine, however this is the second challenge and is the reason for wanting to re-flash it in the first place.

  1. After removing the jumper from GP10 and rebooting, the ESP8266 is stuck in a boot loop, when I monitor the serial port I get

[CODE]

ets Jan 8 2013,rst cause:2, boot mode:(3,6)

load 0x4010f000, len 1384, room 16
tail 8
chksum 0x2d
csum 0x2d
v3de0c112
~ld

EmonESP 51805
Firmware: BUILD_TAG

Exception (3):
epc1=0x40100221 epc2=0x00000000 epc3=0x00000000 excvaddr=0x40013650 depc=0x00000000

ctx: cont
sp: 3fff29c0 end: 3fff2d20 offset: 01a0

stack>>>
3fff2b60: 3fff1c0c 00000219 00000219 4010020c
3fff2b70: 00000484 4024ff70 000003fd 4010068c
3fff2b80: 4010589e 3fff429c 000003fd 40106e04
3fff2b90: 4022ec42 000003fd 4024ff70 4022ec5f
3fff2ba0: 3fff4724 4022ecc5 3fff429c 000003ff
3fff2bb0: 000003fd 3fff2c60 3fff429c 000003fd
3fff2bc0: ffffff00 55aa55aa 0000000f 0000001c
3fff2bd0: 0000001c 000000a2 000000a2 000003ff
3fff2be0: 4022f0b4 3fff429c 3fff429c 000000ff
3fff2bf0: 00000001 3fff2c80 4022f23b 00000008
3fff2c00: 3fff429c 000000ff 3fff2c60 00000000
3fff2c10: 3fff435c 3fff2cc1 00000001 4022f2c8
3fff2c20: 3fff2c60 3fff429c 3fffdad0 3fff1cf0
3fff2c30: 3fff2c80 3fffa5d4 3fff429c 3fffdad0
3fff2c40: 4022f304 3fff1c34 00000000 40214770
3fff2c50: 4020d298 00000001 3fff0ee8 402147bf
3fff2c60: 00000000 00000145 3fff0ee8 40214ad5
3fff2c70: 00000014 00000a00 00000140 000000fd
3fff2c80: 3fff0e00 00000000 0000001f 40214b58
3fff2c90: 00000030 400042db 3fff2cf0 3fff1cf0
3fff2ca0: 40004b31 3fff405c 00000200 40206d0e
3fff2cb0: 00000010 00000140 00000140 40215214
3fff2cc0: 40210719 3fff1a68 00000200 3fff1cf0
3fff2cd0: 3fffdad0 3fff1a10 3fff1c34 4020a246
3fff2ce0: 3fffdad0 00000000 3fff1c34 40207c2a
3fff2cf0: 00000000 00000000 00000000 feefeffe
3fff2d00: feefeffe feefeffe 3fff1ce9 40215410
3fff2d10: feefeffe feefeffe 3fff1d00 40100718
<<<stack<<<
[/CODE]

it’s continually cycling, and not going into AP mode.

Anybody any ideas?

Thx

that is also the error i got. I think you did not get the entire memory wiped…

the wipe_all.bat looks like this:

esptool.py --port COM29 -b 115200 writeflash 0x000000 blank_1MB.bin 0x100000 blank_1MB.bin 0x200000 blank_1MB.bin 0x300000 blank_1MB.bin

You should see some sort of output i the command prompt. It takes about 1 minute or so to wipe the memory

all the above is in one line, can’t remember if I did, but think you should right click on the file and select “run as administrator

PS: i use ardunio IDE version 1.8.6

Hi Henrik,

Spot on, the memory wipe hadn’t cleared it properly, re-ran it, and then all loaded fine.

Now to get the Arduino side working.

I’m currently on arduino IDE Version 1.8.2

Thx, G

Finally :slight_smile: All up and working
Now to work out how to reconfigure the Wifi when moving it between sites :smile: