Hi,
I bought an emonTx last month and yesterday I started to configure it. The LED was lighting / blinking normally. I connected an emonESP Huzzah I bought here too. I was able to configure it just like explained in the site. I bought a UART to USB adapter too (here) and I tested too.
Everything seems fine until today. The LED is not lighting when I power it up and when I connect the Huzzah to the Emontx, I cannot find its IP address anymore in my network. It seems that emonTx is not powering up anymore. Did I do something wrong? Could I burn / brake it? Oh my God, I live in Brazil and it was very expensive… I kindly ask for some help, please.
Thanks,
Do you have a multimeter that you can use to check voltages?
What are you using to power the emonTx + ESP8266?
Yes, I do.
To power both I use the 9V ACAC I bought here and the USB port (I opened the JP2). Also, I tried only the USB and after only the ACAC but nothing…
OK, The a.c. adapter will not power both the emonTx and the ESP8266. You must have a USB power supply - either a 5 V d.c. adapter or a computer - to supply the extra power needed by the ESP8266.
When you are using the USB power, the a.c. adapter is only used to measure the voltage, it does not supply power when JP2 is removed.
Can you remove the ESP8266 module and check the emonTx on its own, using both the USB power (from your UART or d.c. adapter) and with the a.c. adapter with JP2 fitted?
Does the emonTx work like this on its own?
Can you measure the voltage on the screw terminals between terminal 3 (GND) and terminal 1 (5 V) and between terminal 3 & terminal 2 (3.3 V)?
You should measure 3.3 V both when powered by d.c./UART and the a.c. adapter + JP2, but the 5 V is only present when powered by d.c./UART.
1 Like
Thanks for the support Robert. See my answers below, please:
Does the emonTx work like this on its own? - No
Can you measure the voltage on the screw terminals between terminal 3 (GND) and terminal 1 (5 V) and between terminal 3 & terminal 2 (3.3 V)? 4.90V and 3.29V, respectively. (Powered by USB and 9V ACAC with Jp2 fitted).
You should measure 3.3 V both when powered by d.c./UART and the a.c. adapter + JP2, but the 5 V is only present when powered by d.c./UART. Yes. That was what I measured.
But nothing changed… Yesterday I started to learn how to upload a new firmware. I opened the Arduino IDE and PlatformIO with the USB connected to the board. I didn’t try to compile or upload the firmware. I was just playing around. Is there any possibility the firmware at the board has been corrupted?
Thanks,
I shall do my best.
That’s good - the power supplies appear to be OK.
I have no idea what Platformio does - when I installed it on my laptop, it corrupted my system, so from what I saw then, anything is possible. I deleted it, and I only work with the Arduino IDE.
All the instructions for installing the Arduino IDE and the libraries that you need are here: Learn→Electricity Monitoring→Using the Arduino IDE
Try loading this example “Blink” sketch (from the examples that come with the Arduino IDE, but our LED is on DO 6, so I have changed it for you).
void setup() {
  // initialise digital pin 6 as an output.
  pinMode(6, OUTPUT);
}

// the loop function runs over and over again forever
void loop() {
  digitalWrite(6, HIGH);         // turn the LED on (HIGH is the voltage level)
  delay(1000);                       // wait for a second
  digitalWrite(6, LOW);         // turn the LED off by making the voltage LOW
  delay(1000);                       // wait for a second
}
If that works, most of your emonTx is working.
The sketch in your emonTx will probably have been this: https://github.com/openenergymonitor/emontx3/tree/master/firmware/src
Try to compile and load that.
If that works, you can reconnect your ESP8266 and try that. I don’t have an ESP8266, so I don’t know all the details of what that does or how it works.
Thanks @Robert.Wall, sorry to hear that the EmonTx is not working @MarcioPaiva.
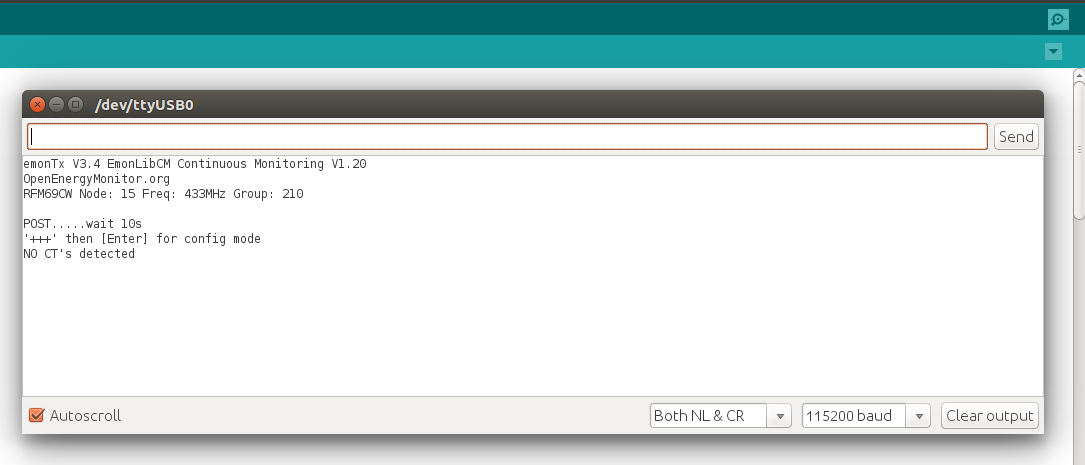
Just a small thing to add to Robert’s suggestions, do you see anything printed to the serial console when you power up the EmonTx? You can check the serial console from within the Arduino IDE as @Robert.Wall suggests.
The Serial console output may look like this
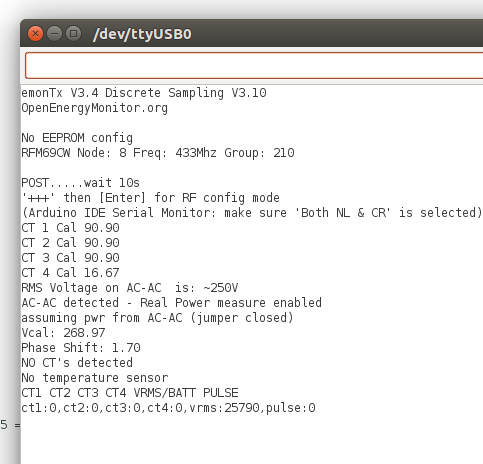
or more likely:
Hi Robert,
Both worked  the blink sketch and the emonTxV3.4 Continuous Sampling. Well, at least now the led is blinking and the sketch has been uploaded. Thank you so much!! Now I will test the emonESP again and I will let you know!
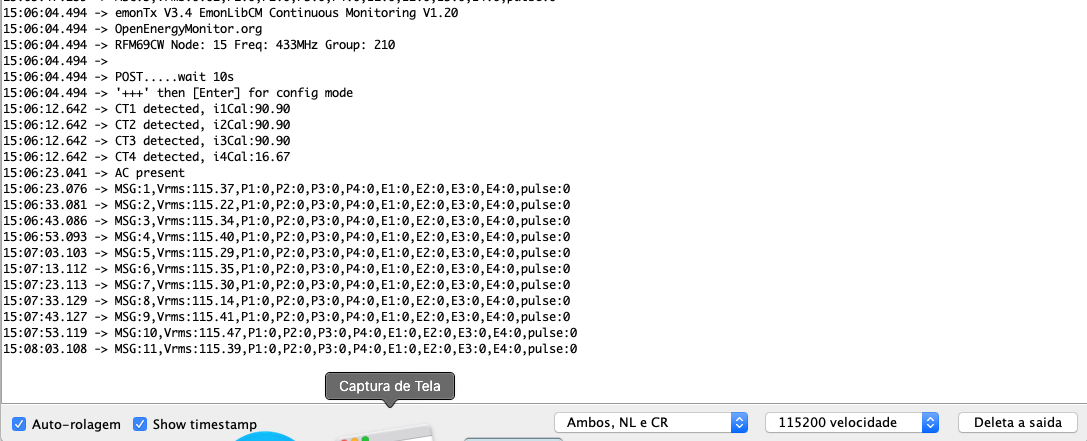
Hi Trystan! It seems now that is working… I will test it… See a capture of my screen, please:
Thanks for all the support!
Good to hear @MarcioPaiva you will want to set the baud rate (velocidade) to 115200 to see more sensible output I think
My sketch has these 4 lines at the beginning:
  Serial.begin(9600);
  Serial.println("Set baud=115200");
  Serial.end();
  Serial.begin(115200);
Thanks! Now it’s working! See:
My installation is a 3-phase with neutral 127Vca Line-ground / 220V Line-Line. I have already set the D9 dip switch to ON. Do I need to make any change in the sketch?
Thanks!
1 Like
Oh dear. You will not read the correct power for two of the powers - the ones that are on different phases to the a.c. adapter. This is because the new CM sketch is for single phase supplies only (like the UK & N.America).
You need the 3-phase sketch, and you also need to edit and re-load the software inside your ESP8266 - that’s because the 3-phase sketch cannot work at 115200 baud.
The three-phase sketch is here:
3-phase 3&4-wire PLL - V1.4: Post with checksums:
Update to 3-Phase PLL sketch - #15 by Robert.Wall
and the EmonESP special sketch (9600 baud) for use with 3-phase PLL sketch:
https://community.openenergymonitor.org/uploads/short-url/zegtvp5lICQT1w6J7ZoTXRnsiw3.bin
(or you can download the sketch source file and change the baud rate, then load that to the ESP8266).
You must carefully select the correct options in the sketch, there is full documentation (sorry but only in English) included in the .zip file.
2 Likes
After the update of the 3-phase sketch, the output of serial now has nothing. Is this right?
If you change the baud (velocidade) to 9600 you should then see data in the serial window.
Then in EmonESP you need to change this line to 9600:
EmonESP/src.ino at master · openenergymonitor/EmonESP · GitHub
and re-compile and upload the EmonESP firmware to the EmonESP module
Or use the pre-compiled sketch that you (@TrystanLea) provided that I gave the link to.
Thanks, but a silly question… how to upload this .bin file into emonESP using IDE?