WiFi MQTT Control Relay Thermostat setup through Node Red - Help

Hi All

I have just bought two WiFi MQTT Control Relay Thermostats from the OpenEnergyMonitor shop and was hoping to get some help in setting them up through code red.

I managed to brick one of the units by trying to upload the lastest firmware for the relay through the web interface. Hopefully I shall be able to reflash that one once a FTDI cable turns up.

Learning from my mistake, I left the other at the version supplied from the shop. I got the wifi set up and set up the MQTT on the relay (as per WiFi MQTT Control Relay Thermostat - Guide | OpenEnergyMonitor) to
Host: (ip address of my emonpi)
port: 1883
keepalive: 120
deviceid: (mac address)
user: emonpi
password: emonpimqtt2016
subscribe topic: emon/heating/control/#
publish topic: emon/heating/status/

I am trying to use code red, but I seem unable to see any values for emon/heating appear in code red. Furthermore, what am I supposed to put in the MQQT output to turn the relay on/off? There seems to be a lack of information on how to glue this together out of the box. Is there any way I can debug it?

My emoncms is the latest version, my emonpiRelease is emonSD-07Nov16

Any help gratefully accepted.

Penny

Hi Penny, do you mean Node-RED rather than ‘code red’ (Jack Nickolson, Tom Cruise, Demi Moore et al)? :grinning:.

Do you simply want to control the heating using this as the thermostat?

I think you can do that within itself; i.e. it has a scheduler built in via the devices web interface?

However, if you do want to control it manually, you do this by Publishing a 1 or 0 to the control topic.

From your links above;

To do that in Node-RED you can create a simple trigger and MQTT publish flow like this (ignore the blue dots);

image

Follow this guide and import the code below. Importing and Exporting Flows : Node-RED

[{"id":"fa5ee418.b01508","type":"inject","z":"bc23786f.345678","name":"On","topic":"emon/heating/control/","payload":"1","payloadType":"num","repeat":"","crontab":"","once":false,"onceDelay":0.1,"x":270,"y":420,"wires":[["714657ab.348058"]]},{"id":"714657ab.348058","type":"mqtt out","z":"bc23786f.345678","name":"","topic":"","qos":"","retain":"","x":520,"y":420,"wires":[]},{"id":"9e9a7e6f.561bf","type":"inject","z":"bc23786f.345678","name":"Off","topic":"emon/heating/control/","payload":"0","payloadType":"num","repeat":"","crontab":"","once":false,"onceDelay":0.1,"x":270,"y":480,"wires":[["714657ab.348058"]]}]

Hopefully that will get you started.

Thank you Brian,

I do indeed mean Node Red, sorry! :slight_smile:

I tried importing your config into my Node Red, changing the ip address for my relay but it still does not work:

Image1

Image3

My MQTT settings:

Image2

My Emonpi is on address 192.168.2.26
My Relay is on address 192.168.2.226

Am I missing something obvious here? I can do the Node Red programming thing, it is just frustrating that there is not actually a complete set of instructions (just outdated notes & videos that show only parts of the set up, etc.) to get this relay set up and working with EmonCMS and Node Red.

Ultimately I would like to turn things on and off when my solar is exporting to the grid, but I would like to excercise a bit more control over which items are on and off at which times (hence Node Red)

Penny

What you are missing is an understanding of MQTT.

There are 2 parts to MQTT, a client and a broker (server). Generally you have one broker which lots of clients connect to. The broker in this case runs on the emonPi (but emonCMS connects to it as a client) as does the thermostat and Node-RED. You need to connect your Node-RED MQTT node to the broker (i.e. 192.168.7.26). Then you can either subscribe (receive) data and/or publish (send) data to the thermostat from Node-RED.

There is quite a bit to Node-RED, you probably have a fair way to go.

There is a level of knowledge expected in any instruction. Equally it is not right to write an instruction that explains things such as MQTT from first principles. A google of MQTT would have probably explained what I have just done much better. If you want to contribute to these instructions and make them better, feel free.

emonCMS is inherently a data collection and visualisation system and not a home automation system. For that you need other tools.

Hi Brian

Thank you. I have managed to get it working: your comment about the MQTT pointed me in the right direction:

  • The address for all of the Node Red MQTT should be localhost::1883
  • The topic for the control in the import should be emon/heating/control/1
[{"id":"b9b1dcce.255e5","type":"inject","z":"a5ce04b2.5a31f8","name":"On","topic":"emon/heating/control/1","payload":"1","payloadType":"num","repeat":"","crontab":"","once":false,"x":332,"y":970,"wires":[["d3ca4d87.8ccd68"]]},{"id":"d3ca4d87.8ccd68","type":"mqtt out","z":"a5ce04b2.5a31f8","name":"","topic":"","qos":"","retain":"","broker":"8a9d92d6.75627","x":582,"y":970,"wires":[]},{"id":"81e888f3.e6b1b","type":"inject","z":"a5ce04b2.5a31f8","name":"Off","topic":"emon/heating/control/1","payload":"0","payloadType":"num","repeat":"","crontab":"","once":false,"x":332,"y":1030,"wires":[["d3ca4d87.8ccd68"]]},{"id":"8a9d92d6.75627","type":"mqtt-broker","z":"a5ce04b2.5a31f8","broker":"localhost","port":"1883","clientid":"","usetls":false,"verifyservercert":true,"compatmode":true,"keepalive":"15","cleansession":true,"willTopic":"","willQos":"0","willRetain":null,"willPayload":"","birthTopic":"","birthQos":"0","birthRetain":null,"birthPayload":""}]

For those who find themselves in my shoes, a basic get it connected guide for the WiFi MQTT Control Relay Thermostat and Node Red on the emonPi:

  1. Follow the instructions at https://guide.openenergymonitor.org/integrations/mqtt-relay to set up the wifi, note that the unit appears as OEM_NNN in the wifi list

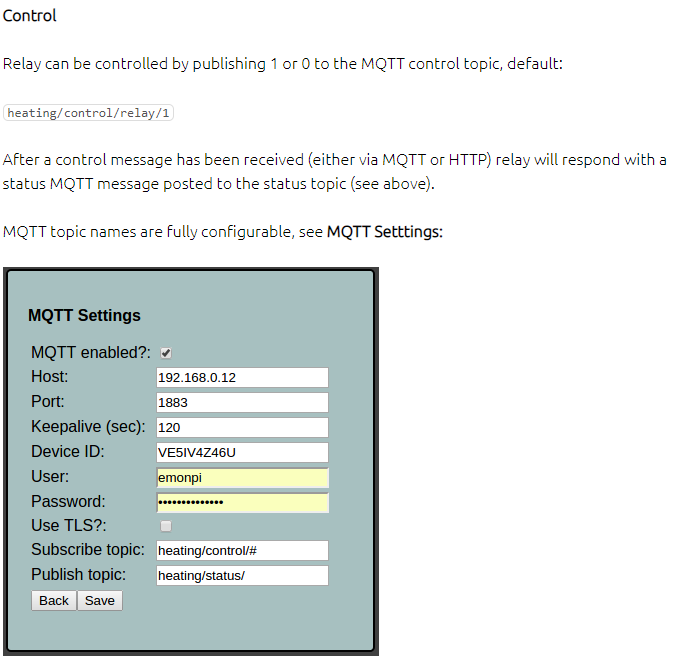
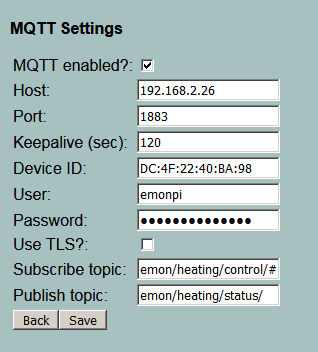
  2. Once the unit is on you network, select the MQTT option from the menu and set the following:

Restart the relay

  1. Connect to Node Red on :1880

  2. Copy this code below to the clipboard

[{“id”:“a04a2b21.66c87”,“type”:“debug”,“z”:“a5ce04b2.5a31f8”,“name”:"",“active”:true,“console”:“false”,“complete”:“false”,“x”:580,“y”:1150,“wires”:[]},{“id”:“19f53dd1.0b401a”,“type”:“mqtt in”,“z”:“a5ce04b2.5a31f8”,“name”:"",“topic”:“emon/heating/#”,“qos”:“1”,“broker”:“8a9d92d6.75627”,“x”:354,“y”:1143,“wires”:[[“a04a2b21.66c87”]]},{“id”:“7c8462a.c6b2c1c”,“type”:“inject”,“z”:“a5ce04b2.5a31f8”,“name”:“On”,“topic”:“emon/heating/control/1”,“payload”:“1”,“payloadType”:“num”,“repeat”:"",“crontab”:"",“once”:false,“x”:357.5,“y”:1236,“wires”:[[“16a859af.d48096”]]},{“id”:“16a859af.d48096”,“type”:“mqtt out”,“z”:“a5ce04b2.5a31f8”,“name”:"",“topic”:"",“qos”:"",“retain”:"",“broker”:“8a9d92d6.75627”,“x”:607.5,“y”:1236,“wires”:[]},{“id”:“ece429af.53f3”,“type”:“inject”,“z”:“a5ce04b2.5a31f8”,“name”:“Off”,“topic”:“emon/heating/control/1”,“payload”:“0”,“payloadType”:“num”,“repeat”:"",“crontab”:"",“once”:false,“x”:357.5,“y”:1296,“wires”:[[“16a859af.d48096”]]},{“id”:“8a9d92d6.75627”,“type”:“mqtt-broker”,“z”:“a5ce04b2.5a31f8”,“broker”:“localhost”,“port”:“1883”,“clientid”:"",“usetls”:false,“verifyservercert”:true,“compatmode”:true,“keepalive”:“15”,“cleansession”:true,“willTopic”:"",“willQos”:“0”,“willRetain”:null,“willPayload”:"",“birthTopic”:"",“birthQos”:“0”,“birthRetain”:null,“birthPayload”:""}]

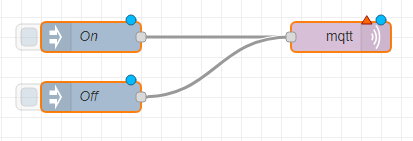
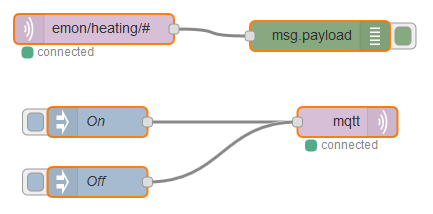
  1. In Node Red, import the the clipboard using the dropdown menu on the top right. You should have something that looks like:
    Image4

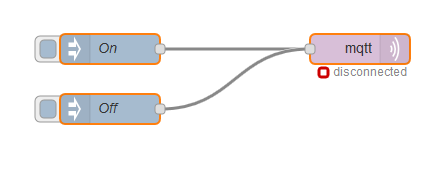
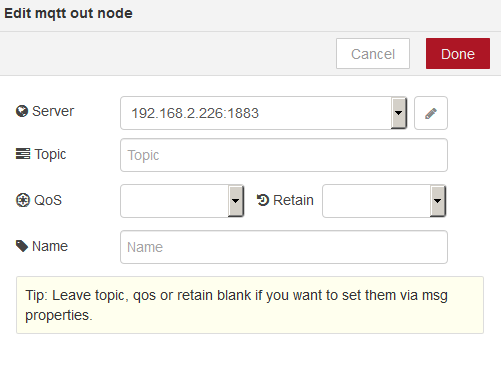
  2. Check that the mqtt output is pointing to localhost:1883

  3. Deploy the Node Red code.

  4. Select the button to the left of on/off. The relay should turn on or off. The debug display should show status messages from the relay

A note about updating the firmware on the relay:

The latest version of the relay firmware https://github.com/openenergymonitor/mqtt-wifi-mqtt-single-channel-relay will break the relay if uploaded through the web interface. You must follow the instructions at https://github.com/openenergymonitor/mqtt-wifi-mqtt-single-channel-relay/tree/master/firmware to do a full erase and flash. This can be done from a PC with python installed. Amazon sell a cable at https://www.amazon.co.uk/gp/product/B071WPW292/ref=ppx_yo_dt_b_asin_title_o00_s00?ie=UTF8&psc=1&tag=streetmap-21 that will do this.

By using the base topic of emon, anything you publish to that topic (from Node-RED for instance) will appear as an Input in emonCMS.

It would be better to choose a different base topic unless you want it to appear on the emonCMS Inputs page.