What to do next...improving the system

So just as some background, the start of March 2022 our boiler died, so seemed like a good idea to get an ASHP. Finally getting one installed in Sept 2022. Getting quotes was difficult plumbers would come and visit, but not quote, or would quote, but quote for 12/16kW units.
So ended up going with a localish company, who ended up subcontracting the ASHP install to a company in Wales. They advised no radiator upgrades required and a flow temp of 40˚C. So at the time it was the best option available and not having heating/hot water since March it was kind of getting desperate.

So some stats on the property.
1950’s 3 bed semi-detached, solid walls 330mm thick poured concrete. No internal/external wall insulation.
Heat required at -3C is 6.53kW
Total floor area is 72m2
No UFH

Heat loss per room @ -3C is as follows
Living Room 1954.58
Kitchen 947.6
Study 1084.04
Landing 144.29
Bathroom 660.69
Bedroom1 597.59
Bedroom2 509.54
Bedroom3 628.97

Giving a total loss of 6527.3

After the install and a failed commissioning (secondary pump not connected on house side of buffer) we had heat and hot water. It quickly became evident that it was going to use huge amounts of electric to run. The worst bit being though some rooms never got warm enough. So (for me at a least) a steep learning curve was undertaken in learning more about ASHP installs, especially to increase performance (so the house was actually warm when cold outside), along with the hope to be able to run of battery power predominately.

Changes I’ve made over the last 12months.

Fitted primary pro insulation to external pipes (7m run) this made quite a large impact.
Central heating main runs were in 15mm copper, I’ve upgraded these to 22mm PEX the non-coiled plastic pipe stuff. This dropped the flow temp by circa 5deg. All radiators are now directly off the 22mm other than the 4 in the living room, which has 22mm to ground level (comes in from the first floor) which then feeds into 15mm to the radiators.

Upgraded radiators working towards a delta a 10 ? A flow temp of low 30’s and a room temp of 20˚C for the ground floor and 18/19˚C for the bedrooms.

Upgrades are as follows (all K2 unless stated otherwise)

Living room
1600 x 750 x2 (798w)
2400 x 500 (467w)
1600 x 900 (482w)
Total w 1747

Kitchen
1000 x 900 (301w)
800 x 900 (241w)
Total w 542

Study
1000 x 700 x2 (1722w)

Bathroom
1200 x 700 (303w)

Bedroom 1
900 x 600 (690w)

Bedroom2
900 x 600 P+ (88w)

Bedroom3
900 x 600 (690w)

Landing
800 x 600 P+ (88w)

Due to space/lack of wall for any more radiators a delta 10 wasn’t really possible in the worst case, so ended up being more like a delta 12.5-15 in the end.

The upside is the house warms up much quicker, no cold spots (as per last year)

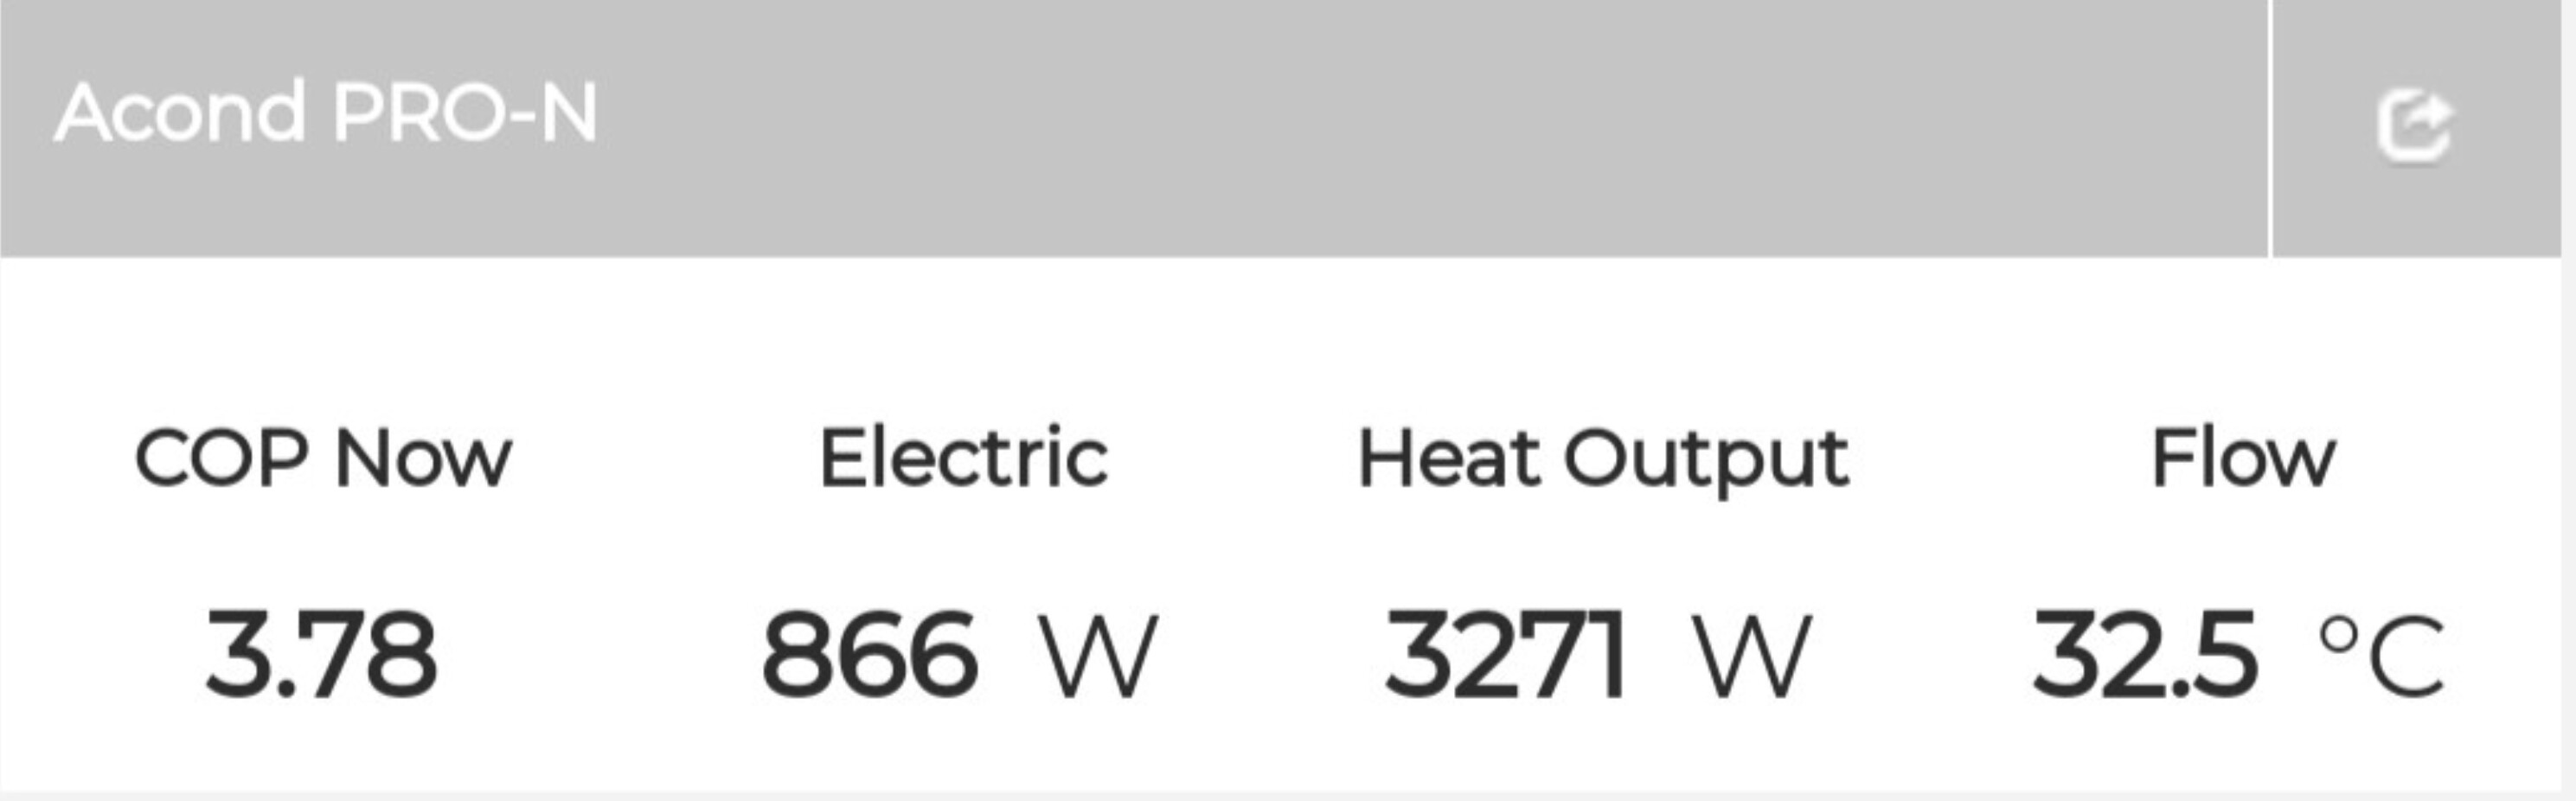
I installed heatpump monitoring kit in Febuary this year which has been very insightful and helpful. I have no idea what COP I was doing during the winter last year, but I do know that my 2 8.2kWh batteries on colder days would be drained before noon, now though they’ll last through to late afternoon/early evening.

Ideally, I’d like to improve my COP as it’s still not the greatest to say the least (in comparison to other systems), just to make the batteries last that bit longer. I don’t know if that’s an achievable goal or not really, or how I would go about improving it some more.
The pipe run from the ASHP to the furthest away radiator is circa 26m of which 4m of that is 15mm copper (at the end). Swapping out the 22mm plex to 22mm copper (circa 10meters), would obviously be less restrictive, but if of any benefit I don’t really know.

So just after pointers what to investigate for improving next really.

Of course the stats for the ASHP in question is here

https://emoncms.org/app/view?name=MyHeatpump&readkey=3eee4128b572e459bf65f2deaf9707d7

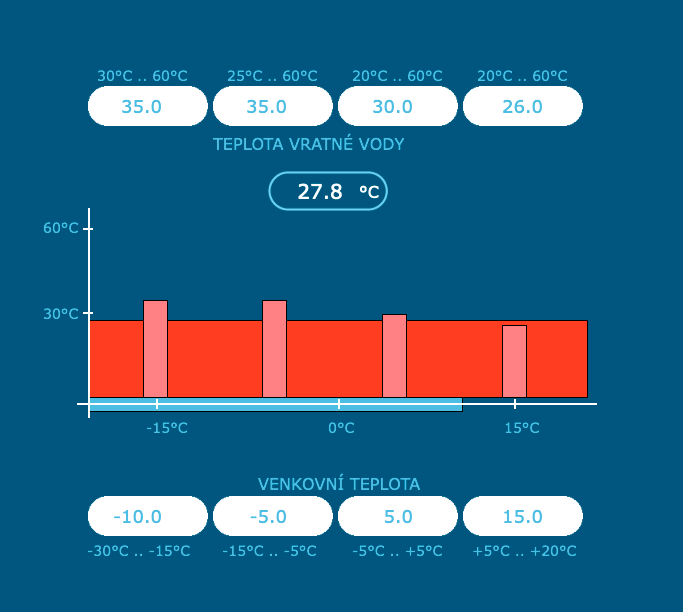
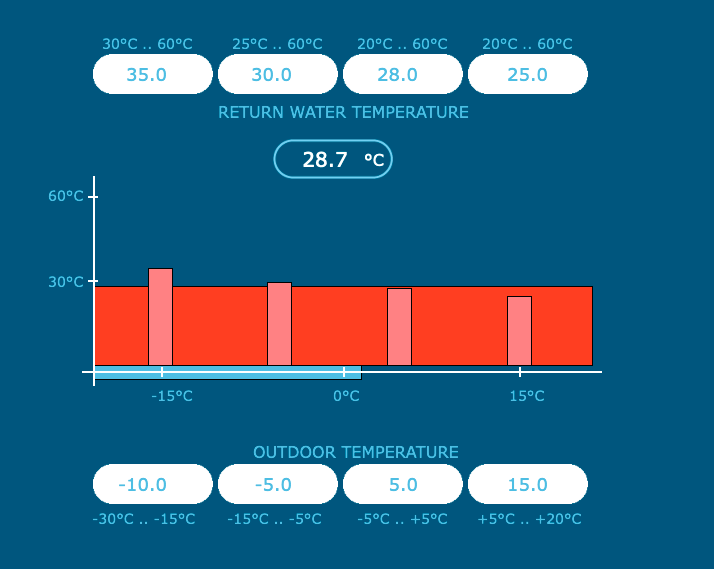
Lots of people go on about a heating curve, mine will either run fully automatically (weather comp and dynamic curve, or the attached image shows manually set cure + weather comp. All temp settings can be manually input on the screen.

Thanks for any thoughts.

3 Likes

so a few thoughts of mine. although our houses and systems are different sizes, I also have 90% K2 radiators and the odd P+. I’ve compared our systems and we have similar lines, yours a little bit better (yours is Kidderminster right?).

I’m reasonably happy with my system as it is, getting 4.0 at 7C and 2.3 in the defrost-heavy freeze we just had , but obviously there are better in the league table and we all want to get higher ! Getting super-sized emitters into my setup isn’t feasible, so my feeling at the moment is that to get any better, I need to up the flow rate further where I can, I wonder if you may have the same issue.
I know there are a still couple of places in my house where still some 22mm pex which is carrying more rads / going further than is ideal. upping those to 28mm will be a job for next summer. Are you aware that with 22mm pex , due the 3mm wall thickness , the inner diameter is only about 16mm? so only 2.4mm better than 15mm copper (0.7mm walls). So in the places you mentioned where it carries multiple radiators and/or runs a long way, it may not be enough.

3 Likes

Yes, I’m in Kidderminster It’s the only Acond unit in the sea of Valliant :rofl:

Interesting stats, I’ll have to have a look into this comparison tool.

For a reasonable amount today mine has be using circa 500w and COP 4-4.5 which Is alright. Like you say always room for improvement.

It was Dec last year and a Sunday, so that why I ended up with pex, it was a long day that day. I was aware of the 22m pex internal diaamter, but thought it’s going to better than 15mm trying to feed 9 rads. It was kinda on my summer list this year to look at replacing the pex but ended up replacing the external insulation as it was zip tied and had pretty large gaps in it.
I have thought about moving the entry point of the pipes from the attic to the airing cupboard (which they go past), as this will half the exterior run and also take about 3-4 meters out of the heating run.
Downside is it’s pretty cramped in the airing cupboard already without try to drill through and fit 3 way vales as well. However it would also bypass the 100L buffer tank (however the installers have said removing that would invalidate the warranty), but they quoted me £500 for a service anyhow so it’s like 6 years and it will pay pretty much for a new pump.(but that’s another can of worms).

I did come across some 35mm external insulated bendy pipe which had the same internal as 22mm copper, but that was ££££ and probably overkill.
Never really thought about upping the main runs to 28mm, had considered 22mm. Wonder if any negatives of running 28mm. I will have to get watching some more heatgeek vids and work out watts required and pipe sizing for the runs.

Thanks for your reply and thoughts, appreciated.

1 Like

Looks like you’ve made good improvements already but I agree there’s always more to tweak! If you’re stuck with a buffer (there’s some simple tests to see if you really need it) it would help to ensure the primary (ASHP) flow rate is equal, or very close to the secondary pump’s flow rate. Tricky to measure if you don’t have a secondary heat meter, but if you can measure the in/out temperature difference (flow in to flow out) and minimise this difference, say to 0.5C, this will make the buffer work more efficiently (you want a good thermocline so no mixing up/down the buffer) and thermal distortion will be reduced.
My system was fitted with a 25 litre buffer which I since have all-but proved is unnecessary, and I’ve tweaked the flow rates as much as poss., to match. On my Vaillant Aro+, I leave the unit flow rate on “auto” which means it controls to a constant DT, and after setting the sec. pump speed to the best match, I fine-tune the sec. flow rate by choking-down one of the pump’s isolating valves if too high, or opening-up lockshields on the cooler rads if too low. We’re not talking big adjustments, but it’s improved system efficiency for me. Will be better without the buffer, though, and I’ll bypass it next summer, turning it into a volumiser to keep system volume up.
Cheers, Andy

1 Like

I have just looked at the information page and it mentions you are running your DHW at 50*c, If you are not running out of hot water are you able to lower the temperature down to 45 or 43?

DHW cycles can be a real COP killer, especially if you have small, uninsulated or undersized primary pipework between the Cylinder and the ASHP. Also depending on how much you use and the tank volume you could also try setting it to only heat water on reheat (not on a schedule), This way you will be able to heat the tank in one go and maximize the energy input at the higher temperatures.

How long is the pipe run from ASHP to the cylinder, again on longer runs you may want to consider upsizing the primary pipework.

Regarding radiators we had 4 upstairs on 15mm copper flow and return and this was an issue and during the system installation or commissioning they got blocked up. The installer cam back and retrofitted to 22mm and we now have a much better flow rate.

One thing you haven’t mentioned and I cannot see on the page is what the system flow rate is (flow rate is one of the main COP killers.

2 Likes

Thanks @Fortune7 & @KnightPhoenix I’ve got a busy few work days ahead so will come back to you both in due time. As I don’t have all the answers to hand.

I’ll get some heat meters on the buffer.

Flow rate I have no idea, will have to have a look on the meter.

Length of pipe work to DHW Tank is 7m in 28mm and 2m in 22mm all lagged. Probably need to updated the page , DHW temp is set to 45˚C, but it overshoots and ends up at 48˚C. Have lowered it a few degrees this morning. DHW tank volume is only 140L So it gets used pretty quickly. I don’t have a login to the admin side of the controls, so only options are timed or on demand. On demand seems to kick in with a 7˚C Drop. So moved to timed (2x per day) Reheat times are about 60-80minutes.

1 Like

I am guessing the Primaries are 28/22mm copper, 22 mm should be sufficient but if you do have the option to cut the run in half and go all the way in 28mm that would be my preference. It may be overkill but I have yet to see a COP killed by lower resistance and better flow rates.

For the radiator flow / return, If you are in a 2 floor house and have an upstairs & downstairs circuit then you should be able to split these direct from the 28mm feed by the Tank (t piece 28mm → 2x22mm) that way you can (in theory) send up to 6kw to each circuit.

All of the above is provided it is in Copper, if using PEX you will likely need to go to the next size up due to the restrictions on the fittings. I would personally be looking to go copper but as you mentioned definitely a summer job.

One other thing to mention is that at 30°c and with a heat pump, a DT of 10 is quite high, It would be worth reviewing the manual and the settings on the heat pump to see if this can be lowered.

1 Like

28mm pex fittings are big, ugly , expensive. But easy to work with for DIY’er.
my rule has always been where I’ve needed to use PEX instead of copper for reasons of ease of fitting (bendiness) then go up a size. So for example I have some radiator side trunk pipework that is serving 3 large rads, it would be ok in 22mm copper, but its done in 28mm PEX because it has to bend through an absolute **** of an awkward hole between the downstairs toilet and the kitchen.

3 Likes

Finally have some time so can update a little.

Thanks for the chart @KnightPhoenix copper 15 > 22 is a significant jump, 22mm PEX is probably a bit Meh in comparison, so will upgrade to 22mm copper in the summer.

Primaries are in 28mm and heating circuit in 22mm copper and 22mm PEX.

After @Ian_Calderbank comment I priced up installing 28mm PEX (where current 22mm is used), It’s pretty much 2x the cost, due to fitting costs predominately. So upgrading to 22mm copper with a 3m run of 28mm PEX (just because the impossibility to run 22mm copper (doesn’t bend as well as PEX), seems like the way forward. Copper 22mm even with hiring a press fit tool (and fittings) is pretty much half the cost of going 28mm speedfit.

@Fortune7 I have found some old readings from the buffer I took not long after install which showed a 5˚C difference between flow / return on both sides. I’m waiting on batteries for the heat meters which seem to be taking an age to arrive (should be here this week). So will see what it is now post the current changes.

Heating circuit wise it’s just a single primary run on the 1st floor with drops in 15mm to ground floor rads. The run from 3 way valve to furthest radiator is roughly 26m away.

During the recent cold snap and well when it was warmer with the ASHP in full auto mode, it seemed to overshoot. As in, after set back had ended it would ramp up pretty high, then have short period of running 500-700w before going over the room stat temp, so then would turn off, then repeat the process once room temp had dropped .3˚C below the set point and repeat the process. With all the talk of the valiant heat curves, I investigated what they were exactly and came across this helpful page.

So, I’ve manually configured a heat curve of 0.3 with room temp of 21˚C (still uses weather comp). This has resulted (even taking into account the milder weather) some decent improvements in COP, now seeing low 5’s and high 4’s, which looking back at days with similar outdoor temps prior to the changes seems to roughly equates up to a 0.5 COP increase.

My current heating curve looks like this now.

2 Likes

I’ve managed to get logged into my local emoncms heatpump pi :smiley:

@Fortune7 flow rate is “0.87” but I’ve yet to clarity what that number actually is.

1 Like

would assume it to be in m3/h based on the value. no other unit would make sense. Equals about 14.5 litres/min which is a sane value for a heat pump of your size.

1 Like

There are usually 4 ways to show flow rate

m3/hour, litres/sec, litres/min, litres/hour

0.87 m3/h x 1000 = 870 litres/hour
870 litres/hour / 60 = 14.3 litres/min
14.3 litres/min / 60 = 0.239 litres/sec

You can then use the litres/sec flow rate in the mass flow calc.

Heat Output (kW) = flow rate x DT x SHC (4.2 for water).

0.239 x DT5 x 4.2 = 5.019 kW

Which is why most 5kW models target 860 l/h flow rate, so it can hit 5kW at DT5. :+1:

I created this noddy flow rate chart for the Vaillants.

image

Glad you found it helpful. :wink:

1 Like

Sorry I’ve not got back with the buffer heat temps, it’s getting towards the top of my list of priorities in the list time I have. Being out of the house for 14 hours a day doesn’t leave much room for other stuff currently.

Thanks @Ian_Calderbank as well for the expansion on the flow rate.

@Zarch Most informative post. I have seen heat output hit 6kW on DHW runs, but I think that 28mm all the way to the DHW cylinder. So flow rate isn’t a limiting factor on the ASHP side of the buffer then at least.

Yes “everyone” is always on about what valiant curve they’re on so at least now I can match them with ease. :grin:

With the recent colder weather I think it’s not doing to badly, this was at -2˚C outside, house was heated to 21.2˚C.

Thanks.

At last I’ve been able to get the flow temps off the buffer.

So flow temp is set to 27.6˚C in the ASHP control software, flow temp on OEM is reporting 30.2˚C

So ASHP side of the buffer temps are 29.0˚C and 25.2˚C
On heating side of the buffer temps are 27.1˚C and 25.5˚C

ASHP not working particularly hard today.