Temperature and Humidity monitoring

Currently I have Eve Thermo HomeKit enabled TRVs on most of my radiators.
Since moving to a Heat Pump I’m thinking or removing these to have no TRVs on all radiators apart from the bedrooms where I will put some standard ones on again and set them to stop those rooms overheating. I have currently set the ones I want to be open with very high target temperatures.

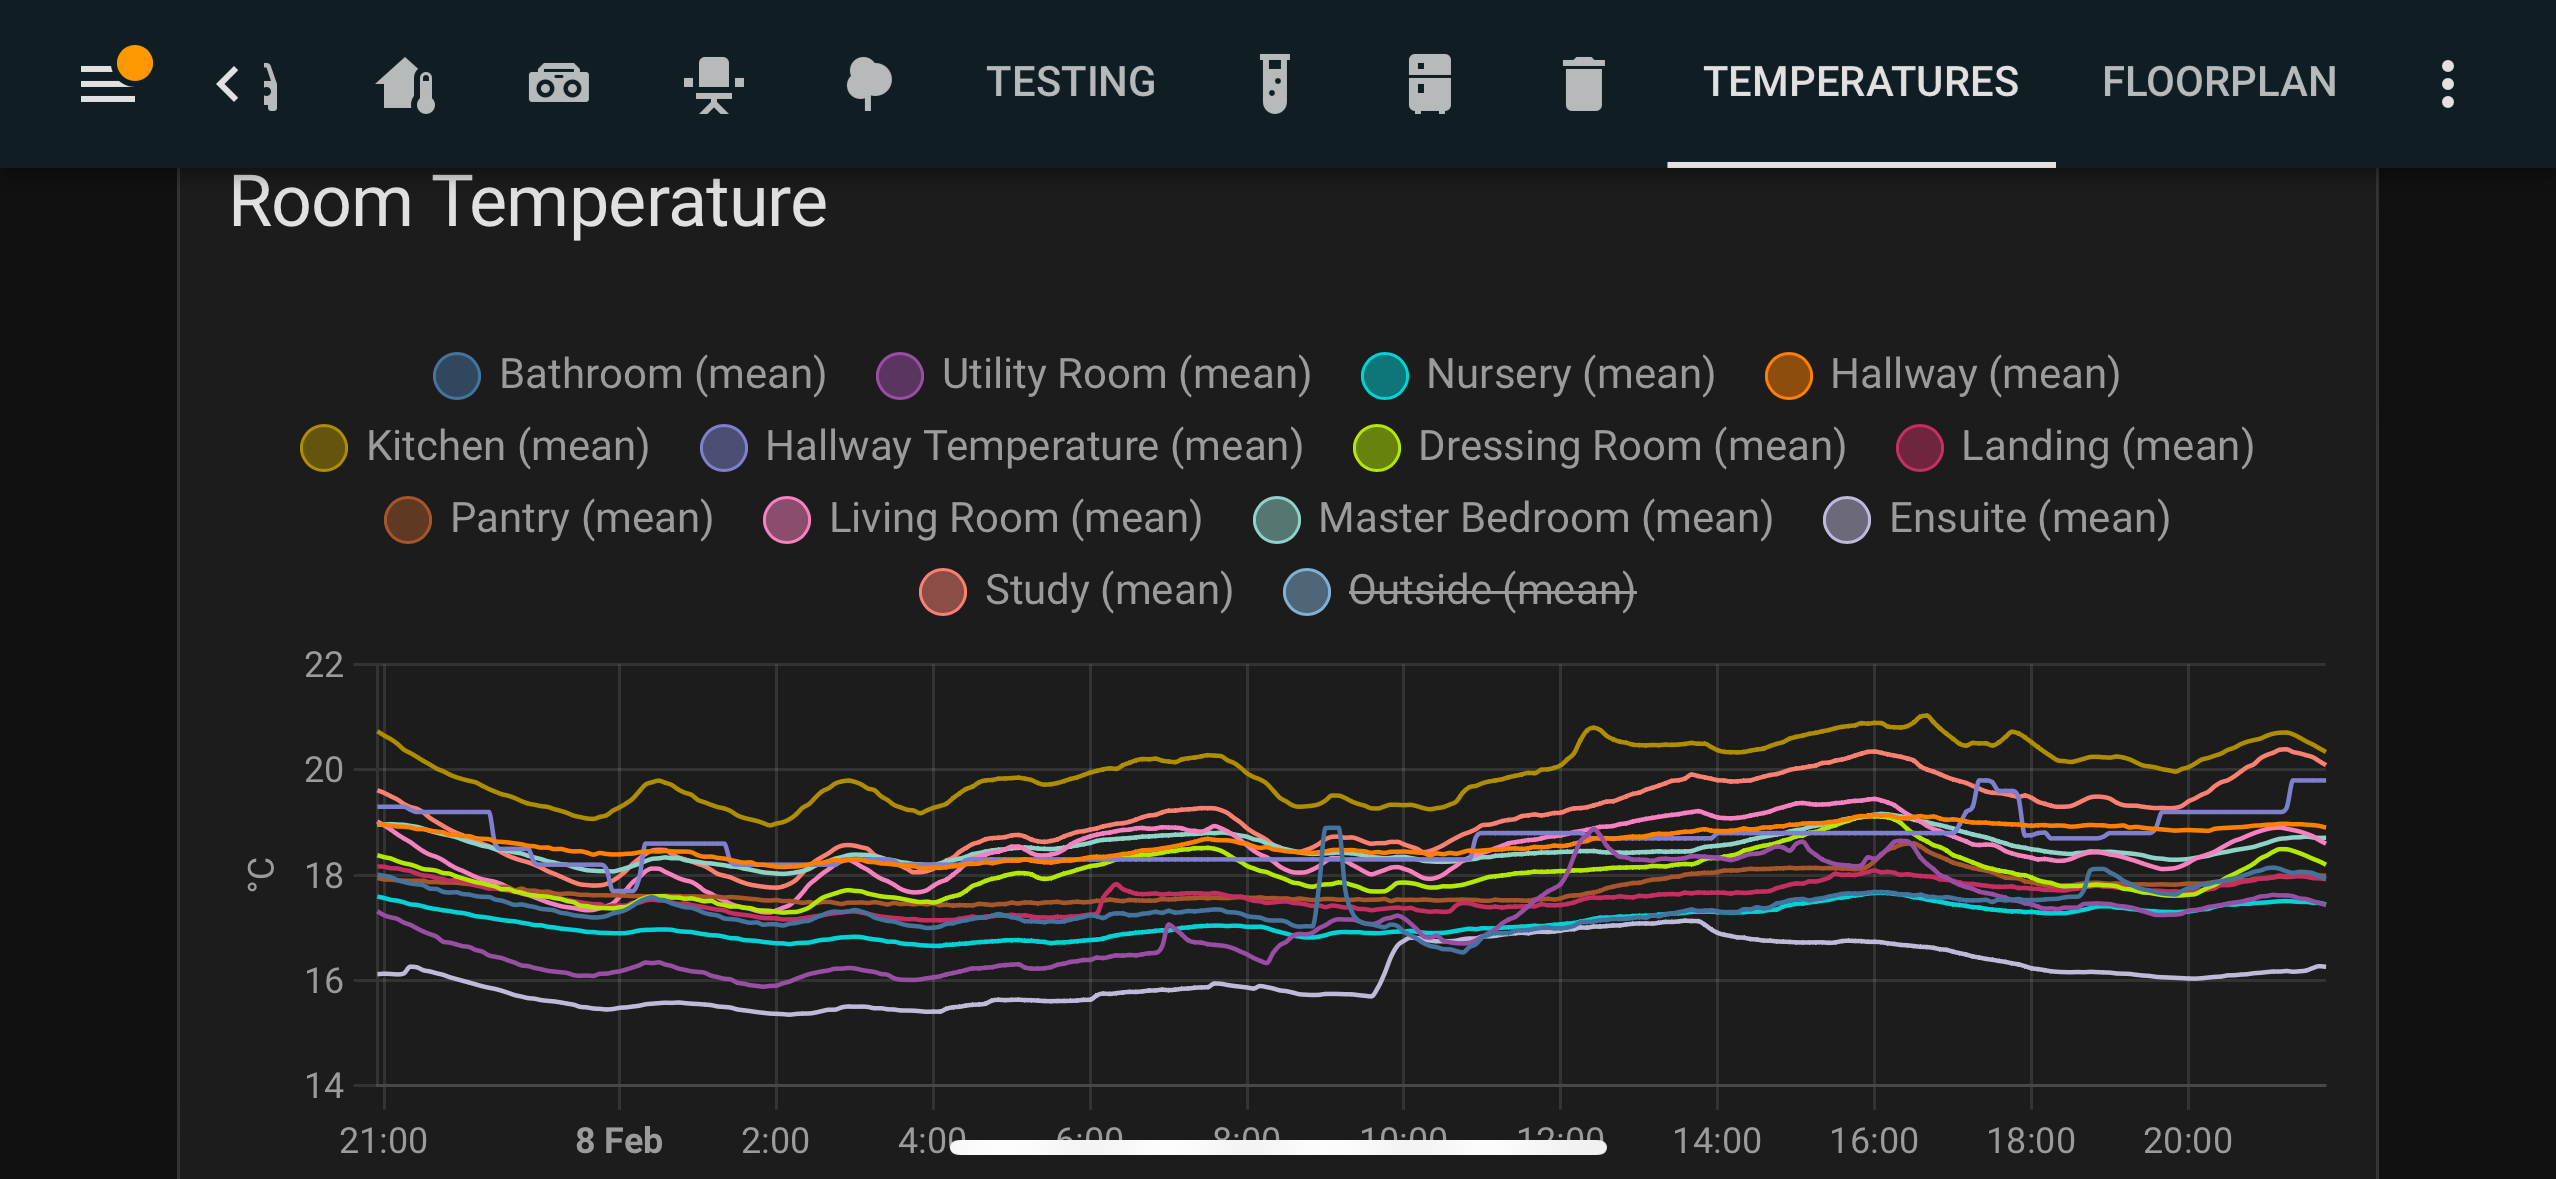
However, I still want to be able to monitor temperatures in the rooms (humidity would also be nice) and am looking at what solutions I could put the sale of the Eve Thermo’s towards.

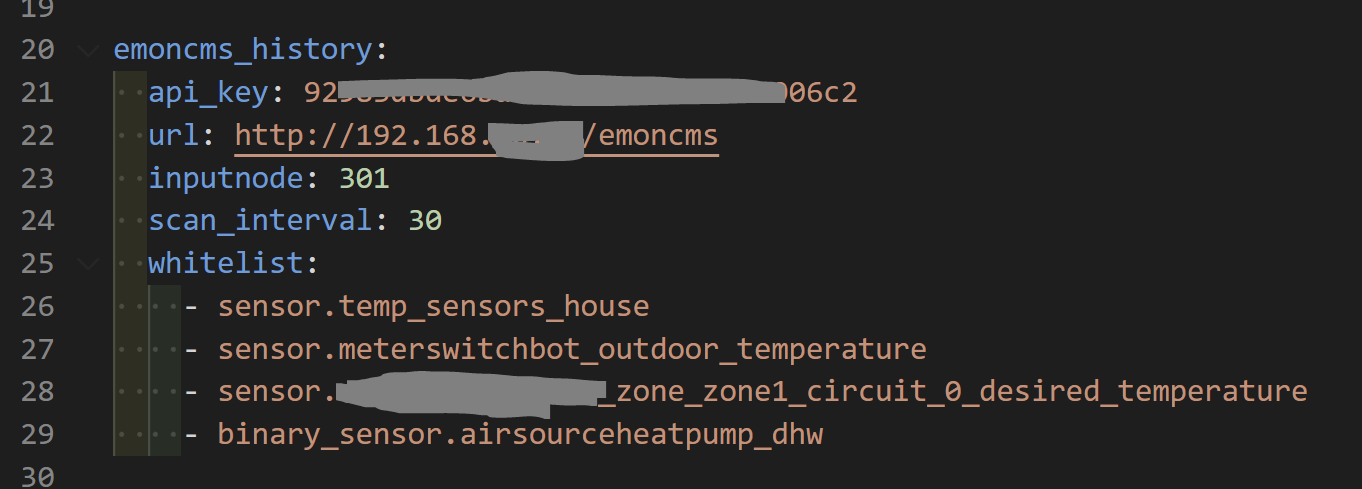
I would like something that I can log preferably to emoncms as then I don’t have to worry about backups and losing data. Also then I can see the data along side what the Heat Pump is up to.
It would ideally be battery powered with a long time between replacement (one of the reasons to move away from the Thermos is because the battery life isn’t very long).

I currently have an EmonHP and a separate Raspberry Pi 3B running Home Assistant (hooked up to DC Invertor).

The EmonTH sensors looks good but, if I’m correct, would need me to buy an EmonBase or EmonPi to communicate with them, log the data locally and upload to Emoncms.

The cheapest option looks to be EmonBase but it looks to be currently unavailable. Is there any way I can add a module and configure either the HP or Pi to act as the base for the EmonTHs and how involved would that be. Ideally I want something fairly easy to set up and forget.

1 Like

I believe that the EmonTH will work with the EmonHP as it is available as an add-on the kit but I am sure @TrystanLea could confirm.

1 Like

I have Switchbot indoor and outdoor thermo-hygrometers, which integrate easily into Home Assistant. You can use the Emoncms History integration to push entity values from Home Assistant in to your local Emoncms, or if you prefer, direct to the cloud instance.

temp_sensors_house is an average template of all the indoor SwitchBot temperature entities.

The entity names come through to my local Emoncms as Inputs and you create Feeds from those that you can then configure to be used by the MyHeatpump app.

In my instance…

  • house_temperature
  • outdoor_temperature
  • heatpump_targetT
  • heatpump_dhw

I believe you can name them what you like but (if I’m not mistaken) the name above are the defaults which will automatically be selected by the MyHeatpump configuration.

@TrystanLea is this possible?
If so would it fit in the EmonHP enclosure?

Could I add one of these tow to my EmonHP and then pair some EmonTHs to it?
JeeLink RFM69CW to USB Transceiver 433Mhz - Shop | OpenEnergyMonitor
RFM69SPI 433Mhz Transceiver - Shop | OpenEnergyMonitor

What is involved in setting it up?

I’ve moved to zigbee sensors (xiaomi, sonoff etc). They’re fairly cheap, easy to place and discrete.

You will need a zigbee interface (conbee, sonoff zigbee 3, etc) and a way of acquiring the data. I use zigbee2mqtt. That could run on your home assistant pc and connect to the mqtt server on emonhp or an emoncme instance running elsewhere.

It’s a bit of a fiddle to setup (as most of this stuff is) but once done its reliable, easily expandable and gives you access to lots of fairly cheap zigbee devices. They should also become accessible in Home Assistant.

1 Like

I already have a Conbee II that I haven’t been using recently connected to a RPi fairly central in the house. It was set up with deconz but I could reconfigure it to use zigbee2mqtt.

So am I correct that I then configure Zigbee2mqtt to publish to the mqtt server on the EmonHP and this would appear on the inputs in the local emoncms on there?

Do you know of any good clear guides on doing this?

I’ve been playing with the $4 xiaomi Bluetooth sensors which many folks seem to like. Have set up 15 of them now and impressed so far. Data sends from HA to emoncms for long term analysis against ASHP data. Still via Bluetooth, range works across the house fine helped by a single esp32 proxy upstairs. Battery life to be determined as I’ve only had them a couple of weeks. Will see whether they go past the year on a cr2032 as others are suggesting.


2 Likes

Yes, I’ve used these for a number of years with HA and the passive_ble addon (it was the only way at the time). Work perfectly. I also have some Govee Bluetooth sensors which work well as well.

These also do not need any firmware flashing - just work out of the box.

Ah that’s reassuring! Thank you. I was bracing myself for the batteries going flat in 2 weeks :man_dancing: What sampling frequency have you specified, may i ask? I will look at the Govee’s…

I pull the data off HA with Node-Red with a 30s trigger and send to emoncms via MQTT.

Batteries last a while. Long enough that I don’t worry about it.

I got them off Amazon, but Govee are selling them direct as well Govee Bluetooth Hygrometer Thermometer H5075 – UK-GOVEE

1 Like

I have followed this with interest. Have got as far as a Govee H5075 working in Home Assistant and have the Node-Red add-on. As I am quite a novice at all of this, it woud be really helpful if you could post instructions/screen shots of what you did with Node-Red to acheive this.

Thanks in anticipation of your help.

This flow will start you off. You will need to edit the sensor it is looking for. Output the result from the sensor to the emoncms MQTT server - no topic should be specified as it is set in the function.

I’ve included one ‘get_entities’ node, but as you can see, you can suck up numerous sensors in one go and process through the same function.

[{"id":"87789c210eb269e7","type":"inject","z":"085dd5ac6c2fac91","name":"30s","props":[{"p":"time","v":"","vt":"date"}],"repeat":"30","crontab":"","once":true,"onceDelay":"10","topic":"","x":110,"y":140,"wires":[["0b14af28d48c3798","61d7368ff63c5d86","82406eaf5b6f2b11","60055d4fa834c880","e244b665c825591d","32ef84b3caf86610","7dc0b93208c9978a","4c2da82ccdf5f9b0","295c9e993bc52f21"]]},{"id":"295c9e993bc52f21","type":"ha-get-entities","z":"085dd5ac6c2fac91","name":"sensor.ble_temp TS*","server":"9bb65ffe.1998d","version":0,"rules":[{"property":"entity_id","logic":"starts_with","value":"sensor.ble_temperature_ts","valueType":"str"}],"output_type":"array","output_empty_results":false,"output_location_type":"msg","output_location":"data","output_results_count":1,"x":380,"y":180,"wires":[["8cd55d75b2ff2414"]]},{"id":"8cd55d75b2ff2414","type":"function","z":"085dd5ac6c2fac91","name":"Process data for sending","func":"let newmsg =  {};\nnewmsg.payload =  {};\nvar reptext = \"\";\n\nnewmsg.topic = \"emon/sensor\"\n\nif (msg.hasOwnProperty(`Data_Source`)) {\n    newmsg.topic = newmsg.topic + \"/\" + msg.data_source;\n} else {\n    reptext = msg.data[0].entity_id.split(\"_\",1)[0] + \"_\"\n    newmsg.topic = newmsg.topic + \"/\" + msg.data[0].entity_id.split(\"_\",1)[0].replace(\"sensor.\",\"\")\n}\n\nmsg.data.forEach((element, index, array) => {\n    if (!isNaN(element.state)){\n        newmsg.payload[element.entity_id.replace(reptext,\"\")+\"_state\"] = Number(element.state);\n        // newmsg.payload[element.entity_id.replace(\"sensor.\"+reptext,\"\")] = Number(element.state);\n    }\n});\n\nnewmsg.payload.time = Math.trunc(msg.time/1000);\n\nreturn newmsg;","outputs":1,"timeout":"","noerr":0,"initialize":"","finalize":"","libs":[],"x":790,"y":280,"wires":[["7ca692f481d4a99c"]]},{"id":"9bb65ffe.1998d","type":"server","name":"HassIO","version":5,"addon":true,"rejectUnauthorizedCerts":true,"ha_boolean":"y|yes|true|on|home|open","connectionDelay":true,"cacheJson":true,"heartbeat":false,"heartbeatInterval":30,"areaSelector":"friendlyName","deviceSelector":"friendlyName","entitySelector":"friendlyName","statusSeparator":"at: ","statusYear":"hidden","statusMonth":"short","statusDay":"numeric","statusHourCycle":"h23","statusTimeFormat":"h:m","enableGlobalContextStore":true}]

If you wanted to, you could filter the get entities node on device_class: temperature and that will pick up all sensors with that device class.

image

However, be careful, I found I had 58 temperature sensors (in HA terms) in my setup!

1 Like

Thank you for your kindness in posting this Brian. Have been working through the task of making it work. Have got through the first two nodes with the code the same as that shown. However, after much reading it appears the function node has been updated to have four sections in properties; Setup, On Start, On message, and On Stop. Unless I am mistaken the code you have provided is for an earlier version that did not have this division. How do I allocate the code accordingly?

Also for my edification, is there a reason why you chose to use the ‘get entities’ node rather than the ‘sensor’ node?

For general information there is another bluetooth temp/humidity sensor in two versions that also work out of the box - the Thermopro. Come in one or two battery versions. Thermopro TP357 and TP358, available on Amazon. Already had several of these that ‘appeared’ when one placed close to the Pi using Home assistant, so didn’t need to flash them. The single battery version is very inexpensive.

Odd it didn’t just import.

The code should import into the on message section

image

Thanks Brian
Seeing the notation in your post made it easy to replicate. Every import attempt showed it in JSON rather than Javascript. The Javascript removes the spaghetti of slashes and new line instructions. I more or less understand what this does due to years of using nested commands in Excel (if,then true, false, etc). My version is now identical to that you originally posted.

There is always another question! The last expression originally posted does not appear to be for an MQTT Out node. It shows ‘server’ as a type and ‘HassIO’ as its name. The rest of the text doesn’t appear to accord to anything I can see in the MQTT Out node settings. Greatful if you can help me out on what is hopefully the last lap.

Yes, it will as it is a “Flow JSON”. Just paste it in the box and import. Never known it not to work.

image

I didn’t include the MQTT node (as it would include password etc). Just connect the function node to an MQTT out and it should just work. The payload is a JSON and topic is set in the function node.

Use a debug node and ‘whole msg’ (rather than payload) to see what is being sent to the MQTT node.

Just to note, you must have clicked
image
rather than
image

as I did not get a notification you had replied. You are a little fortunate I saw it as I do not read everything!

Clicking reply in the message ensures the author of the reply you are replying to is notified.