Today I would like to present a DIY project
Tasmota ESP32 CO²-Box
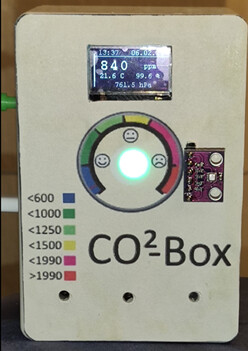
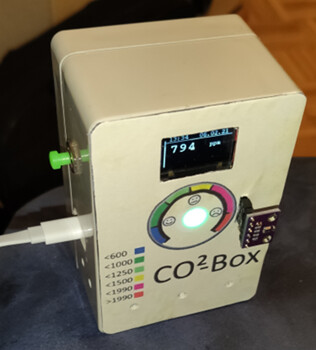
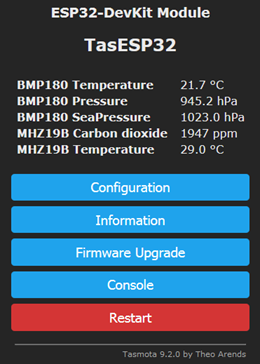
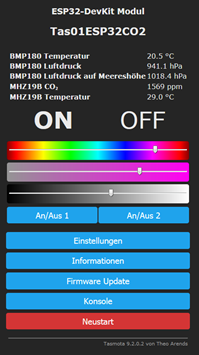
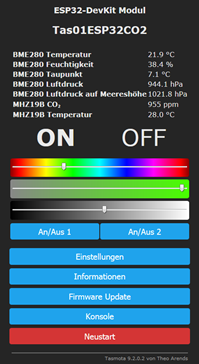
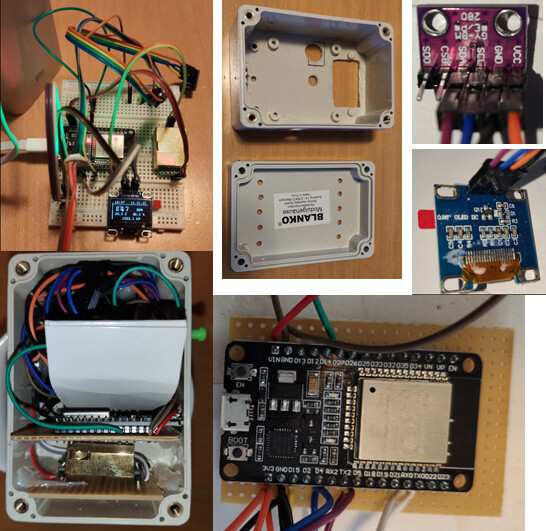
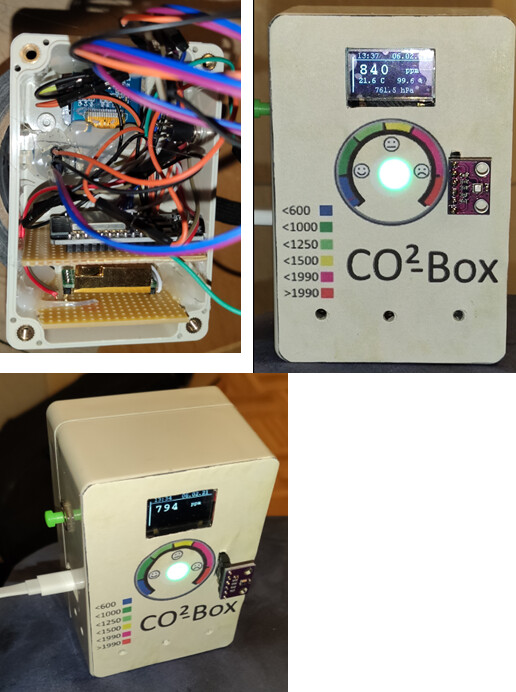
A CO² Sensor Box, based on ESP32 and the optical sensor MH-Z19B with additional BME280 sensor (BMP180) for temperature, humidity and air pressure detection.
The sensor values are displayed on the device via a WS2812B LED and additionally via an OLED display, additionally the sensor values are transmitted via the Wlan using MQTT.
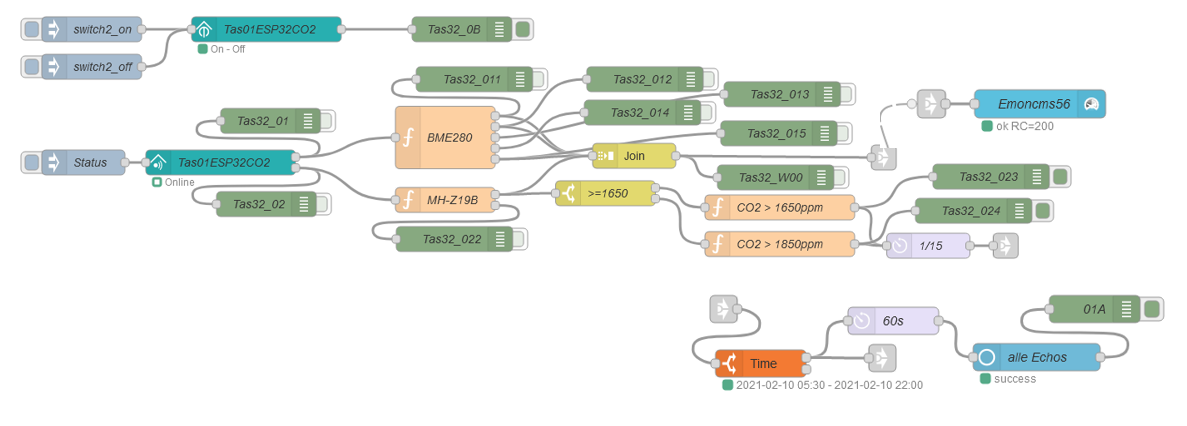
In my case the MQTT sensor values are processed via Node-Red, transferred to Emoncms and if the threshold values are exceeded, information messages are sent out via the Echo speakers.
(Please ventilate or ventilate absolutely)
The OLED display can be switched ON/OFF via the green button on the side.
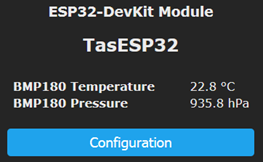
The software used is Tasmota ESP32 in a self-compiled version 9.2.0.6.
ESP-WROOM-32 30 PIN Development Board PINOUT

Text colors in this Guide:
Blue = Internet Links
Purple = Console commands
Red = own parameters to be changed
For this project the Tasmota firmware was compiled myself
tasmota32-DE-Sensoren-sk.bin look at Visual Studio Code - Tasmota
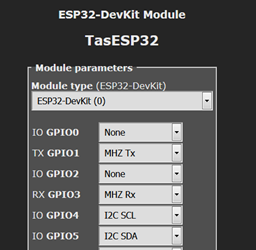
BMP180 Connected to 3,3V, GND, GPIO4 SCL, GPIO5 SDA. BME280 uses the same PINs
Make console settings:
TIMEZONE 99
NTPSERVER1 meine Router IP
LATITUDE 48.212416
LONGITUDE 8.491095
altitude 654 (for Sea Level Dunningen 654m)
MH-Z19B Connected to 5V, GND, GPIO1 TX, GPIO3 RX.
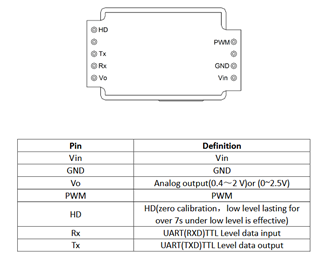
MH-Z19B
https://tasmota.github.io/docs/Commands/#sensor15
Sensor15 0
Sensor15 5000
Sensor15 2 (for this, the sensor must be in operation and stand outside for approx. 20 minutes.)
 Here you can see that 4 people increase the CO2 values.A control and ventilation is indispensable here.
After airing, we are at approx. 403 ppm, the value is slowly increasing.
Health assessment of carbon dioxide in indoor air, sorry, only in German
Connection of one WS2812B LED as color value function
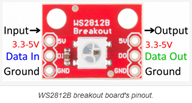 Since we use only one WS2812B LED, it can be connected directly to the ESP32. In case of a row of WS2812B LEDs a 3.3V/5V converter must be connected for the data line, it is also important to connect a buffer capacitor.
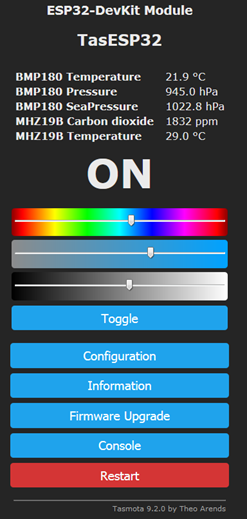
Define rules for controlling the LED:
# <600 == BLUE HsbColor 242,100,65

# <1000 == Dark green HSBColor 103,100,53

# <1250 == light green HSBColor 82,75,53

# <1500 == Yellow HSBColor 59,100,52

# <1990 == Purple HSBColor 303,75,58

# >1990 == Red HSBColor 1,100,65
Switch rules on and off
Rule1 on
Rule1 off
Delete the Rule1 with Rule1 "
Below rule copy & paste in Console:
Rule1
ON MHZ19B#CarbonDioxide>1990 DO HSBColor 1,100,65 BREAK
ON MHZ19B#CarbonDioxide<600 DO HSBColor 242,100,65 BREAK
ON MHZ19B#CarbonDioxide<1000 DO HSBColor 103,100,53 BREAK
ON MHZ19B#CarbonDioxide<1250 DO HSBColor 82,75,53 BREAK
ON MHZ19B#CarbonDioxide<1500 DO HSBColor 59,100,52 BREAK
ON MHZ19B#CarbonDioxide<1990 DO HSBColor 303,75,58 BREAK
The three parameters in the HSB color stand for:
Hue (H)
Color saturation (S)
Brightness with "B" for Brightness
HSL color corresponds to HSB, where “L” stands for Lightness.
e.g.: Red HSBColor 359,100,67 or 1,100,35
Set web password in the console.	User: admin  PW: MyPassword
With command:  WebPassword MyPassword
--------------------------------------------------------------------------------------------------------------------------------------
I2C SSD1306 OLED 128 x 64 Display connected 0x3c: GND, 3.3V, SDA, SCL
--------------------------------------------------------------------------------------------------------------------------------------
These rules are installed on the I2C display, with MHZ19B und BMP180, copy & paste in Console:
Rule2
on MHZ19B#CarbonDioxide do DisplayText [zf1p5x6y1t] [f1p8x62y1T] [x0y12h128x128y12] [f2p4x8y18]%value%[f1p3x84y23]ppm endon
on tele-BMP180#Temperature do DisplayText [f1p7x8y45]%value% C endon
on tele-BMP180#SeaPressure do DisplayText [f1p9x56y52]%value% hPa endon
--------------------------------------------------------------------------------------------------------------------------------------
These rules are installed on the I2C display, with **MHZ19B und BME280,** copy & paste in Console:
Rule2
on MHZ19B#CarbonDioxide do DisplayText [zf1p5x6y1t] [f1p8x62y1T] [x0y12h128x128y12] [f2p4x8y18]%value%[f1p3x84y23]ppm endon
on tele-BME280#Temperature do DisplayText [f1p7x8y40]%value% C endon
on tele-BME280#Humidity do DisplayText [f1p7x70y40]%value% % endon
on tele-BME280#SeaPressure do DisplayText [f1p9x34y55]%value% hPa endon
DisplayText [z]
SSD1306 OLED 128 x 64 Display is on Power2 and can be switched on/off via console
 Power2 1 bzw. Power2 0
Button to switch on/off the OLED display (Power2)
Settings: GPIO 27 Button1
console:
SwitchMode 4
Rule3
ON Button1#State=2 DO POWER2 TOGGLE ENDON
Rule3 on
Botton via GPIO 27 and GND toggles the OLED Display.
 Modified to MHZ19B and BME280.
Set a fixed IP address (enter it directly in the Console)
backlog savedata 1; ipaddress1 DeviceIP; ssid1 ssidname; password1 WLanpassword; ipaddress2 Gateway; ipaddress3 Subnet; ipaddress4 DNS; savedata 0; delay 90; restart 1;
Set name in router: Tas01ESP32CO2
MQTT configure: MQTT server: port:1883 user: emonpi PW: emonpixxxx
Host ServerIP Client Tas01ESP32CO2 topic Tas01ESP32CO2
Node-Red Flow written and configured
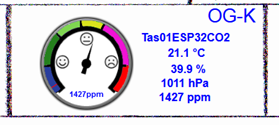
Widget created for the CO2-Box for Emoncms EmonPi
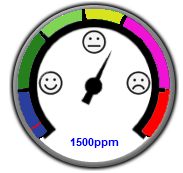 co2meter1 Widget
var/www/emoncms/Modules/dashboard/widget/co2meter1/
Config 300-2300 ppm also Scale 1, Max value 2300, Min value 300, Units ppm
# <600 == BLUE Healthy
# <1000 == Dark Green Healthy
# <1250 == Light Green Acceptable
# <1500 == Yellow Temporarily acceptable
# <1990 == Purple Unhealthy Please Ventilate
# >1990 == RED Unhealthy necessarily ventilate
Why this Project?
Motivated by homeschooling in times of Corona, where everyone is at home, it is Important to learn how to ventilate properly. The price should be within a reasonable range without missing out on some interesting features.
Thanks to Theo Arends for the Tasmota Project,
the EmonCMS-Team and to everyone who inspiring me.
Node-Red:
Bugfixing: SSD1306 128x64 with the I2C address 0x3c, a vertical line is displayed from top to bottom, texts are all displayed correctly, but this line is always visible.
If I enter DisplayModel 2 in the console, the answer is DisplayModel 7, but this is a different Display. RESULT = {“Display”:{“Model”:7,“Width”:128,“Height”:64,“Mode”:0,“Dimmer”:0,“Size”:1,“Font”:1,“Rotate”:0,“Refresh”:2,“Cols”:[16,8],“Rows”:2}}
Solution: I2cDriver RESULT = {“I2CDriver”:“3,!4,5,6,10,47”}
Enter these console commands:
I2CDriver6 0
I2CDriver4 1
DisplayModel 2
Cost: shipping costs may be drastically reduced by combining the order with one vendor, so parts and shipping costs are shown separately.
ESP-32 30Pin oder ESP-32 38Pin T03.32$ V2.32$
BMP180 T00.45$ V2.47
BME280 3.3V T02.74$ V2.32
MH-Z19B NDIR CO2 Sensor Module T21.07$
WS2812B (4pins) LED Chip T00.07$ V2.32
5V 2A Micro USB Universal Power Adapter Supply T02.41$ V2.11$
circuit board T00.99€
Module case ABS, 100x68x50 mm, IP65, lichtgrau T03,85€ V5,99€
White 0.96 inch OLED 128X64 OLED Display Module T01.74$ V1.04$
Miscellaneous parts T01.00€
Total T31,57€ V10.53€
Total Sum 42,10€
As with all hobby DIY projects, the time is not listed, because it helps you personally to grow and not to despair.
PS: It was a radio and television technician who saved the world (Independence Day). 
The Tasmota ESP32 in a self-compiled version 9.2.0.6 (tasmota32.bin) in german language and the front cover as PNG I provide with pleasure.
I am available for questions and will try to answer them as soon as possible.
I have consciously ignored the upper / lower case.
Whoever finds spelling errors in this manual can keep them
somehow I did the formatting not get it right
Tasmota_ESP32_CO2_Box_en.pdf (1,2 MB)
 I’ve always wanted to do this, Im sure its really interesting to see effect of people and cooking etc?