3. ADC Tutorial Part3, adding user code to make it useful.
Once you’ve got a clean build out of part 2, it’s time to actually write your own code to make it do something useful. Actually, this ADC example doesn’t do anything useful, other than start the ADC running and monitor how often the data comes in, but it hopefully forms a good starting point for getting the ADC started and then adding your own code. You should always add your code only in the areas provided in the generated source, denoted by comments like /* USER CODE BEGIN n / / USER CODE END n */, thereby ensuring your code won’t get clobbered next time you need to regenerate via the GUI (double check you’ve ticked the relevant tick box in the Panel in Step 3 of Part 1 to ensure that).
I’ll attach a tar file of the Src and Inc directories at the end so you can have something concrete that compiles. But it goes roughly like this:
in main.c before the infinite loop starts (so a bit like Arduino’s setup()):
  /* USER CODE BEGIN 2 */

  HAL_GPIO_WritePin(LD2_GPIO_Port, LD2_Pin, GPIO_PIN_SET);      // LED on

  snprintf(log_buffer, sizeof(log_buffer),
	   "\nOEM ADC Demo 1.0\n");
  debug_printf(log_buffer);
  calibrate_ADC2();
  start_ADC2();

  /* USER CODE END 2 */
in main.c the infinite loop (so a bit like Arduino’s loop()):
  /* Infinite loop */
  /* USER CODE BEGIN WHILE */
  while (1)
  {
    if (adc2_half_conv_complete && !adc2_half_conv_overrun) {
      HAL_GPIO_WritePin(LD2_GPIO_Port, LD2_Pin, GPIO_PIN_RESET);      // LED off
      adc2_half_conv_complete = false;                                // ready for the next batch
    }

    if (adc2_full_conv_complete && !adc2_full_conv_overrun) {
      HAL_GPIO_WritePin(LD2_GPIO_Port, LD2_Pin, GPIO_PIN_SET);        // LED on
      adc2_full_conv_complete = false;
    }

    //
    // See if we've overrun and lost our place.
    //
    if (adc2_half_conv_overrun || adc2_full_conv_overrun) {
      snprintf(log_buffer, sizeof(log_buffer), "Data overrun!!!\n");
      debug_printf(log_buffer);
      adc2_full_conv_complete = adc2_half_conv_complete =
	adc2_full_conv_overrun = adc2_half_conv_overrun = false;
    }

  /* USER CODE END WHILE */
Those four adc2_xxx_conv_xxx boolean flags are all flags set in the DMA ISR (below). The half version tells us the bottom half of the array has just been filled with conversions, and the full version tells us the top half of the array has just been filled with conversions. They’re cleared here in the main loop to acknowledge we’ve “processed them”. In fact, the only processing we do is turn the LED off when a new batch of data has arrived in the bottom half and turn it back on for the top half. It’s all happening way too fast for you to see that with the naked eye, but a scope on the LED reveals:
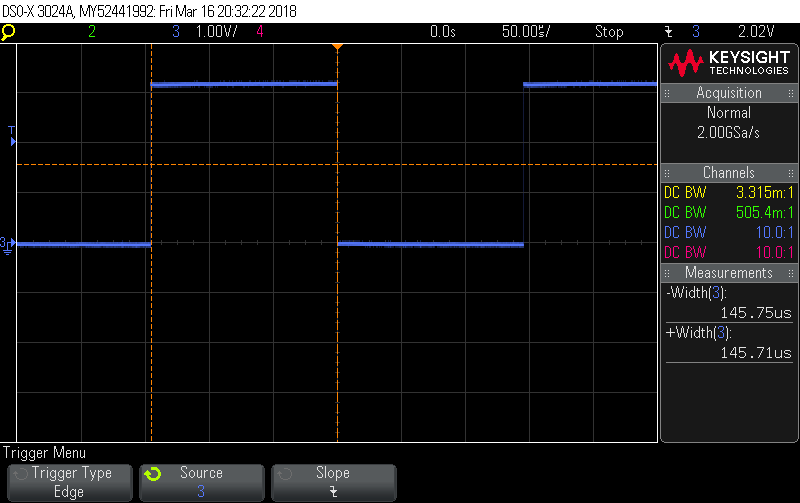
So a new batch of 50x15 readings is arriving every 146 usecs as theory predicts (50x15 x 14 cycles/conversion / 72MHz).
The rest happens in adc.c:
/* USER CODE BEGIN 0 */

volatile uint16_t adc2_dma_buff[ADC2_DMA_BUFFSIZE];
volatile bool adc2_half_conv_complete, adc2_full_conv_complete;
volatile bool adc2_half_conv_overrun, adc2_full_conv_overrun;

/* USER CODE END 0 */
ADC2_DMA_BUFFSIZE is15x100 from adc.h (also user code, that’s not some HAL setting). The booleans need to be volatile because they’re set by the ISR. The DMA buffer needs to be volatile because it’s being continuously written to by the DMA controller.
Still in adc.c, we have the two functions we called from main.c before we entered the infinite loop:
/* USER CODE BEGIN 1 */

...

void calibrate_ADC2 (void) {

  HAL_ADCEx_Calibration_Start(&hadc2, ADC_SINGLE_ENDED);
}

void start_ADC2 (void) {

  HAL_ADC_Start_DMA(&hadc2, (uint32_t*)adc2_dma_buff, ADC2_DMA_BUFFSIZE);
}

/* USER CODE END 1 */
If you check the hardware reference manual for the device, you’ll see the ADCs have a pretty complicated self-calibration process. Fortunately, it’ll all been implemented in the HAL by stm, just don’t forget to call it or you get lousy results.
The start routine is what kicks it all off. From the moment you call that, there’ll be a new conversion written somewhere in adc2_dma_buff[] every 194 nsecs forever… well until you call Stop and this example never does. This call is where you associate your data buffer with that DMA channel and tell it how big it is. Recall we configured it as “Circular” in the GUI which means instead of running off the end, it starts back at the beginning.
There’s no way of knowing where in the buffer the DMA is currently writing, except that we know: it writes sequentially from adc2_dma_buff[0] to adc2_dma_buff[1499] 16-bits at a time and generates a half-full interrupt as it writes to adc2_dma_buff[749] and a full interrupt as it writes to adc2_dma_buff[1499] but it just keeps on trucking whether you process the data or not. 194nsecs after writing to adc2_dma_buff[1499] it’ll be writing the next conversion to adc2_dma_buff[0]… on and on forever with no CPU intervention… even if you disable the notification interrupts, it just keeps trucking.
You can make the DMA buffer as big or as small as you like. The bigger you make it, the less frequent the interrupt rate will be and the more data you’ll have to process when they do occur, which is good for amortising the cost of the ISR overhead. Make it small enough and you’ll be doing nothing but servicing interrupts, especially at the crazy fast speeds this example is running the DAC.
[EDIT] - but make it a multiple of the number of channels in the ADC sequence thereby ensuring any particular position in the array will always correspond to the same channel. In this example it’s defined in adc.h like this:
/* USER CODE BEGIN Private defines */

#define ADC2_DMA_BUFFSIZE 15*100    // 15 samples in a sequence, 100 sequences
extern volatile uint16_t adc2_dma_buff[ADC2_DMA_BUFFSIZE];
extern volatile bool adc2_half_conv_complete, adc2_full_conv_complete;
extern volatile bool adc2_half_conv_overrun, adc2_full_conv_overrun;

/* USER CODE END Private defines */
Finally in adc.c are the handlers for the half-full and full-full interrupts:
/* USER CODE BEGIN 1 */
void HAL_ADC_ConvHalfCpltCallback(ADC_HandleTypeDef* hadc)
{
  //
  // If the flag is already set, process level has been too slow
  // clearing it down.
  //
  if (adc2_half_conv_complete) {
    adc2_half_conv_overrun = true;
    adc2_half_conv_complete = false;
  } else
    adc2_half_conv_complete = true;
}

void HAL_ADC_ConvCpltCallback(ADC_HandleTypeDef* hadc)
{
  //
  // If the flag is already set, process level has been too slow
  // clearing it down.
  //
  if (adc2_full_conv_complete) {
    adc2_full_conv_overrun = true;
    adc2_full_conv_complete = false;
  } else
    adc2_full_conv_complete = true;
}

...

/* USER CODE END 1 */
Normally that’s where you’d want to do some preliminary processing of the data in adc2_dma_buff[]. This example just notes its arrival so that the main loop can flash the LED.
You might wonder how just declaring two functions gets them linked into the ISR. Their names are special. The HAL has already declared two functions of the same name (that do nothing), but declared them WEAK. If you don’t provide these functions, the linker will resolve it to the WEAK version. If you do, the WEAK version disappears to allow your version (no doubly defined symbol errors, because one is defined WEAK).
Note also there’s no ADC2 in the name, just ADC. These two functions get called for all ADCs and it’s up to you to determine which ADC just passed a boundary by looking at the handle that is passed in. This example doesn’t bother doing that because there is only one ADC enabled.
There are other ways to do ISRs within the HAL boundaries. Have a look in Src/stm32f3xx_it.c. That’s where the actual ISRs live, i.e. those routines are what the vectors point to. And they too include /* USER CODE BEGIN */ so you can put your code in there, or you can use the Callback approach that this example uses.
There are two common gripes users have about HAL:
- uses a lot of RAM (all those init structures are static)
- interrupt latency
In this example I measured the latency to be about 2usecs and that’ll get slightly worse when you have to demux the incoming handle when you have more than one ADC pumping. If that’s an issue, moving your critical ISR code to Src/stm32f3xx_it.c can help.
Finally, debug_printf() is very simple it lives in usart.c and looks like:
/* USER CODE BEGIN 1 */

void debug_printf (char* p) {
  HAL_UART_Transmit(&huart2, (uint8_t*)p, strlen(p), 1000);
}

/* USER CODE END 1 */
I broke it out like that because some of my projects have other output devices that I sometimes want to send the debug messages out over. That ‘1000’ isn’t the length of the buffer, but rather the maximum time this routine should wait (in msecs) to get the message out through the UART. It’s a simple block-until-done interface so be careful where you call it. uart2 is hardwired to the st-link programmer strip at the top of the Nucleo board, and those messages will get sent all the way to the host via /dev/ttyACM0 etc.
When you fire up this program, you should see:
OEM ADC Demo 1.0
in your minicom window.
Oh, and finally, all these HAL routines return a status. This example ignores that and assumes the best, but probably shouldn’t.
Tar file of Src and Inc directories attached:
ADC_demo.tar.gz (12.5 KB)