Orange Pi Zero - IOT MQTT monitor - with onboard influxdb, chronograf and kapacitor

for those who might be interested-
here an IOT MQTT monitor based on OrangePi Zero ( or OrangePi R1) a cheap Pi device that cost < $20

the image includes - influx, chronograph and kapacitor
simply connect to your router and login it using the router assigned ip the passwords for it are all blank.

  • you can also connect it directly to your laptop - and use the 169.254.10.250 to login to ssh or the web gui.

to enable data collection go to System > Startup > local startup

/root/./influxdb-1.6.2-1/usr/bin/influxd  >nul 2>&1 & echo "started" & /root/./chronograf-1.7.5-1/usr/bin/chronograf   >nul 2>&1 & echo "started"
/runfiles/./start.sh  >nul 2>&1 & echo "started" & /root/./starttrans >nul 2>&1 & echo "started" 
/root/./kapacitor-1.5.2-1/usr/bin/kapacitord  >nul 2>&1 & echo "end"

then simply reboot and it ready to go…
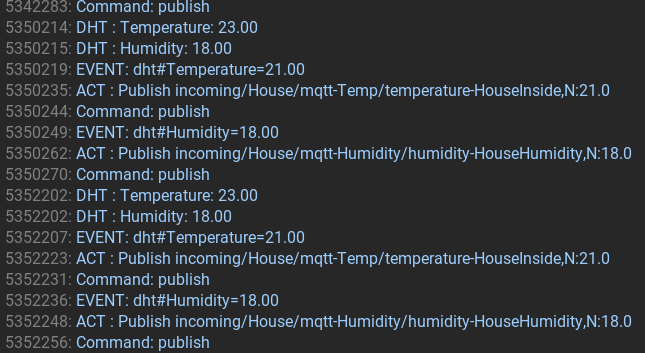
the format for MQTT
is as follows

mosquitto_pub -t 'incoming/OpenWrt/mqtt-Energy/power-grid' -m 'N:21.5'

mosquitto_pub -t 'incoming/OpenWrt/mqtt-Temp/temperature-greenhouse' -m 'N:21.5'

mosquitto_pub -t 'incoming/OpenWrt/mqtt-Humidity/humidity-greenhouse' -m 'N:21.5'

mosquitto_pub -t 'incoming/OpenWrt/mqtt-Flow/flow-heatpump' -m 'N:21.5'

mosquitto_pub -t 'incoming/OpenWrt/mqtt-Pressure/pressure-heatpump' -m 'N:21.5'`

there is also translation section that you can use to translate prexisting MQTT topic… you just need to create a *.pl based on the example grid.pl and add it to starttrans that is found in the root dir

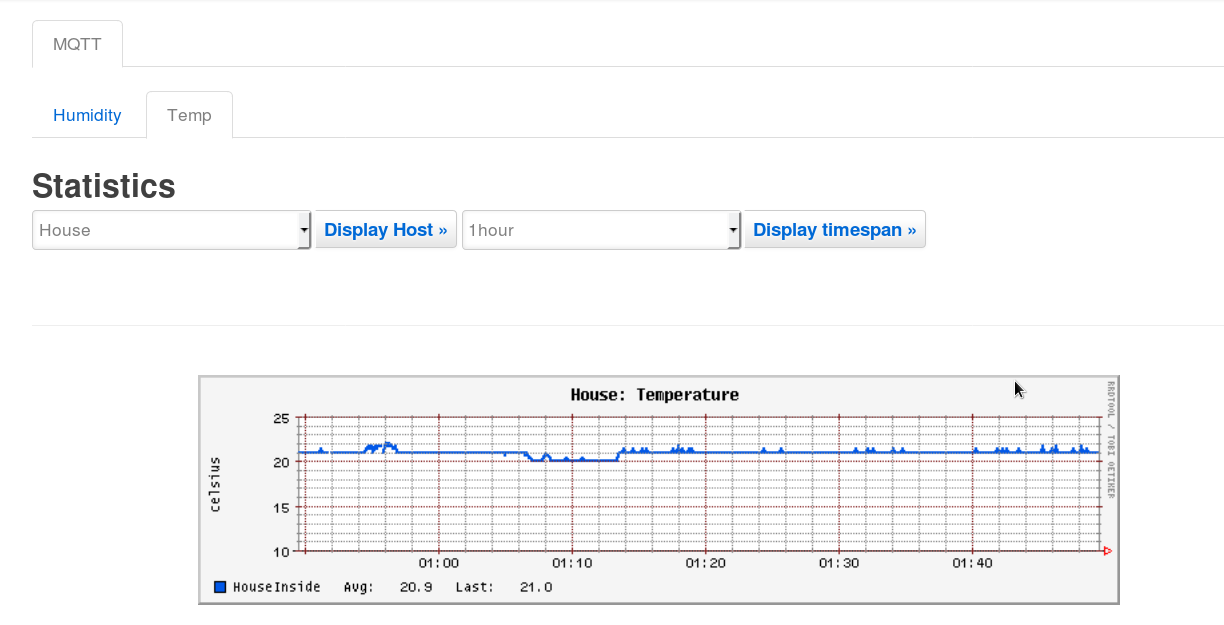
biggest advangages is that all Mqtt topic if sent in the correct format are automatically added to the local influx data base no configuration required - and easily added to the your dashboard in chronograf when ever you chose, you can use kapacitor to send trigger events to your phone or other devices

it will write data points as fast as you can send them. so if you wish data collection at every 1/2 second or less not that much of an issue…

here the current SD image
copy to SD and expand ( as I shrank it the most I could to make it as small as possible for up load )

if it does not work let me know

Stephen,

Upload your image directly to the forum. i.e. attach it to your post.
That way it won’t “disappear” should the site you linked to become unavailable.

I’m curious… Why not Grafana vice Chronograf?
Otherwise, looks good!

Edit - per the msg on the linked page, the link expires in four weeks. BT - Moderator
image

Hi Bill the OS is openwrt (LEDE) hence why the image is small and fast - as i tried originally to do it with grafana but it did not want to run under openwrt… but I am finding chronograf to be much lighter then grafana. as it is running at less than 10% when running under a typical load of + 20 device connections ( ie translating Mqtt- writing to the database and rendering graphs … etc). I could get Grafana to work under other os ( ubuntu armbian …etc) but the image was never as small (+ 400 megs compressed) or work nearly as fast or under such a light load. and they often caused the pi device to freeze or reboot under stress… under openwrt and chronograf i do not have that issue.

I would upload it but the size is too big to that here ( as rar it is 180megs as zip it is 220 megs most of that is all related to influx software the os itself is only 50 megs )

1 Like

okay in an effort to conserve size I rebuilt from scratch and left out the influx software … the entire OS if compressed with rar is only 10 megs… the os can be found here

and install influxdb ( using 1.6.2 as they change something in the new version that made it incompatible for some reason) just ssh into root and run these :

wget https://dl.influxdata.com/influxdb/releases/influxdb-1.6.2_linux_armhf.tar.gz

tar xvfz influxdb-1.6.2_linux_armhf.tar.gz

wget https://dl.influxdata.com/chronograf/releases/chronograf-1.7.5_linux_armhf.tar.gz

tar xvfz chronograf-1.7.5_linux_armhf.tar.gz

wget https://dl.influxdata.com/kapacitor/releases/kapacitor-1.5.2_linux_armhf.tar.gz

tar xvfz kapacitor-1.5.2_linux_armhf.tar.gz

enable it in system> startup> local startup

break down of the topic:

mosquitto_pub -t ‘incoming/OpenWrt/mqtt-Pressure/pressure-heatpump’ -m ‘N:21.5’`

you can change the “hostname” OpenWrt to what ever you like, you can use it to develop sub groups - but if you do not use at least one that matches the hostname of the device it will not display in luci statistics ( if you only wish to save data to influxdb and do not wish it to be displayed locally in luci statistic then you can ignore the localhost) -

mqtt-Energy, mqtt-Temp, mqtt-Flow and mqtt-Pressure are the the current fixed catagories for displaying in openwrt. you can use one of these or add your own catagory- the only prequisite is that it starts with mqtt-XXXXX - but these will not be displayed in luci statistics

power, temperature, humidity, flow, and pressure is the typedb used by collectd you can use any of the assigned typedb listed in collectd ( but only the 5 listed above will be displayed in luci statistics)

. grid, greenhouse and heatpump are descriptions you can use whatever you like here…

it creates a data base based on the MAC of the orange pi in the influxdb - then the value is stored as -“hostname”- type -description

you can use one orange pi zero as the influxdb server and other as one as remote nodes just edit Sendinflux.pl to have the ip or domain of the remote location these remotes will be based on thier MAC so there will not be any data overlapping - every thing is automactic and any new MQTT or nodes will automatically add it data to the influxdb server …

1 Like

if you wish to build your own – base on another arm capable openwrt device

ie http://downloads.openwrt.org/releases/18.06.0/targets/sunxi/

simply install in openwrt from it software installer
wget-ssl
ca-bundle
ca-certificates
nano
mosquitto-ssl
mosquitto-client -ssl
perlbase-sys
bash
collectd
collectd-mod-csv
collectd-mod-mqtt
follow these my directions to configure collectd mqtt ( my nom de plume - sash)

extract these runfiles at /
runfiles.tar.gz (4.3 MB)

and these in /root
wind.tar.gz (871 Bytes)

set collectd output for csv from /tmp to /tmp/csv

add in to local startup

/root/./influxdb-1.6.2-1/usr/bin/influxd  >nul 2>&1 & echo "started" & /root/./chronograf-1.7.5-1/usr/bin/chronograf   >nul 2>&1 & echo "started"
/runfiles/./start.sh  >nul 2>&1 & echo "started" & /root/./starttrans >nul 2>&1 & echo "started" 
/root/./kapacitor-1.5.2-1/usr/bin/kapacitord  >nul 2>&1 & echo "end"

then install influx software listed above simply reboot and it ready to go…

if you wish can install all non openwrt software to thumb drive and just point the startup at it.

1 Like

Hi there for those who might be interested - I also added SNMP/ MODBUS-TCP/RTU functionality configuration through openwrt interface.
to manually add follow these directions
for SNMP

for MODBUS TCP/RTU

you need to update the runfiles dir with this 1runfiles.tar.gz (4.3 MB)

the next bit will be to add in the GPS functionality to the openwrt node via openwrt luci interface- my and goal to make remote nodes act as lowjack using Orange Pi 3G-IOT-B or simular - but also send information from vehicle to influxdb as well

just a minor update to the above IOT monitor…for those few who use it… to bad more do not use it a very easy IOT monitor. install able on 1000’s of devices . routers ( asus, belkin linksy Dlink ), PIs ( all variants) and even client radios such as Ubiquity and engenius … all you need is USB to overlay the file system so you do not run out of space… if using those Boards you just need Collectd to send data to Influxdb as it not arm base so my custom influx software will not work …
but for those Who use and want to use EasyESp firmware for your devices.
here how to do it:
use the newer version esp Easy mega. ( but you can use the older version as well)
under controllers add Domoticz MQTT set it to your MQTT setting.
under device set up your device – ( not necessary to set up send to controller)
then go to tools > advance and enable rules
Check out under Tools> logs and see what are your event listing are:
Screenshot_20190129_193934

then under rules create an action for each event;

on dht#Humidity do
 Publish incoming/House/mqtt-Humidity/humidity-Househumidity,N:[dht#Humidity] 
endon

on dht#Temperature do
 Publish incoming/House/mqtt-Temp/temperature-HouseInside ,N:[dht#Temperature] 
 endon

save and apply
then afterward your log will display these outputs

Screenshot_20190129_194602

and on your router or pi device it will automatically produce a RRD graph that will store one year of data in a small 64byte file. per graph

based on the example above --under the Host name of House it will automatically create graphs for you as such:

and if you have collectd ( and influxdb) configured correctly it will automatically create a database under the host name House in infludb to which you can then build all your custom graphs in chonograf or other…

now you can either check your router for very basic info. or login to chronograf(grafana) and see your data that way…

okay good luck have fun ( i also add Tail Csv to openWrt Collectd check openwrt website for more info ) now it can tail any csv and add data from that to collectd and influxdb automatically

another update to my energy monitor - for this I installed domoticz and zigbee2mqtt plugin as the MI power adaptor came it a couple days ago, it actually works quite well with the xiaomi Mi and you can control the switches quite easily and and sends all that usage data to domoticz every 10 seconds or so which I can then send to my infuxdb or use the domoticz

but anyways for those who wish to compile their own - energymonitor/homeautomation router - based on openwrt os. here a Howto I created on their forum

also once it is connected to domoticz you can scrap the mqtt zigbee2mqtt topic for info directly if you wish

1 Like

Modifying the xiaomi smart switch for the north american market is quite easy. you could simply just twist the prong parallel but that the device would not sit flush. to get a better, fit simply cut a notch on each side of the neutral and line prong about 1/2mm to 1 mm in, then twist the prongs parallel you will end up with better result ( but like any if modifying something it always at your own risk). Then simple solder in the gaps to provide extra strength…, you will also have trim the outside of the ground prong about 1.5 mm. remember for the north American market it only good to 10amps… it list 2500 watts on the device but that is at 220volts…

finished product will look something like this… no need for travel adapter unless you wish to plug in a 3 prong device into the xiaomi as it only supports two prong for north American plug on the face of the device