Newbie - hardware question

OK - I’ve tried that (and rebooted the whole thing in between for good measure!) but still just get the

DEBUG    MBUS       Decoded MBUS data: None

at all times

I’m not sure I can help further as I have no mbus experience or mbus device to play with, but I’ll though a couple of ideas your way whilst you wait for Trystans help.

Try multiple pages eg pages = 0,1

The reason I say this is because looking at the interfacer code, if you have only one page, it tries once, then retries after 0.2s and then gives up.

whereas if you have multiple pages defined, it seems to retry 10x and looks significantly different to the single page attempt, it uses a different data request and a different frame layout.

however, the number of sleeps suggests this may have been “tuned” to the device Trystan is using, I have no idea how many different devices he has tested with.

if there is only one page or you only want to access the one page use the same page number twice eg pages = 0,0 perhaps? It certainly works differently if there are a list of pages rather than a single item because of this

Beyond that I would need to get you to add some more debug log lines to the emonhub source code to work out where it’s falling over, that can be slow and messy. Hopefully Trystan will have some better ideas.

This is worrying!

Unless the Sharky has some form of short circuit protection, doing that might cause physical damage to the outputs as the voltages involved are not low (24 VDC if IIRC) and that 3rd pin is a ground connection.

Can you please confirm you are currently using the 2 furthest right terms on the top edge of the pcb as pictured in post 18 and NOT the “two nearest the centre of the board”?

Much like my advice in the other (modbus) thread, I think some direct comms via a simple script is needed to confirm the device is alive and connected correctly. Unfortunately, whilst i do have modbus experience and devices (just time is a bit thin), I have no mbus experience nor devices. Sorry.

As a side note here, I have glanced through the manual for the Sharky and also the MBus protocol documentation (Documentation – M-Bus) and I’m rather glad I was never tempted by the promises of a simpler protocol, I see nothing simple about mbus at all!!! Long live modbus I say!

The sharky leaflet says there is

Configurable telegram, according to EN13757-3, data reading and parametrization via 2 wires
with polarity reversal protection, auto baud detect (300 and 2,400 baud)

So I assume polarity at least is protected,

Correct. The board I have has the labels hidden by the terminal block which caused initial confusion.

I’ve tried all sorts of various pages syntax to no avail so far.

There’s a communications data sheet available Here. Most of it is over my level (which isn’t hard!!) but I notice this…

3.2 Request response
The following command must be sent to obtain a response from the meter SHARKY 775: REQ_UD2 10 7B AA CS 16 RSP_UD

Is this something different to the Sontex? I’m really wishing I insisted Stockshed sold me the Sontex now!!

Thank you again for your help with everything

Hello @richardsmith99 how frustrating! Id be happy to try to help via a remote access connection using dataplicity if that would be helpful? You can setup an account and link your pi using the instructions on dataplicity here https://www.dataplicity.com, you just need to copy a single command onto the pi and it installs everything for you. If you choose a username and password that you dont use for anything else and are happy to PM me the details I can login and try and get this talking for you. You can then change the password on the dataplicity account once Im done so that I no longer have access. Shall I give you a ring and we can chat this over? If you can send me a private message (PM) on here with your number and a convenient time I will give you a ring.

Done :+1: Thank you

1 Like

Im pleased to say that we’ve found the main issue with @richardsmith99’s MBUS reader. It turns out that the new programmer in the shop has it’s orientation flipped, and the picture of the programmer in the guide shows the SMT components on the top, whilst with the new programmer the SMT components should be on the underside. The main issue being that I had not put a GND label on the MBUS reader board to indicate the right connection orientation.

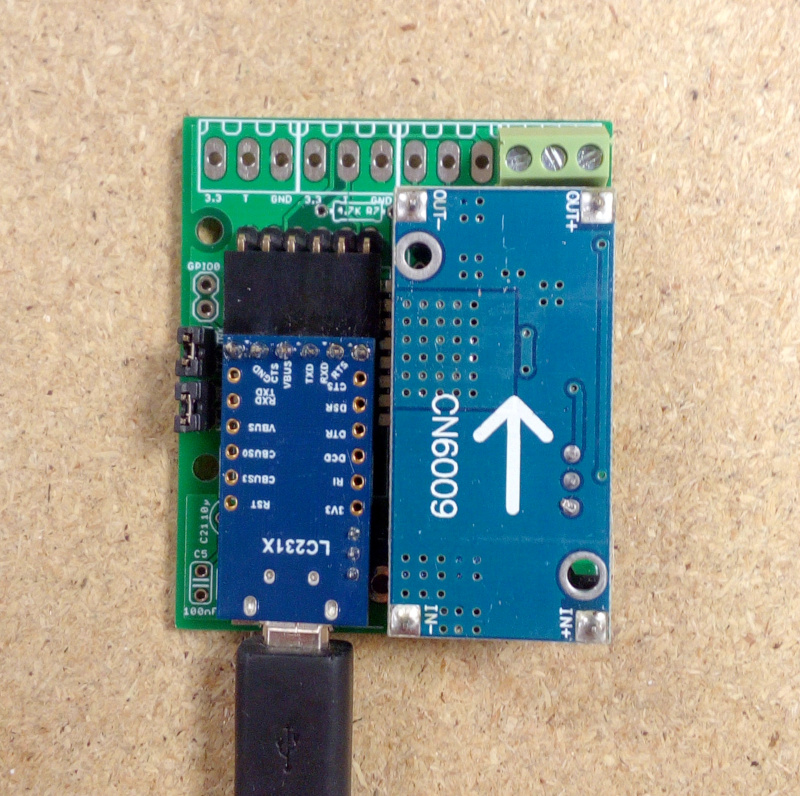
This is what the orientation should be for the new programmer:

After that I needed to update the emonhub MBUS interfacer to expand the variable types it supported. I have written the MBUS interfacer as a relatively minimal implementation of a full mbus decoder without needed external dependencies.

Using rSCADA - Raditex control systems and GitHub - ganehag/pyMeterBus: Pure Python implementation of the Meter-Bus (M-Bus EN13757-3) protocol. I cross check what the full set of readings should be for a given attached MBUS meter and then add the required fields to the emonhub MBUS interfacer.

Im not 100% sure that this is the right approach in the long term. It may be better to just use the pyMeterBus library and have full frame decoding support. Something I may revisit.

The EmonHub MBUS interfacer now supports reading the following values from the Sharky 775:

  • Cumulative Energy in kWh
  • Cumulative Volume in m3
  • Power in Watts
  • Flow temperature in Celsius
  • Return temperature in Celsius
  • DeltaT in Kelvin

Flow rate is also available but I haven’t quite managed to decode this one properly yet.

1 Like

A candidate for the FTDI Programmer Guide, methinks. Shall I send an update request to Gwil?

Yes It would be a good idea to review what is said/shown where and update to reflect it if needed. I will try and have a look as well.

Basically, a couple of lines and that image.

Aha, I hadn’t seen that guide, that’s great! I see what you mean now.

Is that a new OEM system wide usb programmer, not just mbus? ie does this info also apply to all emon devices when using a 2021 OEM usb programmer. If so are there distinguishing marks between a recent programmer and a new programmer?

Is this latest one built on a FTDI chip? Which one? Does it have an eeprom?

Great job getting @richardsmith99 sorted :+1:

[Edit} Ok just looked it up myself in the shop and then the ftdi website, did I miss an announcement on this?

from the datasheet

8.2.1 Programming the MTP memory over USB
The MTP memory on all FT-X devices can be programmed over USB. This method is the same as for the EEPROM on other FTDI devices such as the FT232R. No additional hardware, connections or programming voltages are required. The device is simply connected to the host computer in the same way that it would be for normal applications, and the FT_Prog utility is used to set the required options and program the device.
The FT_Prog utility is provided free-of-charge from the FTDI website, and can be found at the link below.
The user guide is also available at this link.
Utilities - FTDI
Additionally, D2XX commands can be used to program the MTP memory from within user applications.
For more information on the commands available, please see the D2XX Programmers Guide below.
http://www.ftdichip.com/Support/Documents/ProgramGuides/D2XX_Programmer’s_Guide(FT_000071).pdf

This is really good news for users that want to serially connect multiple emonTx’s eg a 3ph install with 3x emonTx.

Seconded! I’m eternally grateful!

2 Likes

The new FTDI programmer has been on sale since the beginning of this year. Looking back through the forum, I can’t see an announcement of this - that was a mistake, sorry.

Very many thanks to @Robert.Wall for all his work on updating the documentation for both the old and new programmer.

1 Like

New Sharky 775 owner here.

My meter came with channel/address 25 as default.

Which was shown on the display as
Pri_Adr 1
(menu rotation 3)

As detailed in the manual.

Rest of EmonHub config…

[[MBUS]]
    Type = EmonHubMBUSInterfacer
    [[[init_settings]]]
        device = /dev/ttyAMA0
        baud = 2400
    [[[runtimesettings]]]
        pubchannels = ToEmonCMS,
        read_interval = 10
        validate_checksum = False
        nodename = mbus
        [[[[meters]]]]
            [[[[[sharky775]]]]]
                address = 25
                type = standard

Hope that helps someone out if they get stuck.

[edit by Mod - added file directly]

SHARKY_775_IOM.pdf (2.8 MB)

1 Like

Thanks @Zarch !

1 Like

And as another new Sharky 775 owner (thanks to those already using, and reporting on their implementation), my meter came with address 76 already selected.

[BTW, I misread Mick’s message above as saying the parameter “Primary Address” was set to the value “1”, and I was about to message asking how that related to address being 25. Doh!

He is of course actually saying the parameter “Primary Address 1” has a setting of 25, as will appear in menu rotation 3. Becomes more sensible when you appreciate the M-bus concept of a device having two addresses on which it will respond. I know that now.]

1 Like

Another Sharky 775 snippet for folks that get stuck.

The mbus connections only work one way around. You can’t flip these as you won’t get any data.

I found this after having it all working on my desk, then having it stop reading when I recabled it when putting it in into the final destination. A bit of head scratching and then flipping the mbus connections at one end sorted that.

1 Like

A Sharky 775 question.

What is the difference between the two fields:

  • sharky775_Power
  • sharky775_heat_calc

The outputs seem very close to each other, but not always the same.

Which one should we use for the heat output field in the Heatpump App?

I know you’ve swapped out the Sharky but did you ever figure out which one is the right one to use?

sharky775_Power seems to be the one that appears on the display so I’m currently using that one.

I’ve always used _Power. Like you say it matches the display. I’ve no idea what Heat_calc could be and the original comms data sheet I linked to ages ago above has gone dead link.