The new IDE for Arduino, V2, came out on 2021. So as a first time Arduino programmer - I installed it instead of V1.
My laptop is Ubuntu 20.
The old IDE: Arduino IDE 1 - has a help page here using Ubuntu:
For programmer hardware: I bought one from the OEM shop. It needs a micro-USB to connect to your laptop,
A) download the IDE V2
Arduino’s help page says: “To install the Arduino IDE 2.0 on Linux, first download the AppImage 64 bits (X86-64) from the Arduino Software page.”
I followed that path; ( and downloaded: arduino-ide_2.0.0_Linux_64bit.AppImage ).
To run it - just click the file. (Unlike V1 which involved a install.sh script).
Do NOT connect the programmer to your eMon device until:
- you check what voltage to set it to: 3.3 or 5V
- and to know which way round to plug it in
- see the FTDI programmer hardware page.
NO batteries are needed for a emonTH - the programmer provides it.
Serial Ports on Ubuntu
With your programmer now set up - plugin to your Programmer the USB cable.
Before you plug in to your Laptop: run ‘lsusb’ which lists all your USB devices.
Run it again after plugging in, there’ll be a new line:
- Future Technology Devices International, Ltd Bridge(I2C/SPI/UART/FIFO)
So your programmer is not damaged in the post!
Your device is probably called ttyUSB0
But prove it by searching for any USB named tty devices:
- ls -l /dev/ttyUSB
which in my case returned - crw-rw---- 1 root dialout 188, 0 Oct 12 18:26 /dev/ttyUSB0
Permissions to access the Serial Port on Ubuntu
Notice the permissions above, show that the Group owner is ‘dialout’.
So you need top make yourself a member of that group.
- sudo usermod -a -G dialout <your_user_name>
Check you’re now a member of dial out:
- grep dialout /etc/group
Let’s test we can listen in on the Serial - just using Ubuntu tools
Most eMon things log to the serial port - if one is plugged in.
So before using the IDE - let’s just prove to ourselves that we can do that from raw Ubuntu.
Although if you want to skip this step (you feel lucky!) - do jump ahead to the next section- but come back here if that fails!
Run this command to listen to the serial port - using the old Linux friend ‘cat’:
- sudo cat /dev/ttyUSB0
and with luck you’ll see something below - even if it is gobblydegook like this:
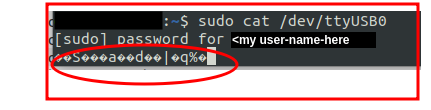
Gobblydegook - is because the baud rate is wrong: set it with:
- sudo stty -F /dev/ttyUSB0 115200
and check it is now correct - sudo stty -F /dev/ttyUSB0
Notice that you have to redo the ‘cat’ command after every time you plug in; it ends when you unplug.
Setting up Arduino IDE 2 for your port and Board
Start the IDE by clicking on the AppImage file.
As a precursor to all work with the programmer - the IDE needs to know what port and what Board you’re using.
Under 'Tools /Port - you’ll hopefully be able to select the tty from above, for me it was /dev/ttyUSB0
Then under 'Tools /Board" select “Board_Manager”: then in the Green Menu at top; highlight the box and click ‘Select Other Board and Port’
Search there for ‘Arduino Uno’ and select it; and click OK.
Open the ‘Serial Monitor’ window in the IDE
In the menu: “Tools / Serial Monitor”
Set the serial port speed to 115200 from 9600 baud
Then in the window - notice on the right hand side:
- 9600 baud - that will need changing
- ‘New Line’ or similar - change to ‘Both NL & CR’

The Big Moment: Plugin your Programmer to your emon device and to your laptop!
If all is well, you’ll see the device logging to serial as it boots up.
If nothing shows:
- go back and check the steps again - your Ubuntu set up is probably not done yet!
IF gobblydegook shows - make sure the baud is set to 115200 as above.
Using Sketches
Your IDE is now set up and talking to your eMon device -so you’re ready to play with sketches: uploading to your device etc.
See the Arduino IDE 2 tutorials pages