I’ve been running an emonTx and emonBase for around 18 months and I’m really pleased with it so I’d like to develop our setup further by including some sub-metering for the various DBs around the property. I was hoping someone could validate/critique my plan, please
The current emonTx is connected to the incoming 3ph supply which then, via Henley blocks, feeds 2x 3-phase boards and 2x single-phase boards. Whilst the boards are not all in the same place, the wiring from the Henley blocks to the isolators for each board are all together, so it makes sense for me to implement all my metering here, rather than at the remote board locations.
Q1: Should I retain the existing emonTx on the incoming supply or repurpose it for one of the 3ph boards? I like the idea of retaining it as checksum for the incoming supply, but it could easily be calculated by adding the inputs from the various boards together in Emoncms. What is best practice?
Q2: Depending on what I decide to do with the existing emonTx (1), I will need either one or two additional emonTx devices for the 3-phase boards, which will need the 3-phase firmware – I have a USB/UART programmer.
Q3: Is there any reason why I can’t use a single emonTx for the 2x single-phase boards?
Q4: As I’ll have 3 or 4 emonTx devices, I’ll need to change the channels via the firmware.
You’ll never get the numbers to add up exactly, and I wouldn’t say one method is better or worse than another. But what follows has a bearing on this too:
These are really one question, and I might have a better idea. The 3-phase sketch depends on the assumption that the voltages of phases 2 & 3 track the voltage of phase 1 - the one with the a.c. adapter on it. Therein lies a source of inaccuracy. If you want accuracy, then I’d suggest using one emonTx per phase, each with its own a.c. adapter measuring the voltage (and powering it - unless you’re using the ESP8266, when you also need a USB power supply). Each emonTx would then revert to using the standard single-phase sketch, and you’d combine the powers/energies in emonCMS.
Whether you can do this with 3 emonTx’s and measure the grid connection depends on which phases the single-phase boards are on - they need to be on different phases if you want to measure the grid as well, so on 2 emonTx’s you have Grid, 2 × 3-phase & 1 × 1-phase, and on the 3rd you have Grid, 2 × 3-phase.
Do you mean NodeIDs? Either way, with a programmer, not a major problem.
There’s a risk of some readings being missed when you use the built-in ISM band radio to get the data to the emonBase, as all three emonTx’s use the same channel and can jam each other - the modern software can alleviate that to some extent.
You can “desensitise” the 4th input of the emonTx so that it will go above 16 A, by adding a second resistor in parallel with the existing c.t. burden. 27 Ω will make it the same as the other 3 inputs - 100 A max.
That’s true as long as you only want to measure the total power for each board. If you wanted to measure the individual consumption of some device or group of devices, then you’d need to do that at the board. But you could add that later.
I really like the sound of this idea. The single phase boards are on different phases, so it would look something like this:
Garage DB - 3-phase
Basement DB - 3-phase
FF DB - single-phase (L1)
Office DB - single-phase (L2)
emonTx 1:
AC adapter on L1 for voltage reference
Garage DB (L1)
Basement DB (L1)
FF DB optional: desensitise 4th input for grid L1
emonTx 2:
AC adapter on L2 for voltage reference
Garage DB (L2)
Basement DB (L2)
Office DB optional: desensitise 4th input for grid L2
emonTx 3:
AC adapter on L3 for voltage reference
Garage DB (L3)
Basement DB (L3) optional: use 3rd input, or desensitise 4th input, for grid L3
Have I understood correctly?
Could you expand on this further please as I think I’d like to capture the grid supply too – it seems like a waste not to. I found your response to someone in 2018, below, is this still current/correct?
I can’t seem to find a 27 Ω / 0.5% / 0.1W - do you have any ideas? From RS I can get a 27 Ω ±1% / 0.25W (here) but I’m happy to shop around if it exists.
Would it make sense to modify all three emonTx units and put the grid on input 4 on each, so that each phase of the grid supply is on a “modified” input… or doesn’t it really make any difference?
What is the reference to the calibration constant in the sketch when using this fourth input?
Thank you for your help here and on my previous posts – you are a real asset to this forum!
The main consideration is physical size. The power rating you need is less than 50 mW, so 0.1 W upwards is more than enough. Ideally, you want the best tolerance you can get, which will probably be ±1%. If you can get 0.125 W or 0.1 W, it will be easier to get into the holes, the pitch of the holes is about 7.5 mm, so a body length greater than 7 mm means it will have to stand on end.
Yes, given “terminal” software, e.g. the ‘serial monitor’ of the Arduino IDE, you can do it ‘on-line’ and save the value to EEPROM. Or you can download the sketch, modify the default and re-load the sketch. (And still do a fine adjustment on-line if you wish.)
Thanks! That’s a better size than the RS one so I’ll order those. I did find some with a better tolerance but they were a military specification with a minimum order quantity of 1,000
Great, I’ll dig out my laptop and refresh myself on the Arduino IDE … I don’t recall it being a pleasurable experience last time!!
There’s a full guide in ‘Learn’. And if you think that’s bad, don’t try platformio. When I tried it, it moved files and directories and generally screwed up my system. It took hours to put everything back. Malware as far as I’m concerned.
I’ve been sitting on the hardware to complete this since January (!!) but I’ve decided that it’ll make a nice Easter project!
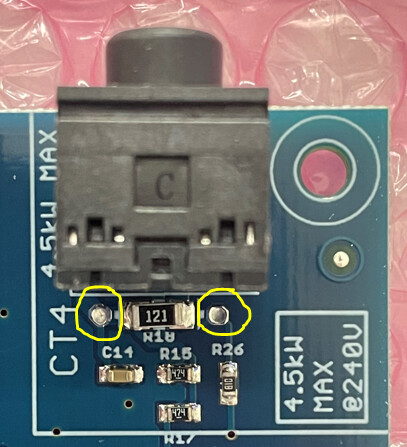
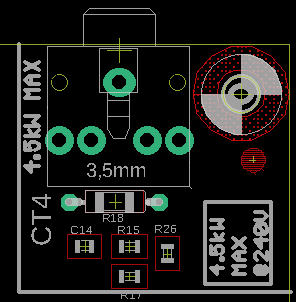
I’ve located the 120 Ω resistor behind input 4 (R18) but have a quick question if I may, please:
We spoke a lot about needing a short body resistor (and I think it’s this which is confusing me) but there’s plenty of space if the resistor doesn’t need to sit flush to the board… unless I’ve missed the point!
Can I utilise the outer (plated?) mounting holes, or do I need to try and literally solder the additional resistor on top of the 120 Ω surface mounted one?