I understand how it’s setup now, thank you. The topic is /modbus_A90 (Where 90 is current monitor’s modbus address) subscribing to that I can see the information so that’s great, thanks!
Hi, does anyone have a template for a 3d print file for the shunt with mounting holes?
have you manage to fix this problem? i have the same…
Are you trying to edit the code? If not, use the pre-compiled version from GITHUB and use the instructions there to program the chip using UPDI.
I am trying to build/compile code using platformIO.
4.4 version was working (and is still working)
when i download current release
non of target is able to build/compile.
I have same error on Windows and on Linux, so i am afraid there is no issue at my end of line
Error looks same:
ibrary Manager: [email protected]+sha.f909d31 has been installed!
Updating metadata for the vscode IDE...
Error: Processing V450_5K (platform: https://github.com/platformio/platform-atmelmegaavr.git; board: ATtiny1624; framework: arduino)
--------------------------------------------------------------------------------
Verbose mode can be enabled via `-v, --verbose` option
TypeError: 'NoneType' object is not subscriptable:
  File "/home/mgx/.platformio/penv/lib/python3.6/site-packages/platformio/builder/main.py", line 181:
    env.SConscript(item, exports="env")
  File "/home/mgx/.platformio/packages/tool-scons/scons-local-4.4.0/SCons/Script/SConscript.py", line 597:
    return _SConscript(self.fs, *files, **subst_kw)
  File "/home/mgx/.platformio/packages/tool-scons/scons-local-4.4.0/SCons/Script/SConscript.py", line 285:
    exec(compile(scriptdata, scriptname, 'exec'), call_stack[-1].globals)
  File "/diybms/diyBMSv4ESP32-master/ATTINYCellModule/buildscript_versioning.py", line 27:
    env.Append(git_sha_short=git_sha[32:])
========================== [FAILED] Took 2.56 seconds ==========================
I have 2 questions:
- can I use attiny1614 chip instead of 1624 for cell board 4.5?
Please check BOM, you have incorrect 1614 chip there, so i order a wrong one. Please confirm, if 1614 will work instead of 1624, or i should return them back (its possible till friday) - i tried to upload precompiled hex file, ( i think succesfully), but board does not live. No led diode blinking, resistors not hot, nothing… Is there some basic steps how to diagnose non-working board? I reviewed all video/info, nothing.
Maybe it will be good to stop with current development and focus more on 45 installation documentation and also videos, as i see lot of it is obsolete. f.e You are mentioning TX go to RX from cell to controlboard, but its not valid anymore with new 44 controll board. Lot of invalid information and confusion, so maybe time to tidy up things.
It’s due to downloading a zip file rather than using git to checkout a copy. This could be considered a bug in the build scripts as well though.
Hello, thanks for heads up!
You was right, obviously!
I cloned git, and voila!, itworks …so SW part is finally closed.
ANy idea about this?
-
can I use attiny1614 chip instead of 1624 for cell board 4.5?
I have them currently on stock by mistake (incorrect BOM line), 1624 i dont (and looks like will not be here for 3 month+) -
i tried to upload precompiled hex file, ( i think succesfully), but board does not live. No led diode blinking, resistors not hot, nothing… Is there some basic steps how to diagnose non-working board? I reviewed all video/info, nothing.
C:\Users\mgx>e:

E:\>mkdir diybms4
E:\>cd DIYBMS4
E:\diybms4>git clone <stuart_repository_url_ending ESP32>
Cloning into 'diyBMSv4ESP32'...
remote: Enumerating objects: 5822, done.
remote: Counting objects: 100% (2615/2615), done.
remote: Compressing objects: 100% (478/478), done.
remote: Total 5822 (delta 2248), reused 2434 (delta 2120), pack-reused 3207
Receiving objects: 100% (5822/5822), 3.94 MiB | 10.65 MiB/s, done.
Resolving deltas: 100% (4421/4421), done.

E:\diybms4>


Resolving V450_10K dependencies...
Library Manager: Installing git+https://github.com/mike-matera/FastPID.git
git version 2.39.2.windows.1
Cloning into 'C:\Users\mgx\.platformio\.cache\tmp\pkg-installing-bq8_uufr'...

Submodule 'test/Arduino-PID-Library' (https://github.com/br3ttb/Arduino-PID-Library.git) registered for path 'test/arduinopid_lib'
Submodule 'test/AutoPID' (https://github.com/r-downing/AutoPID.git) registered for path 'test/autopid_lib'

Cloning into 'C:/Users/mgx/.platformio/.cache/tmp/pkg-installing-bq8_uufr/test/arduinopid_lib'...

Cloning into 'C:/Users/mgx/.platformio/.cache/tmp/pkg-installing-bq8_uufr/test/autopid_lib'...

Submodule path 'test/arduinopid_lib': checked out '9b4ca0e5b6d7bab9c6ac023e249d6af2446d99bb'
Submodule path 'test/autopid_lib': checked out 'fea6b99a4f05f2b53669d684fae6fe09b5391754'
Library Manager: [email protected]+sha.1792d23 has been installed!
Library Manager: Installing git+https://github.com/stuartpittaway/SerialEncoder
git version 2.39.2.windows.1
Cloning into 'C:\Users\mgx\.platformio\.cache\tmp\pkg-installing-p6yw9ud6'...

Library Manager: [email protected]+sha.f909d31 has been installed!
Updating metadata for the vscode IDE...
Project has been successfully updated!


====================== [SUCCESS] Took 19.73 seconds ======================
Environment      Status    Duration
---------------  --------  ------------
V450_10K         SUCCESS   00:00:08.508
V450_5K          SUCCESS   00:00:20.266
V400             SUCCESS   00:00:21.641
V410             SUCCESS   00:00:19.603
V420             SUCCESS   00:00:19.049
V420_SWAPR19R20  SUCCESS   00:00:19.294
V421             SUCCESS   00:00:21.152
V421_LTO         SUCCESS   00:00:20.152
V440             SUCCESS   00:00:19.535
V440_COMMS_5K    SUCCESS   00:00:20.353
V440_COMMS_9K6   SUCCESS   00:00:19.730
====================== 11 succeeded in 00:03:29.283 ======================
No sorry, that won’t work - 1624.
Where is the BOM/Part incorrect - this is from KICAD. The 1624 is listed correctly.

The pre-compiled file will be specifically for the ATTINY1624, so won’t work if you are testing it against a 1614.
EDIT:
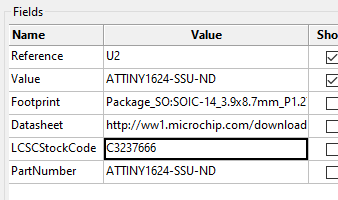
Looking at the BOM file, I can see where the confusion has occured - the footprint for the ATTINY chip is shared between the 1614/1624 part, but the actual part number ATTINY1624-SSU-ND is correct.
Row,Description,Part,References,Value,Footprint,Quantity Per PCB,Status,Datasheet,LCSCStockCode,PartNumber,JLCPCBRotation
21,"20MHz, 16kB Flash, 2kB SRAM, 256B EEPROM, SOIC-14",ATtiny1614-SS,U2,ATTINY1624-SSU-ND,SOIC-14_3.9x8.7mm_P1.27mm,1, ,http://ww1.microchip.com/downloads/en/DeviceDoc/ATtiny1614-data-sheet-40001995A.pdf,C3237666,ATTINY1624-SSU-ND,
I’ve also raised a bug for the Python error you see when compiling natively without cloning the GIT repository [link]
Sure, so HEX file for 1624 will not work for 1614. But in theory, if I compile everything for 1614 and create a new hex file (platformIO is working for me), will it work?
Important for me is HW difference between 1614 and 1624. If I can adjust source code to use 1614 instead of 1624, i am willing to do that, with probably little help to point out what are the areas which need attention.
Currently, I see only difference in 12bit ADC in 1624 vs 10bit ADC in 1614, but maybe more. Please advise. Currently there is no stock 1624, but plenty of 1614, so maybe it will be worth of effort to create a new cell450 platformio branch for 1614. But only when HW will work with 1614, sw part i think i can rework if you can advise what to check…
I don’t know, I’ve never tried that combination. It wouldn’t really be any better than the original ATTINY841 / older style boards.
Hi Vas,
I a in the same situation now as you were a few months ago.
purchased a working shunt boards that now needs updating as its reading current too high.
I have programmed evreything in relatin to the diybms and cell boards ok, but this updi stuff is giving me a real run around.
There are little no no videos on youtube going thro step by step the items, programs and files required to do the simple process of programming or upgrading this god damn chip.
Can you please give another enthusiast an easy to follow step by step guide on how to get this thing updated with the latest code.
I have the tools here to program via arduino nana
or
ive also got a usb/serial afaptor as advised by spencer konde to be used with pyupdi.
Please can you spare some time and i`m sure other users will alo benefit hugely from this help.
Thanks, Anthony.
Any update on the 229 based design?
diybms is working as a charm, just this cherry is missing ![]()
UPDI Programming of the current shunt
Items you’ll need (Not the only way to do it, but the simplest):
Arduino UNO or clone with Atmega 328p.
USB cable to connect to your UNO
3 Male to Female jumper wires
Download Arduino IDE Here (Follow instructions, straightforward)
Download AVRdude Here (Follow instructions, straightforward)
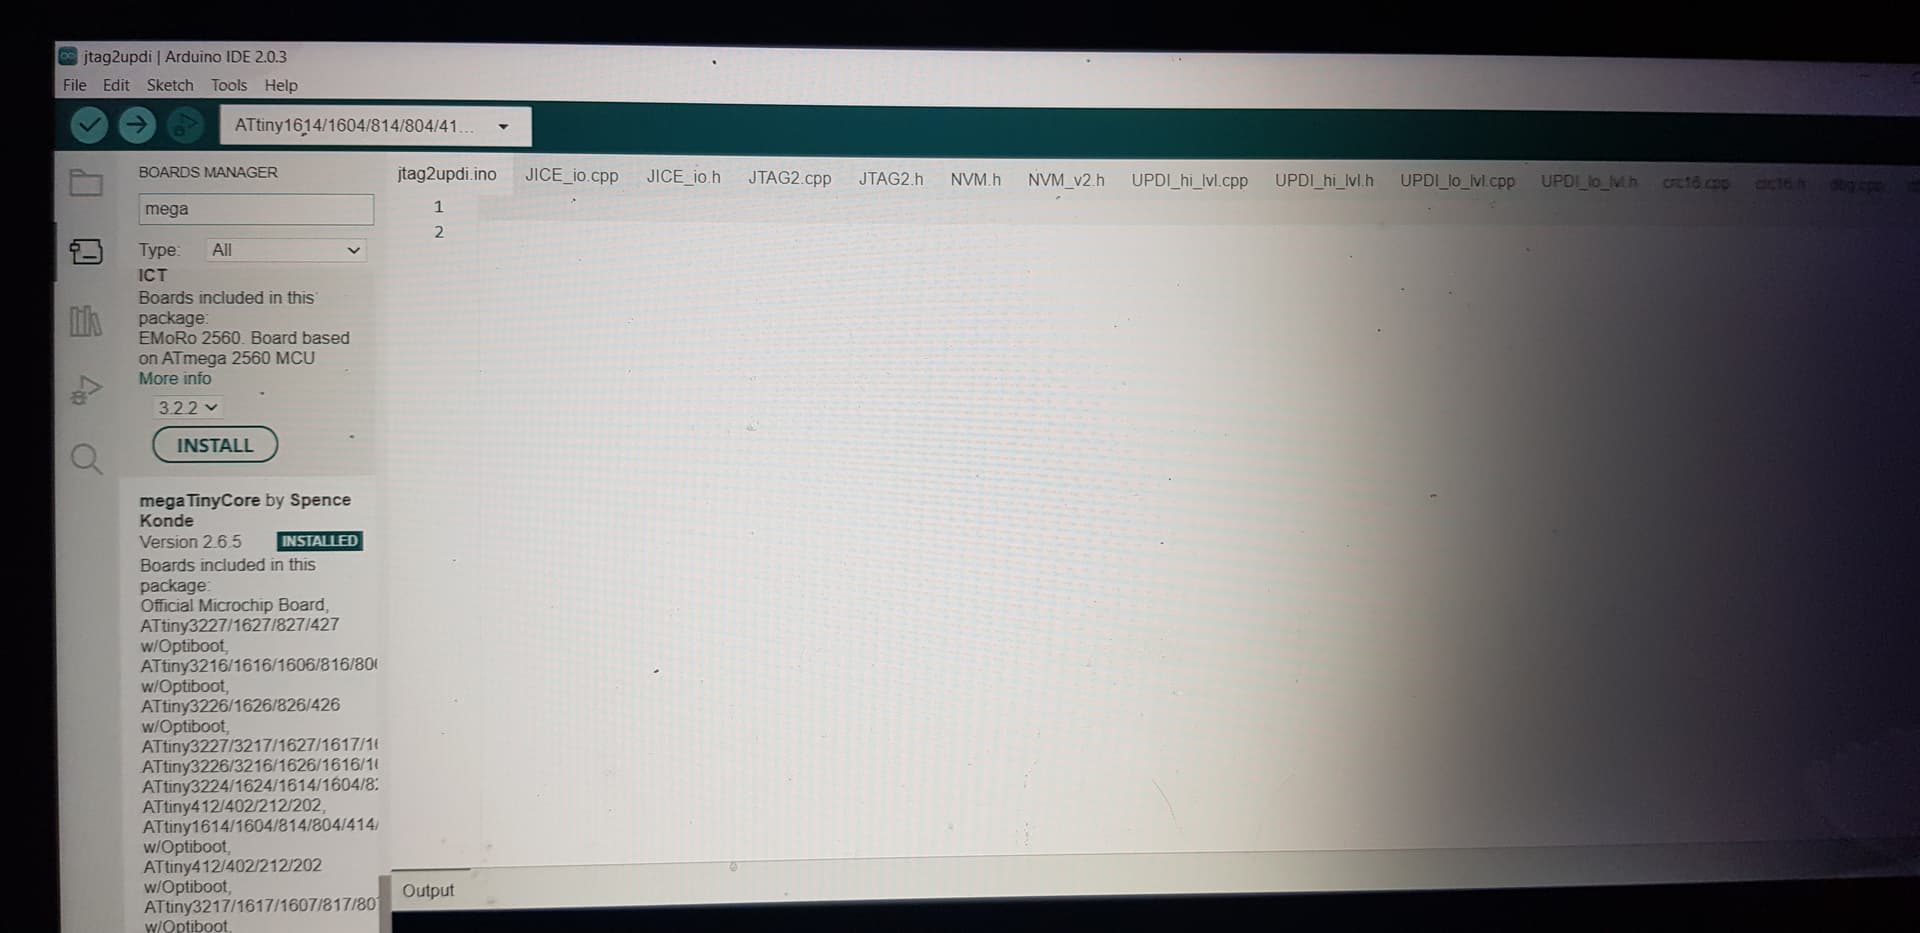
Download jtag2updi sketch Here
Download and install MegaTinyCore Here
Once all these are downloaded and installed, upload jtag2updi sketch to Arduino Uno. Now the Uno is a updi programmer. Choose Tools–> Board–> Megatinycore–>ATtiny 1614
Connect 5v power from Uno to Shunt UPDI 5v, Gnd to Shunt UPDI Gnd, and Digital Pin 6 to Shunt UPDI Reset.
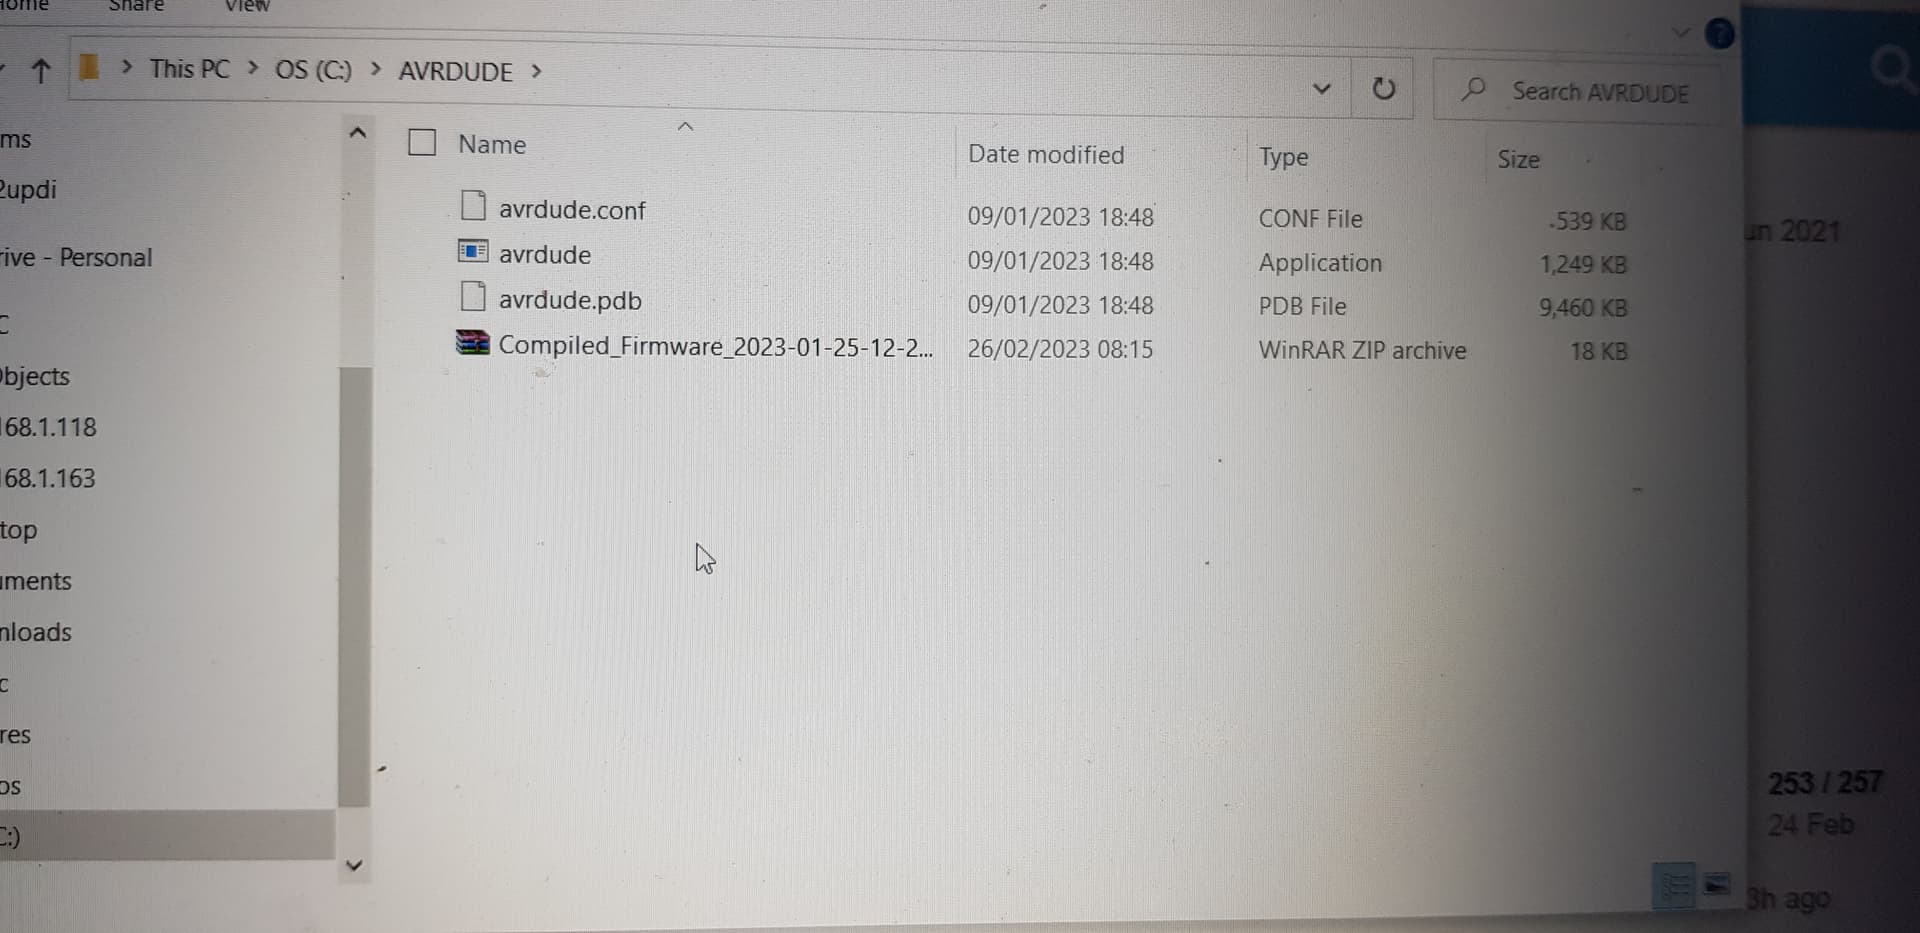
Download Shunt hex file Here and drop it in the avrdude install folder.
From command prompt, go to avrdude install folder, and type .\avrdude -v -p attiny1614 -C avrdude.conf -c jtag2updi -b 115200 -P “COM4” -F -U flash:w:diyBMSCurrentMonitor_ATtiny1614.hex:i -e
This should now install the file to the Attiny1614. If the Uno reboots and the install fails, install a 10 microfarad cap between UNO reset pin and ground.
Good Luck!
Very soon
whats the 229 based design Bert?
Stuart is breeding on a INA229 based shunt design, the chip has the same specs but has another way of communicating. The INA229 is on stock, the INA228 almost never…
Hmm, im in the market for 3 more current shunts, probably worth waiting a few weeks then till stuart releases his new design.
For me, I have no programming skills, never studied it, so its like learning a new language at nerly 60 years of age, and i`m really struggling to upgrade my existing current shunt to the latest code as its not working correctly.
For me, in an ideal world the esp32 controller can program the shunt, like it does the cell boards, that for me would be a best case scenario, as trying to understand arduino, jtag, updi, avrdude, its a very hard seep curve, and im struggling with it if im bluntly honest.
Im a good mech eng, have repurposed 3 nissan leaf packs to home energy systems, have repaired another leaf pack with 3 bad cells to get the car back on the road with now good cells in good balance… but this programming malarky is quielty driving me mad.
Ive programed loads in the past, sat decoders, dreamboxes, all sortos of cards etc… but im really struggling with this updi stuff.
Why cant it be as simple as download a updi flash tool, upload to it the latest flash hex file, and press flash…job done, like it is on the esp32.
And the esp32 is to be fair only a few quid itself, couldnt the esp32 be the onboard chip for the current shunt and run the shunt? For me that is simple, and id gladly pay the extra few quid per board to have that, overkill yes, practicality…priceless.
Anthony.
Hi John, and many thanks for your input.
I can follow your instructions up to dropping the file into the avrdude install folder.
I assume you mean put that file where the avrdude folder is on my pc, im my case
This pc - C:AVRDUDE
in that folder i have 4 files…avrdude.conf abrdude app avrdude.pdp and now the unzipped shunt code and ive unzipped it to expose the hex file.

Also ive opened arduino, i think got the jtag2updi loaded and megatinycore boards loaded with attiny 1614 selected.
Then i`ve opened a cmd prompt, changed directory to C:\AVRDUDE and entered this
C;\AVRDUDE .\avrdude -v -p attiny1614 -C avrdude.conf -c jtag2updi -b 115200 -P “COM4” -F -U flash:w:diyBMSCurrentMonitor_ATtiny1614.hex:i -e
beofre i press enter, is this right please?
thanks
did you solder a 4.7k resistor and a 10uF cap to the arduino to make the updi programmer?
on a breadboard ready
thanks