I understand the basic calculation to work out the correct burden resistor, when using a current output CT. From one of the learn pages:
To maximise measurement resolution, the voltage across the burden resistor at peak-current should be equal to one-half of the Arduino analog reference voltage. (AREF / 2)
If using a voltage output CT, I don’t need to calculate and provide an external burden resistor, but I do need to pick a CT with the correct output voltage for my ADC.
The ADC that I’m intending to use says it has a vref of 1100mv - so should I be targeting a voltage output CT rated at 1100/2 = 550mv? Naively, it feels like using a voltage output CT that is as close to the 1100mv as possible would be best.
The A in AREF/2 is for the Arduino (as used in the guide), I’m not sure if that is a specific calculation for the ADC on the Arduino, which can be ignored as I have the figure 1100mv for my ADC.
The vin voltage I’m working with is 3.3v, but as I understand it, that doesn’t have any impact once I know the vref of the ADC (?)
A voltage-output c.t. is no different to a true c.t. and its burden combined. The only difference is you know neither the c.t’s output current nor the value of the burden resistor, but you do know the output (i.e, the burden) voltage, for a given primary current.
No.
I’m guessing that the ADC’s Vref also represents the maximum input voltage that can be converted accurately. The data sheet should make it clear what the input voltage range is.
On this basis, the maximum voltage swing that the input can tolerate is (if it’s a single-ended ADC) zero to Vref, and this then is the maximum peak to peak voltage of the input. If your input is a nice clean textbook sine wave, 1100 mV peak-peak is 389 mV rms. I think a standard 0.333 V rms voltage output c.t. will be suitable, because you need to make allowances for (a) the wave you’re measuring might be ‘peaky’, so the peak value is higher than it would be for a true sine wave having the same rms value, and (b) if the input signal isn’t accurately biased to the midpoint of the ADC’s input range, you lose some range there.
I’m not sure what you mean by this - please explain.
The input voltage (5v on this diagram, that I’m using for reference) will be 3.3v. I mentioned it for completeness, I don’t believe it has any impact on the calculation that lead you to 389mV rms.
It’s standard maths. The sine wave is described by its amplitude. At any moment in time the voltage is:
V = A sin(2πft) where A is the amplitude, f is the frequency and t is time.
The maximum values of the sine function are +1 in the positive direction and -1 in the negative direction (n.b. I’m an engineer, not a mathematician, so I consider 0 as being smaller than both +1 and -1).
If you take this sine wave and think of it as a voltage or a current applied to a resistor, you will get a certain amount of heat. That heat will be the same as a direct voltage or current with a value equivalent to the root mean square value of the alternating voltage. This is the definition of the rms value. You get it in maths by integrating sin² over time (because power is proportional to voltage² or current²), or you can get close in a spreadsheet by taking discrete values (say every degree of angle) computing sin² and taking the square root of the average of those over one complete 360° cycle.
It turns out, when you do this, that the peak value is √2 × the rms value, so the peak-peak value is 2√2 × the rms value.
or
1100 / (2√2) ≈ 389
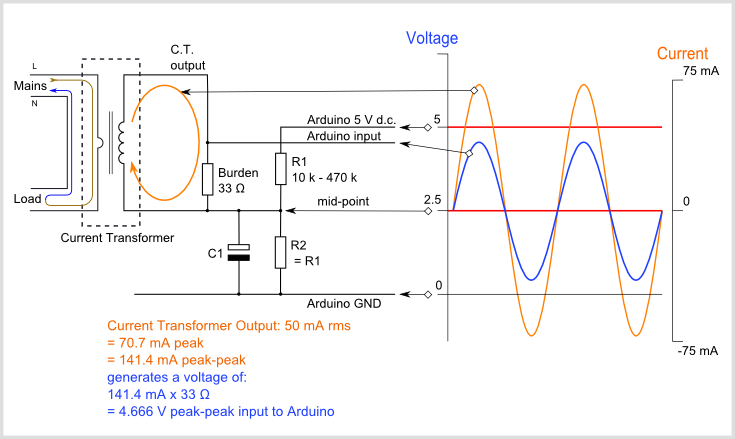
OK, the diagram is tailored specifically for a 5 V Arduino, so all the values relate to this. It’s only relevant to you when you scale everything from 5 V to 1.1 V in your case. But you must ignore the orange current - you don’t know that.
Yes - It’s the rated current of your c.t. - provided that you tell emonLib or emonLibCM what the reference voltage is (and what the ADC output for that voltage is). This is easy in emonLibCM - there are API calls, in emonLib you’ll need to change some values inside the library.
But - you’ll probably need to change the library anyway, because both assume the ADC that’s part of the Atmel ATMega 328P, whereas I think you’re using a separate ADC.
I’ve already got a library (not written by me), based on EmonLib, that should work for the ADC. Whilst I’m not (yet) studying the library in depth, it does appear to have correct values for the ADC range, reference voltage etc.
For the example YHDC SCT-013-000 CT, the primary / secondary peak currents are 141.4A and 0.0707A. To then calculate the resistor, To maximise measurement resolution, the voltage across the burden resistor at peak-current should be equal to one-half of the Arduino analog reference voltage. (AREF / 2) - so for my ADC with a vref range 0 - 1.1v and input voltage of 3.3v I do the calculation with the ADC vref (and not input voltage) of (1.1 / 2) / 0.0707 = 7.8 ohm ?
Once you’ve calculated the voltage across the burden resistor, everything that follows is the same, whether you have a true c.t. with a burden you provide, or a voltage-output c.t. with an internal burden.
I wish you’d stop using “input voltage”. It’s ambiguous without specifying which input.
What’s confusing you is for the Arduino and the emonTx V2-V3.4 - for which ‘Learn’ was largely written, the supply to the processor is the supply to the ADC and the voltage reference to the ADC. That is not always the case. (The emonTx4 uses a 3.3 V supply but a 1.024 V reference to the ADC, therefore its ADC’s input voltage range is 0 - 1.024 V and so it’s suitable for 0.333 V output c.t’s and v.t’s, the nominal peak-peak output of which is 0.942 V given a clean sine wave, so you have around 16% in headroom to allow for the mid-point bias not being accurate or ‘peaky’ current wave shapes.)
Which “input voltage of 3.3v” is this? If it’s the supply voltage to your processor and/or the ADC, but the ADC’s input voltage range is zero to Vref, then it doesn’t come into the calculation and you use Vref. If however, the ADC’s input voltage range is zero to 3.3 V, then you use that in the calculation instead of Vref. Only the ADC’s input voltage range comes into the calculation for scaling the input current/voltage.