3 Phase Monitoring with EmonTXv4 WiFi

Hi there,
I just purchased one of the EmonTXv4 Wifi units from the Open Energy Monitor Shop.

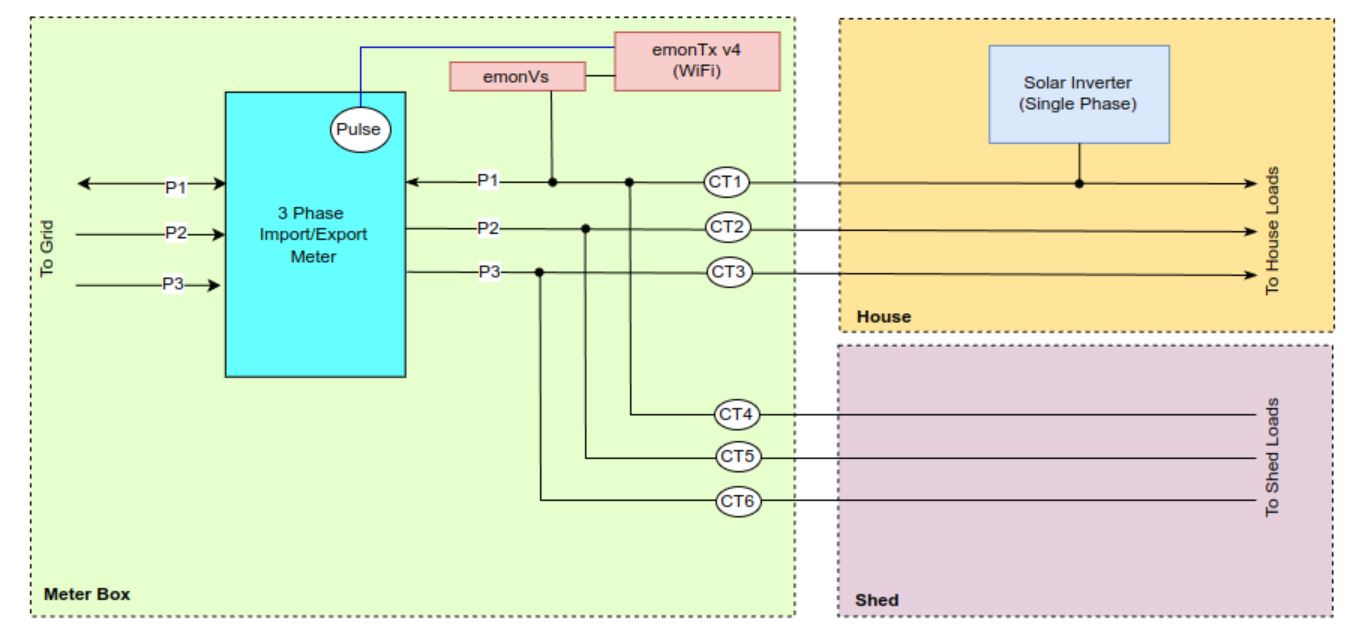
The following shows the current installation configuration (Neutral & Fusing omitted for clarity), where Phase 1 is the only phase with import/export, the rest are import only. The EmonVS is also connected to Phase 1.

Tonight, after finally getting WiFi working on the device, I have discovered that many of the phases are reporting negative values (where no export is actually possible), and after (re)checking clamp orientation etc, with some searching I now assume that the issue is related to the following article: EmonTx4 3-phase support with emonLibDB - #11

Rather than hijack that topic, I just want to confirm understanding of the steps required to make this configuration work with 3 phase:

  • I need to re-sequence the CT’s (working downwards in my diagram) to be 1,3,5,2,4,6
  • I need to update the firmware to variant in the above quoted link

Which leaves 2 residual questions:

  • How do I upgrade/configure the firmware to the 3 phase version in the EmonTXv4 WiFi variant
  • I trust that the updated version will still correctly recognise import/export on the phase where the EmonVS is attached?

As an aside, it has taken quite a while to get the WiFi working, and I have discovered that the WiFi range of the unit is extremely limited (Yes it is installed in a Galv meter box, but every other device I tried in there got quite a reasonable signal and stable connection). Anyway, had to get another WiFI AP, and install it in the immediate vicinity of the Meter Box, and I now seem to have overcome that hurdle!!

Cheers - Glen

Welcome, Glen to the OEM forum.

I’m afraid I’m not yet familiar with @TrystanLea’s sketches, so I can’t say what he’s pre-supposed. However, I can assure you that the underlying library is capable of accepting any mix of voltage sources and CTs, so there isn’t an insurmountable problem.

[I see he’s composing a response, so I won’t add how to set up a computer to be able to edit a sketch and upload it to the emonTx4.]

Hello @glen_m and welcome to the forums!

I’ve taken a look at your order and it looks like you have the single phase version of the emonVs voltage sensor there?. There is a note on the shop page in the emonVs section “Please email us if you would like to buy a 3-phase capable voltage sensor in advance of the available firmware” but I cant find any reference on the shop order to suggest that it might be a 3 phase unit?

We would be happy to exchange the emonVs that you have there for a 3 phase unit. Could you send us an email at [email protected] and we can take a look at this for you.


The 3-phase firmware was only made available last week, so the firmware that you have on the unit at the moment is single phase as well. I’ve written a post here on how to configure, compile and upload the two 3 phase firmware examples that we have so far. You will need the 3 phase emonVs to make those work, but it might be worth getting the Arduino IDE environment setup and following the steps there as a starting point in advance of us sorting out the emonVs.

This confirms the negative and half-power values that Glen’s reading.
@glen_m
I know it’s too late now, if you’d asked here first, we could have steered you in the right direction…

Because of the time/phase shift between the three voltages, trying to measure real power (which is what your emonTx computes) with the “wrong” voltage from a different phase means that the power you read will be negative - all other things being equal - and only roughly half of the true value. If you look at the phasor diagrams on the 3-phase page in ‘Docs’ 3-Phase Power — OpenEnergyMonitor 0.0.1 documentation', and take the red phase as your reference, then project the phasor of either the yellow or blue phases onto it, you’ll see it’s on the negative side and only half the length. So multiplying the current by half the correct voltage and negative gives you a negative power of half what it should be.

We got round this in the emonTx V3 by generating in software a guess at what the missing phase voltages should be. For obvious reasons this won’t happen for the emonTx4.

Hi @TrystanLea - Thanks for the response. I had looked on the forum’s prior to purchasing, and had seen that 3 phase monitoring was available, by using a single phase connection.

I have a meter box, with a single-phase socket outlet available, and this was the perfect solution, thereby avoiding additional expense in terms of electricians, balance of system components (including a 3 phase RCBO). I was aware that the other 2 phases would be approximations, given the lack of voltage monitoring, which was fine for me. This is the reason the single phase version was ordered.

I have included a picture, so you can better visualise the installation situation.

What wasn’t obvious, nor documented, was that such functionality would differ/be unavailable in the EmonTX4, and that only ‘true’ 3 phase voltage monitoring was available for the EmonTX4.

I understand that this may be a bit edge case, but in the past users ran this scenario, probably mostly due to the prior hardware limitations, but I am sure that there are others who wished to avoid a costly install, and just use a simple “plug ‘n’ play” (and easily relocated) approach. This would still be the ideal approach for me.

I will flick you an e-mail as per above, but at face value:

  • The cost of EmonVS 3P (plus high shipping cost to NZ)
  • Plus installation & balance of system components required for a 3P connection
  • Added to the sunk cost of the AP I just purchased to overcome the WiFi limitations of the unit

…is pushing the total project cost well out of the league of the alternatives I had looked at before selecting/purchasing this solution.

For full disclosure, yes the others required 3P connections for voltage monitoring, but were at a price point where I would have purchased 2, and installed one in each switch board (switch & house), behind existing 3P RCD switchgear, etc, thereby keeping the installation costs low.

Anyway, lets see what solution we can find for getting the setup that I purchased, working. Cheers.

Thanks @glen_m. I’ve replied to your email, hope we can find a satisfactory solution for you.

As you know @TrystanLea, emonLibDB saves a couple of cycles as a by-product of compensating for the transformers’ phase errors. It would be fairly hard, but not impossible, to make a version that phase locked the ADC to the mains supply and then did exactly the same as the emonTx V3 phase-locked loop 3-phase sketch - but of course you lose the accuracy that the emonVs gives you by measuring all three phase voltages.

Hi @TrystanLea - Just want to say thanks for sorting us out with the extra components to convert this unit to a 3 phase. They have arrived, and I dusted off my soldering skills to complete the upgrade, and the electrician has been today to hook it all up.

Yes - It ended up as unplanned cost for me (the additional circuit protection, and requirement for a electrician), but with the benefit of hindsight, probably ended up being a better solution than what I originally had intended, so all good.

Its working well so far (only a few hours in however !!). So updated schematic, and picture (changed from the original install above), now looks like this.


One tiny bit of feedback around the EmonVS case design - The mounting ‘lugs’ are directly underneath the cable entries, making it difficult to install screws (See original photo). I know its probably an ‘off-the-shelf’ case, but a slight offset of the cable entry may allow access to the mounting screw holes. (Also obviously you cannot mount the back-plate first, and then fix the cover on, due to rear-fixing screws).

In the updated photo, I both had to move the position of the EmonVS to allow for the new switchgear, and I did come up with one work-around for the above issue…

  • Fit EmonVS onto a ‘inverted’ mounted DIN rail. This mounting allows enough room behind the DIN rail for the nuts mounting the EmonVS
  • Fix DIN rail top & bottom with screws, but the top screw can be removed to allow the whole DIN rail to swing out 90 degrees
  • The rear cover screws can then be accessed, allowing removal/fitting of the cover to complete wiring
  • Once completed, just swivel back up, refit top screw, and plug in connectors to the EmonTXv4
  • I did change the entry gland to a Flex-conduit fitting, to keep the cabling tidy for a 3 phase connection with individual wires. A couple of cable ties to the DIN rail also keeps it firmly in place

Anyway - Thanks again for sorting us out, and now I need to get on with actually setting up the system for our needs, and also integrating it with OpenHAB. Cheers.

1 Like

Thanks @glen_m that’s great to hear and see it in action!

Yes that was a bit of an oversight, we are moving the cable positions on the next version :slight_smile:

1 Like