I have an Adafruit HUZZAH loaded with the shop installed firmware.
Although it works perfectly with emoncms. I am unable to access the AP to change to a different router. Web browser IP 192.168.4.1 or 192.168.0.17 both ask for id and password. I don’t remember setting any. A carriage return gives a blank screen. Am I missing something or is the firmware corrupt? Any help would be appreciated.
Try running nmap to get the IP addresses of locally connected devices.
nmap is a command line tool which in the line below, for example, will list locally connected devices if they return a ping.
nmap -sP 192.168.1.*
Alternatively, you could turn off the router, wait for the Huzzah to broadcast it’s AP again… Or physically move it out of range of the original router, and wait for it to fail connection and begin broadcasting.
Thanks for your reply, I can access the AP 192.168.4.1 which is the default ip address, but can get no further ,it asks for an id and password,which I don’t know.I am looking for a way to do a factory reset.
This has come up before.
OK. There’s an admin password activated on emonESP… If you can’t find the admin password I don’t think it’s possible to obtain it by other means, except by reading the EEPROM of the ESP module, which hasn’t been done specifically for this problem as far as I know, and from looking at the source code it’d take a while to go through that and get the data.
Reinstalling the firmware would be the easiest option.
I’ll create an improvement note on emonESP github for an option to hold down GPIO0 after boot to do a factory reset.
Looks like it was a change that was in the making. Soon-to-be future ESP-MOD modules will have a hard factory reset on GPIO0.
Can you upload firmware? Let me know if you need pointing to doing that.
I have used arduino ide to load EmonTx 3phase and it works. I have just looked at your sketch but don’t know how to get it into arduino ide in windows.
My sketch is a small part of the overall source code. You’ll need to compile from the source, not too difficult but there are a few steps.
Luckily, I remember there’s already a written guide for uploading emonESP.
(GitHub - openenergymonitor/EmonESP: ESP8266 WIFI serial to emoncms link) find Option 2 - uploading using Arduino IDE.
OK it may take me some time to work this but I will give it a go. Will let you know if I manage it. Thanks for your help so far.
I have managed to upload “Blink” which I think would prove the hardware connections but seem unable to upload emonESP. Warning espcomm_sync failed open failed upload mem failed
Some possibilities…
-
It’s necessary to reset /power cycle and hold down GPIO0 for every upload.
-
Some ftdi adapter I’ve used seemed to ‘stall’ after each upload, I had to unplug from my computer and plug it back in each time. Might be the case for yours.
-
Double check the correct port is selected in arduino IDE.
-
Double check flash size is 4M/1M.
thanks for that ,yes that was the problem the GPIOO was not going fully high.
Sketch now loaded ,connecting to esp through browser 192.168.4.1/home.html not found, have you flashed the SPIFFS?
i have changed flash size from 4M/3M to 4M/1M will try to upload again
still fault, /home.html not found, have you flashed the SPIFFS?, also it has retained some of the original modified settings and is trying to connect to my original router settings.
Guess I need to download and set up a data file
Spiffs is the next step. But first I ask: have you used my form of emonESP or the original openenergymonitor emonESP?
Below is the change to src.ino which permit a somewhat inelegant method of factory reset, it’ll do the job.
Until the original emonESP firmware has been updated, try using this modified src.ino section:
// -------------------------------------------------------------------
// LOOP
// -------------------------------------------------------------------
void loop()
{
  ota_loop();
  web_server_loop();
  wifi_loop();

  String input = "";
  boolean gotInput = input_get(input);

// config wipe holding down GPIO0 to factory reset.
  while (digitalRead(0) == LOW) {
    delay(10000);
    if (digitalRead(0) == LOW) {
      config_reset();
    }
  }

  if (wifi_mode == WIFI_MODE_STA || wifi_mode == WIFI_MODE_AP_AND_STA)
  {
    if(emoncms_apikey != 0 && gotInput) {
      emoncms_publish(input);
    }
    if(mqtt_server != 0)
    {
      mqtt_loop();
      if(gotInput) {
        mqtt_publish(input);
      }
    }
  }
} // end loop
This will wipe the EEPROM config after holding down GPIO0 for 10 seconds.
I haven’t tested it thoroughly, let me know how it goes.
Now the spiffs.
Did you follow this part of the guide?
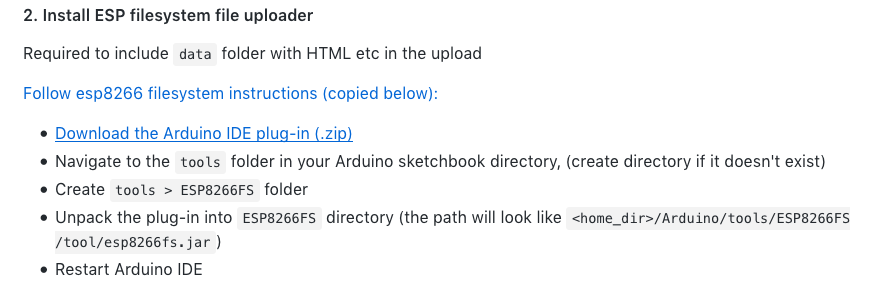
This will give you this menu item :

In your emonESP folder, with src.ino and other files, there should be a ‘data’ folder. The above menu item will upload the contents of ‘data’ to spiffs.
Therefore the upload process is actually a two stage process, first src.ino, second the spiffs, each requiring reboot while holding down GPOI0.
Good morning. I’ve updated the previous post for clarity, I hope that helps.
Good morning to you,I am beginning to wish I had not started this!!!. I cannot get the ESP spiff file loader to work with windows 10,but it works in windows 7. I have done an upload of just what I think is the original spiffs but the esp8266 still wants to connect with the router I first set up.I will now have to set up the Arduino IDE on windows 7 with all the associated libraries and try your modified src.ino.Will let you know the result.
If you’ve got as far as this, uploading src.ino and spiffs already, then you are OK.
You just need to go through the process again using my src.ino changes, something I could have flagged earlier.
First attempts with dealing with libraries can be totally infuriating.
The libraries folder locations got standardised recently for the IDE. Could try copy and paste the libraries folder.